This article was co-authored by wikiHow Staff. Our trained team of editors and researchers validate articles for accuracy and comprehensiveness. wikiHow's Content Management Team carefully monitors the work from our editorial staff to ensure that each article is backed by trusted research and meets our high quality standards.
This article has been viewed 69,222 times.
Learn more...
With phone cameras becoming so widespread, it's not surprising that there's been demand for selfie sticks. A selfie stick is an extendable arm you can attach a phone to and take proper pictures of yourself without the aid of a photographer. While factory-made selfie sticks can be purchased at a store, going DIY and making one of your own can be a lot of fun.
Steps
Making a Tripod Selfie Stick
-
1Choose a proper-sized, extendable flagpole. A flagpole is a perfect choice for a selfie stick because the pole's length is often adjustable. The flagpole should be intended for handheld use. A smaller sized pole will allow you to handle it properly, all the while giving you a healthy range of space to take your pictures from.
- As a rule of thumb, it is good to place the camera at roughly your arms' length. This will keep your face in proximity without unnecessarily crowding the image.
- If you cannot find a flagpole at a department store, they are also available to order online.[1]
-
2Screw a tripod in with a flagpole. If you are looking for a more permanent brand of selfie stick, you can drill a hole through both ends of the top inch of the flagpole. Screw in a nut on either side to secure it in. Some tripods will also have a fastening function to secure them to a stick or other device. The bottom end of a tripod should be able to fit inside a hollow flagpole. If this is the case, drilling through the flagpole and tripod and pushing a screw through should help secure it.
- Afterwards, scotch taping the tripod's legs to the pole should help increase stability.
Advertisement -
3Tape a mini tripod and flagpole together.[2] If you don't want to take the effort of making a "permanent" selfie stick using a drill and screws, you can get much of the same effect by thoroughly wrapping the tripod to a flagpole using tape. Take a roll of scotch tape and loop around a miniature tripod and an extending flagpole. Tape in loops on both the bottom and the top of the tripod to ensure the best stability. Although your tripod will only need to carry the weight of the phone, the potential distance it will be swung from means it could risk coming loose without the appropriate amount of tape.
- Loop the tape around like a coil. This will allow you to create a few layers to further secure the tripod. The legs of the tripod should be placed to wrap around the flagpole and should be taped around each individual leg.
- Although this is more expensive than other DIY selfie stick methods, it's easily the most reliable version you can make from home.
-
4Mount phone to the tripod. A tripod will already be designed specifically to hold a phone in place. With this in mind, secure the phone to it and fasten it as necessary. When you aim to take your shot, you can manually adjust the tripod angle to suit your selfie taking.
- Although certain tripods may work differently based on the specific type and phone you're using, so long as the phone is secured to the tripod, your selfie stick should be relatively safe to use.
-
5Explore flagpole alternatives. A flagpole is considered the standard option because it's adjustable and meant to hold something on the other side. However, you can tape a tripod to a number of objects, provided they have the length needed to make a selfie with. For instances, you can remove the parasol from an umbrella and replace it with the tripod.
- Plexiglass poles are good, as you can drill directly into the top and secure a screw to the opening at the bottom of the tripod.[3]


Making a Cassette Case Selfie Stick
-
1Tape a cassette case onto a flagpole. If you want something truly DIY, scotch tape a flagpole to an empty cassette case. you don't use anymore. Loop two coils of tape around the top and bottom of the case respectively, and wrap them around a flagpole. To create a wedged angle to better aim your camera with, place a length of sponge behind the top of the case and the pole. This will aim the selfie stick downwards, making it easier to catch yourself in the photo.
- Alternatively, you can buy a specifically made cellphone holder. They are adjustable and will offer you a greater degree of security if you're worried about your phone being damaged.[4]
- Although cassette cases may be harder to find now than they used to be, you can usually scrounge them up at used music shops or yard sales. Some electronics stores may have them in stock as well.
-
2Measure out the width of your cellphone. In order to know how far you should space sponges apart to secure your phone, you'll need to know how wide your phone is. Measure your phone, and measure the space between sponges to be approximately 9/10ths of that width. This will give the phone some squeeze factor to help further secure it.
-
3Glue dish sponges on either side of the cassette case. Glue two dish sponges face up on the case on either end of it. Leave an area in the middle of the case front to squeeze in your phone. While you're making this, it's recommended you have your phone at hand to fit test it as you go. The sponges should fit snugly enough to keep the phone in place.
-
4Add popsicle sticks beneath the sponges for a phone support. Gluing some popsicle sticks across the bottoms of the sponges will give your phone a foundation to rest upon. This is recommended if you don't think the sponges are holding your phone in snugly enough.
- Placing an extra popsicle stick's width from under the phone as support is a good idea, as it helps keep the phone in place if it somehow becomes dislodged from the sponges.
-
5Put your phone between the sponges. If you have given a snug mount of space to squeeze your phone into, your phone should can be secured simply between the sponges. Push apart the sponge foam slightly with your fingers, and slide the phone down in a steady motion.
-
6Secure your phone with tape. When you're finished the basic steps, scotch tape around the sponge and pole until you think the stick is suitable for outside use. This will maximize the security and help keep the phone from falling out unexpectedly.
- To be safe, cover the top and bottom ends with tape. Because scotch tape is clear, it won't have a significant impact if the tape covers the camera, so long as the tape itself is relatively clear of lint and dust.


Making a Quick Selfie Stick
-
1Tape your phone to a stick. For a very quick selfie stick, you can tape your phone directly to a pole or stick. Run tape around the phone and secure it to the stick. Make sure the tape doesn't cross over the camera itself or the phone button. When you're done taking your selfie, carefully undo the tape from the phone and wipe away the adhesive. If you want to improvise selfie sticks, it's helpful to keep a roll of tape on you.
- It should be noted that a quick selfie stick is not a good idea if your phone is expensive and you're worried about possibly damaging it.
-
2Add a wedge to the top for an angle. Placing a length of sponge behind the top half of your phone and taping it to the stick as such will give you a slight angle to better take a picture from.
-
3Make sure the grip doesn't cover the camera.[5] Whichever type of selfie stick you decide to make, you should make sure the stick doesn't obscure the camera in any way. This includes making sure the phone is placed with the camera toward you.
-
4Look up new ideas online.[6] Like anything DIY, there is a vibrant community online dedicated to inventing new types of selfie stick. If none of the ideas here interest you, rest assured you can find dozens more elsewhere.
- If you find a version you really like, you might message the person who made it and ask him for tips on how to make it. Chances are the creator will have made some improvements to the published design i the time since and will be able to throw you a few pointers.


Using a Selfie Stick
-
1Download a good selfie app.[7] Due to the popularity of selfies, apps have been developed to help maximize your selfie taking. Downloading an app will help stabilize the camera and automate some of a photographer's tasks, such as timing and framing.
- Camera 360 is a good app to download if you're in the habit of taking selfies.
-
2Extend the stick to your liking.[8] If you've made your selfie stick using a flagpole as suggested, you'll be able to adjust the length to your liking. Because the perceived weight will increase the farther out your extend the pole, it's a good idea to limit the reach at a few feet in front of you.
- Most impromptu DIY selfie sticks (such as those made from actual sticks) aren't adjustable per se, but you can draw the camera closer by holding the stick further up its length.
- Adjust the angle of the selfie stick to your liking while you're at it. Make sure the camera is level when you take a picture.
-
3Take a picture.[9] Even if it's mounted on a selfie stick, press the button you normally would to get your phone to take a photo. Because you'll still need to press the button to make it work, it is preferable that your phone have a timer function. If this is the case, you should set it for 5-10 seconds. This will give you enough time to get into a natural position after pressing the button.
- Alternatively, you can use a secondary stick (such as a conductor's wand) to press the button.
- Make sure the phone camera is evenly levelled before you take a picture.
-
4Store your selfie stick. For some DIY selfie sticks, you may want to disassemble it as soon as you've achieved your perfect shot. With others, like a flagpole setup, you should place them somewhere where excess pressure won't be placed on any part of it. Remove the phone when you're done taking a photo and retract the pole as much as you can.
- Putting a selfie stick in a closet is a good call, as closets tend to have a lot of vertical space available.


Community Q&A
-
QuestionDo you need to take the part out that's inside the tripod head out before you drill the hole to put it on the handle?
 Community AnswerIn the majority of instances, you shouldn't even need to drill into the tripod itself. However, removing the inside of a tripod and replacing it with the flagpole will give the tripod more security during its use as part of the selfie stick.
Warnings
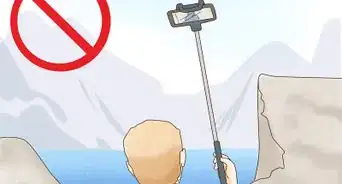
- Selfie sticks won't offer your phone any protection from the things that would normally damage it. Don't hold the stick over water, in the possibility that the phone falls out of place.⧼thumbs_response⧽
- Make sure the selfie stick you make or buy is appropriate for your phone model. iPhones, Androids and other makes may suit different kinds of selfie sticks. While many selfie sticks can be reconfigured easily enough, you should base your stick design around the phone it's going to be used with the most.[10]⧼thumbs_response⧽


-Step-18.webp)


References
- ↑ http://www.ebay.com/bhp/telescoping-flag-pole
- ↑ http://www.popsugar.com/tech/photo-gallery/32522404/image/35508037/Create-Selfie-Stick
- ↑ https://www.youtube.com/watch?v=TR_K2zsgsbk
- ↑ https://www.youtube.com/watch?v=TR_K2zsgsbk
- ↑ http://magicalselfiestick.com/how-to-use-a-selfie-stick-the-complete-guide/
- ↑ https://www.buzzfeed.com/mjs538/people-are-making-homemade-selfie-sticks-and-they-are-insane?utm_term=.rsawDLmKJ#.gvJe0ZKL1
- ↑ http://magicalselfiestick.com/how-to-use-a-selfie-stick-the-complete-guide/
- ↑ http://magicalselfiestick.com/how-to-use-a-selfie-stick-the-complete-guide/
- ↑ http://magicalselfiestick.com/how-to-use-a-selfie-stick-the-complete-guide/
About This Article


-Step-18.webp)