wikiHow is a “wiki,” similar to Wikipedia, which means that many of our articles are co-written by multiple authors. To create this article, 11 people, some anonymous, worked to edit and improve it over time.
There are 9 references cited in this article, which can be found at the bottom of the page.
The wikiHow Video Team also followed the article's instructions and verified that they work.
This article has been viewed 226,833 times.
Learn more...
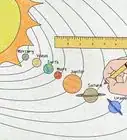
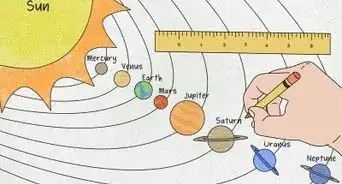
There are eight known planets orbiting our sun, including Earth. Making a model is a fun introduction to this solar system, and a good art project for primary school science classes. This detailed example can take a few hours to make, but most of that involves waiting for paint or clay to dry.
Steps
-
1Find a cardboard box. The planets in your solar system model will hang down inside this box. You'll need to fit nine planets plus the sun into this, so make sure you have enough room. This should be at least as large as a men's shoebox, which is roughly 15" x 10" x 5½" (36 x 25 x 13 cm).
-
2Paint the box black. Cover the inside of the box with black acrylic paint, along with the short outer sides. Set the box aside on newspaper to dry.
- For a more even background, trace the box onto black paper. Cut out the paper rectangle and tape it to the base of the box.
Advertisement -
3Gather five polystyrene balls. If possible, find these in three different sizes. They should all fit in the box with a little room left over, although they don't have to squeeze in all in a row. You'll need:
- One large ball to make the sun (maximum 4" / 10 cm across)
- Two medium balls to make Jupiter and Saturn (maximum 3" / 7.5 cm)
- Two small balls to make Uranus and Neptune (maximum 2" / 5 cm)
-
4Choose your paints. Acrylic paint is your best option, since some other paints can dissolve polystyrene. Choose a variety of colors to paint your planets, including orange or gold, yellow, red, white, and dark blue.
- If you're not sure whether a paint works on polystyrene, check the label for brush cleaning instructions. If you can wash off the paint with water, the paint is water-based and safe to use. If you need to use a solvent like white spirit or turpentine, the paint is solvent-based and may dissolve polystyrene.[1]
-
5Paint the sun. Stick a long skewer into your largest polystyrene ball to hold it in place. Paint the entire surface with gold, yellow, or orange paint to make the sun. Place the skewer in a tall jug or stick the end in a polystyrene block and leave the ball to dry.
- A stenciling brush or other short-bristled brush will help you get the paint to stick into the nooks and crannies on your polystyrene ball. You might need to let the first coat dry and use a larger brush to paint over it for an even color.
- If the paint doesn't stick at all, cover the ball with a thin layer of spackle, let it dry, and paint over that.[2]
-
6Paint the large planets the same way. The two medium balls are the two largest planets, Jupiter and Saturn. These are called gas giants. They each have a diameter about ten times larger than Earth's, and are made mostly of a heavy layer of gas surrounding a rocky core.[3] Skewer these and place them in a polystyrene block or separate jugs, so the wet painted surfaces don't touch.
- Jupiter's clouds form bands and spiral storms. Paint this planet with red, orange, and white paint, swirled into patterns.
- Saturn is pale yellow (a mix of yellow and white paint).
-
7Paint the ice giants. Your last two balls will represent Neptune and Uranus, the smaller gas giants or "ice giants." About four times the size of Earth in diameter, these planets formed from balls of ice and heavy elements. Since then these materials have turned into a fluid core, surrounded by a layer of swirling gas.[4]
-
8Add Saturn's rings. Find a drinking glass with an opening the same size as the ball you used to make Saturn. Put the glass down on gold or yellow construction paper and trace around it with a pencil. To make a ring shape, put down a larger glass over your pencil circle, and trace around that as well. Cut out this ring, then glue it around Saturn and let dry.
- Poke the hole through Saturn at an angle, so the rings will be tilted when the planet is hanging down. This will look better and give you a little extra room to arrange the planets.
- To cut out the ring, start by cutting out the larger circle. Fold the circle gently in half without creasing it, then cut around the smaller circle.


-
1Shape five rocky planets out of clay. You can use polymer clay, air dry clay, or homemade polymer clay substitute. Roll five small balls (maximum 1" / 2.5 cm across) using several colors of clay:
- Mercury is a brownish gray rock, with no cloud cover.[7] You can make it out of red or gold clay instead for a prettier model.
- Make Earth out of blue clay for now.
- Make Venus out of pale yellow clay.
- Pluto is technically not a planet (it's too small), but it can sneak in anyway. Make it out of light brown clay, maybe with some charcoal mixed in to imitate its blotchy surface.
-
2Poke a hole through each ball of clay. Use a large needle to pierce each rocky planet through the center. You'll run thread through this hole later to hang the planets inside your box.
-
3Let the clay dry. Follow the dry instructions on the clay packaging. Air dry clay dries on its own, while other types of polymer clay needs a low-temperature oven to harden.
- For light colored clay, it's a good idea to set your oven about 10ºF (~5ºC) lower than the instructions recommend. This can take twice as long to bake, but the chance of breaking is lower.
-
4Paint the land onto earth. Once the Earth clay is hard, paint on the continents with green acrylic paint.[8]


-
1Paint on stars. Once the black paint on the box has dried, use a white paint pen or small brush to paint white dots onto the inside of the box.
-
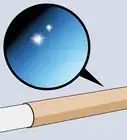
2Thread the polystyrene balls. Once the sun is dry, stick a skewer all the way through the ball, then remove it. Tape a piece of clear beading thread to the end of the skewer, and push it through the same hole. Repeat for each polystyrene ball.
- Each length of beading thread should be long enough to hang a planet from the "ceiling" of the box, when the box is on its side. Five or six inches (13–15 cm) should be enough.
-
3Glue on the thread. Hold the end of the thread and withdraw the skewer. Knot the beading thread two or three times, then attach the knot to the polystyrene ball using a drop of glue from a hot glue gun.
-
4Thread the clay planets. Once the clay planets are dry, drop the clear thread through the holes you made earlier. Attach the thread with a hot glue gun, as you did with the larger planets.
-
5Arrange the planets in the model. Put the box on its side and hold up the threads on the ceiling. Stagger the position of the planets at different heights (top/bottom) and depths (front/back) so you can fit them all in the box. The balls should go in this order:
- Sun
- Mercury
- Venus
- Earth
- Mars
- Jupiter
- Saturn
- Uranus
- Neptune
- Pluto
-
6Hang the planets in the box. Once you find an arrangement that looks good and fits in the box, mark the box at the ten points where you'll hang the sun and planets. Cut through the box at these points with a sharp knife, and feed the thread the planets are hanging from through each hole. Tape down the thread with strong tape and cut off the extra thread.
-
7Cover the top of the box with black paper. Trace the side of the box onto black paper and cut out the rectangle. Glue this over the top of the box to hide the tape. Now you're ready to display your solar system model.
-
8Finished.


Community Q&A
-
QuestionWhat colors are the planets?
 TomPNTop AnswererMercury is grey, Venus is a pale yellow-white, Earth is blue and green, Mars is red-orange, Jupiter has bands of brown and white with the Great Red Spot, Saturn has bands of white and yellow, Uranus is a featureless blue-green, and Neptune is dark blue with occasional white clouds. Look up pictures of them on the internet for more detail.
 -
QuestionHow do I make the ring for Saturn?
 Community AnswerYou could use a CD and cut it and/or paint it to size. You can also use card stock.
 -
QuestionWhat color do I make Jupiter when making a solar system model?
 Community AnswerJupiter has strips of red, white, orange,and yellow, with a big red dot for the storm.
Things You'll Need
- Men's shoe box or larger cardboard box
- Black construction paper
- Gold construction paper
- Acrylic paint in various colors
- White paint pen (optional)
- Clear beading wire
- Hot glue gun
- Bamboo skewers
- Polymer clay
- Large needle
- Polystyrene balls in three sizes
- Several tall jugs or one polystyrene block
- Sticky tape
- Two drinking glasses, one slightly larger than the other


References
- ↑ http://www.paintquality.com/en/understanding-paint/water-based-vs-solvent-based
- ↑ https://www.quora.com/What-is-the-best-paint-to-use-on-styrofoam
- ↑ http://space-facts.com/gas-giants/
- ↑ http://www8.nationalacademies.org/ssbsurvey/DetailFileDisplay.aspx?id=252&parm_type=PSDS
- ↑ http://www.planetary.org/blogs/emily-lakdawalla/2004/11111200-uranus-no-longer-boring.html
- ↑ http://curious.astro.cornell.edu/about-us/58-our-solar-system/planets-and-dwarf-planets/planet-watching/249-what-color-is-each-planet-intermediate
- ↑ http://curious.astro.cornell.edu/about-us/58-our-solar-system/planets-and-dwarf-planets/planet-watching/249-what-color-is-each-planet-intermediate
- ↑ http://www.beadsandbeading.com/blog/acrylic-craft-paints-polymer-clay/3947/
- ↑ http://www.universetoday.com/65356/how-many-earths-can-fit-in-the-sun/
- Adapted from http://blog.hobbycraft.co.uk/how-to-make-a-model-solar-system/ except where noted.
About This Article
To make a solar system model, start by finding a large cardboard box and painting it black to represent space. Next, gather 5 polystyrene balls in various sizes to represent gas giants like the sun, Jupiter, and Neptune. Paint the largest ball yellow, then paint the remaining planets. Shape 5 rocky planets out of colored modeling clay and let the clay dry. Lastly, paint white dots on the black cardboard to represent stars and use thread and hot glue to suspend the planets in the box. Don't forget to put everything in the correct order! For tips on choosing accurate paint and clay colors, read on!