This article was co-authored by wikiHow Staff. Our trained team of editors and researchers validate articles for accuracy and comprehensiveness. wikiHow's Content Management Team carefully monitors the work from our editorial staff to ensure that each article is backed by trusted research and meets our high quality standards.
This article has been viewed 76,468 times.
Learn more...
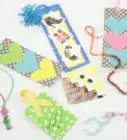
Notebooks and sketchbooks are great ways to put you thoughts to paper, but what if you can't find the perfect one? Luckily, it is easy to make one at home, and you don't need a lot of special tools or supplies. Once you know the basics of making a spiral bound book, you can make all sorts of books, from notebooks to sketchbooks. You can even print out short stories and bind them yourself!
Things You Should Know
- Cut 2 pieces of cardboard down to the size you want using a sharp craft blade. Cut colorful paper to be 1 in (2.5 cm) bigger than the cardboard.
- Glue the paper on the cardboard, fold over the excess, and glue down the paper edges to the inside of the cardboard.
- Cut 20-40 sheets of paper down to same size as the cardboard covers. Stack them and punch holes down the long edge of the stack.
- Thread a strand of wire through the punched holes, bend the ends inward, and trim off the excess to bind the book.
Steps
Making the Cover
-
1Cut two pieces of cardboard down to the size you want. Use a metal ruler and a sharp craft blade to cut the cardboard. Thin cardboard from the back of a pad of paper or cereal box will work the best, but you can use chip board too.
- If you are using an old pad of paper, pull the back cover off and cut it in half.[1]
-
2Cut some colorful paper to wrap the covers with. The paper needs to be 1-inch (2.54 centimeters) longer and wider than your cover.[2] You can use any type of paper you want, such as scrapbooking paper, wrapping paper, or even construction paper.
- For a more unique look, create your design on the computer, then print it out on high-quality paper.[3]
Advertisement -
3Decorate the paper, if desired. You don't have to do this, especially if you used paper that's already fancy, like wrapping paper or scrapbooking paper. If you used construction paper or printer paper, consider drawing designs onto it, then coloring them in.
- Make the front cover fancier than the back cover. Add a title or an image.
-
4Glue the paper to the cardboard. Turn the paper so that the blank side is facing you. Brush a thin layer of liquid glue (ie: Mod Podge, tacky glue, or white school glue) onto the cardboard. Place the cardboard, glue-side-down, onto the paper. Make sure that it is centered.
- You can also use a glue stick instead.
- Smooth the paper down, if needed, with a ruler or credit card. Work your way from the middle of the cover to the outside.
-
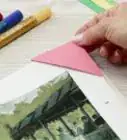
5Clip the corners of the paper. Use a metal ruler and a craft blade to cut the corners of the paper off. Make sure that you cut all the way down to the cardboard. This will help remove bulk and help the paper lay smoother.
-
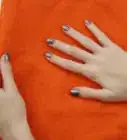
6Glue the edges of the paper down to the inside of the cardboard. Turn the cardboard so that the blank side is facing you, and the covered side is facing down. Coat the back of the paper with more glue. Fold it tightly over the edge of the cardboard, and press it down.
- Smooth the edges of the paper down, if needed. Work your way from the edges of the cover inward. Wipe away any glue that seeps out.
-
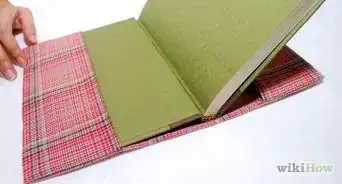
7Cut paper for the inside covers. Cut two sheets of paper that are ½ inch (1.27 centimeters) than your cover, both lengthwise and widthwise. Try solid-colored paper if your cover is fancy, and patterned paper if your cover is plain.[4]
-
8Glue the paper to the back of each cover. Turn the cover so that the paper side is facing down. Coat your cut paper with glue, then press it down onto the cover. This will cover up the bare cardboard and overlap part of the wrapped edges.[5]
- Smooth the paper down, as before, then wipe off any excess glue.
-
9Consider sealing the front and back covers. Choose a waterproof decoupage glue, topcoat, or acrylic spray sealer. Spray it onto the front and back cover. Let the sealer dry before moving on.[6]
- Be careful if you decorated or printed the paper; the ink may run.


Cutting and Punching the Paper
-
1Cut 20 to 40 sheets of paper down to same size as the covers. You can use lined paper, printer paper, or even sketchbook paper. Avoid cutting more paper than this, especially if you are using thick sketchbook paper. If you cut more paper, you will need to make a bigger coil, which is more likely to warp out of shape.[7]
- If you are using an old notebook, cut the paper in half, and use that instead.[8]
-
2Create your punching guideline and template. Take one of the pieces of paper you just cut. Orient it in the direction you want the cover to go. Use a pencil and ruler to draw a vertical line down the paper, about 2 millimeters from the left side edge.[9]
- You can put the binding along the top edge instead. In this case, draw a horizontal line 2 millimeters from the top edge.
-
3Punch your first hole along the center of the line. The hole needs to be to the right of the line so that it's closer to the middle of the paper than the edge. You can make the hole with a thin nail, a 3-millimeter screw punch, or a 1/8-inch (3-millimeter) hole puncher.[10] Don't use a regular hole puncher. It's too big.
- If you made a horizontal line, punch the hole below the line instead.
- You can find these tools in the scrapbooking section of an arts and crafts shop.
-
4Make more holes, spacing them 2 millimeters apart. Work your way up and down from the middle hole. Try to space the holes as evenly as you can. Leave about 5 millimeters of space at the top and bottom of the paper.[11]
-
5Punch holes into the rest of your sheets of paper. Place the template on top of 4 sheets of paper. Punch more holes into the stack, using the template as a guide.[12]
-
6Create more holes in the front and back covers. Lay your template on top of your front cover. Punch the holes, then lift the template away. Repeat this step for the back cover.[13]


Assembling and Binding the Book
-
1Stack everything together. Place the back cover face-down. Stack the paper on top. Place the front cover on top, face-up. At this point, you can also insert other items into your book, such as folders and sticker sheets.[14]
-
2Use binder clips to hold everything together. Tap the stack against the table first to make sure that everything is aligned, especially the holes. Place binder clips along the top, bottom, and right-side edge.[15]
- If you are making a top-bound book, place the clips on the bottom and side edges instead.
-
3Wrap thick wire around a pen. Get some 16-gauge stringing wire; you can find it in the beading section of an arts and crafts shop. Wrap it around a thick pen. How many times you wrap the wire around the pen depends on how many holes you have. If you have 24 holes, wrap it 24 times.[16] Trim off the excess wire with wire cutters.
- Every so often, squish the coils together so that they are nice and tight.
-
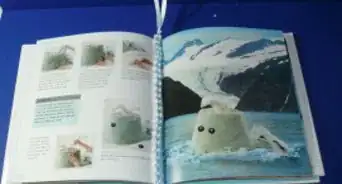
4Slide the wire off of the pen. Gently stretch the wire until it is about the same length as your book. If you put the holes along the top of you book, then stretch the wire to match the width.[17]
-
5Twist the wire through the holes. Poke one end of your coiled wire into the first hole on your book. Twist the wire until it reaches the next hole. Push it through the hole, and twist it again. Keep twisting and threading the wire until it comes out the last hole.[18]
-
6Bend the ends of the wire inward. Use needle-nose pliers to pinch the end of the wire at one end of your book. Bend the wire inward, towards the coil. Repeat this step for the other side of the book with the other end of the wire.[19]
-
7Trim the excess wire off, if needed. If you still have any wire sticking out past the second/second-to-last-coil, you will need to trim it off. Do this with a pair of wire cutters.[20]
-
8Finished.


Community Q&A
-
QuestionCan I only use a pencil for spiral binding?
 Read4everCommunity AnswerYou can use any cylindrical object with about the same size; pencils, pens, straws, sticks, or just about anything round that has a similar size to a pencil.
 -
QuestionWhere can I find the thick wire?
 ReepicheepCommunity AnswerMost craft stores carry this type of wire; you can also check out office supply stores, big box stores (like Walmart), or even use the wire from old notebooks that you no longer use.
Things You'll Need
- Thin cardboard
- Patterned paper
- Filling paper (lined paper, printer paper, sketchbook paper, etc)
- 16-gauge stringing wire
- Wire cutters
- Needle-nose pliers
- 1/8-inch (3-millimeter) hole punch
- Metal ruler
- Craft blade
- Glue and brush or gluestick
References
- ↑ https://www.youtube.com/watch?v=eiC_NUnwX0k
- ↑ https://www.youtube.com/watch?v=bKFx-p7Lx0c
- ↑ https://www.youtube.com/watch?v=bKFx-p7Lx0c
- ↑ https://www.youtube.com/watch?v=eiC_NUnwX0k
- ↑ https://www.youtube.com/watch?v=eiC_NUnwX0k
- ↑ https://www.youtube.com/watch?v=bKFx-p7Lx0c
- ↑ https://www.youtube.com/watch?v=_W99DY-iHcc
- ↑ https://www.youtube.com/watch?v=eiC_NUnwX0k
- ↑ https://www.youtube.com/watch?v=_W99DY-iHcc
- ↑ https://www.youtube.com/watch?v=_W99DY-iHcc
- ↑ https://www.youtube.com/watch?v=_W99DY-iHcc
- ↑ https://www.youtube.com/watch?v=_W99DY-iHcc
- ↑ https://www.youtube.com/watch?v=_W99DY-iHcc
- ↑ https://www.youtube.com/watch?v=bKFx-p7Lx0c
- ↑ https://www.youtube.com/watch?v=eiC_NUnwX0k
- ↑ https://www.youtube.com/watch?v=_W99DY-iHcc
- ↑ https://www.youtube.com/watch?v=_W99DY-iHcc
- ↑ https://www.youtube.com/watch?v=_W99DY-iHcc
- ↑ https://www.youtube.com/watch?v=_W99DY-iHcc
- ↑ https://www.youtube.com/watch?v=_W99DY-iHcc
About This Article