This article was co-authored by wikiHow staff writer, Emily Liu. Emily Liu graduated from UCLA in 2021 with a B.A. in Classical Civilization, a B.A. in English, and a minor in Cognitive Science. She has over three years of experience working with students from different backgrounds, ages, and academic interests as a writing tutor and instructor, in subjects ranging from the humanities to sciences to creative work, as well as personal statements and other application materials. She works on the content team at wikiHow and is always excited to discover and learn about new topics.
There are 21 references cited in this article, which can be found at the bottom of the page.
This article has been viewed 203,222 times.
Learn more...
If you’re looking for a fun weekend project and want to try your hand at some woodworking, we’ve got the perfect idea for you—a wooden fort! It’s the perfect hideaway for your kids to play in right in the backyard (and you can definitely join in on the fun). Follow this step-by-step guide, and you'll be on your way to building a wooden fort!
Steps
Cutting the Door and Windows
-
1Lay 16 half round fence posts with triangular tops flat on the ground. They should each be 6 feet (1.8 m) tall and 4 inches (10 cm) wide, and the rounded sides should face up. Line up the post edges on top and bottom—you should end up with a square or rectangle panel form that has no gaps in between each post. This panel will make up the fort’s front wall.[1]
- You will need 16 posts for each of the 4 walls.
- You can adjust the length and number of the posts depending on what size and height you want your fort to be.
- Try to use pressure-treated wood if possible—it is stronger and will make the fort more durable.[2] You can purchase it from a local home improvement store or online.
-
2Sketch the outline for the door. On the middle 4 posts, measure 4 feet (1.2 m) up from the bottom with a measuring tape and use a pencil or pen to draw a straight line across: this marks the top of the door.[3]
- If you want to make an arched door, measure 3 feet (0.91 m) from the bottom on the outer 2 posts of the 4 middle posts (instead of 4 feet (1.2 m)) and mark it. Then, use the markings to sketch out a triangular V-shape on the posts.
Advertisement -
3Take 1 of the door posts out of the rectangle arrangement. Lay it flat side down on your woodworking station, and make sure to clamp it down or stabilize it so it doesn’t wobble.
-
4Use a saw to cut down from the pencil marking. This will leave you with 2 pieces of wood. Discard the longer piece and replace the shorter piece in the arrangement. Repeat for the other 3 door posts.[4]
- A traditional handsaw will work just fine.[5]
- Use the saw to sever the bottom corners of the post before cutting down all the way through from the top. This makes the cut cleaner and less likely to tear.[6]
- Don’t forget to wear safety glasses for protection. You can also wear gloves and ear protection for extra safety.[7]
-
5Mark the top and bottom outlines for the windows. On the 4th plank from the right side, measure 4 feet (1.2 m) up from the bottom and draw a horizontal line straight across in pencil for the top of the window. Repeat for the 4th plank from the left side. Then, mark the bottom of the window on the same 2 posts by measuring 2 feet (0.61 m) up from the bottom and penciling in horizontal lines.[8]
- Again, you can choose to sketch a V-shape if you want your window to have an arch.
-
6Take 1 of the window posts out of the arrangement. Lay it flat side down on your workstation and clamp it down so that it doesn’t wobble.[9]
-
7Use your saw to cut down at each of the 2 markings. You should end up with 3 pieces of wood: discard the middle piece and replace the other 2 pieces in the arrangement, leaving a gap in the center for the window. Repeat for the other window post.[10]


Constructing the Walls
-
1Measure and cut wooden braces with your saw to bind the front wall into a single piece. Cut 1 plank for the top of the wall—it should match the width of the 16 half round posts.[11]
- Use flat, rectangular wooden planks (not half round).
-
2Cut 2 more planks for the bottom of the wall on either side of the door. They should each match the width of 6 half round posts.[12]
-
3Lay out the planks horizontally. Place them on top of the half round posts to make sure they’re the correct length. Make any cutting adjustments as needed.[13]
-
4Measure and cut 3 more wooden braces of the same lengths. Lay the long piece down horizontally above the window gaps (it should be parallel to the top of the wall), and the 2 shorter pieces horizontally (also parallel) under each of the window gaps.[14]
- These 3 additional braces are necessary because of the gaps in the posts formed by the door and windows. They hold the front wall together so that it’s not loose.
-
5Flip the entire structure over before attaching the braces. Deconstruct the wall by flipping each post over so that the flat side of the half round posts are facing up. Make sure to maintain the gaps for the door and windows. Finally, lay the 6 wooden support braces back on.[15]
- Make sure your wall is laid out exactly as you want the final result to look.
-
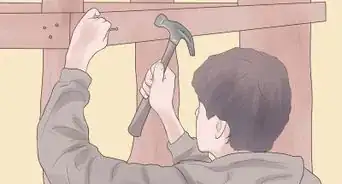
6Nail the braces down to complete the front wall. Use a drill to bore holes down the length of each plank. The holes should be deep enough to span both the wooden brace and the half flat post beneath. Then position a nail in each hole and use a hammer to firmly drive in the nail. Repeat until all 6 planks are secured. Now, the front wall should form a singular piece.[16]
-
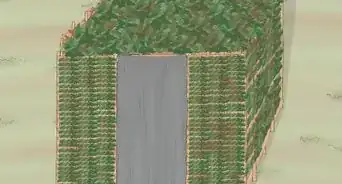
7Construct the other 3 fort walls. Lay out 16 half round fence posts for each with the flat side facing up, making sure the bottom edges form a straight line without any post jutting out. There should be no spaces between each post. [17]
-
8Cut 2 wooden support braces with your saw for the top and bottom of each wall. Use a drill to bore holes, and then nail the planks down with a hammer and nails.[18]
- These walls only need 2 support braces each because they don’t have doors or windows.
- You can still put in windows if you want—just follow the same measuring and cutting procedure to make the window gaps.
- If you want to make the fort easier to access (since the small doorway is better suited to children), you can leave the back wall off and only construct 2 other fort walls.[19]


Assembling the Walls
-
1Cut out 8 square blocks of wood with your saw. Aim for cubes with 4 inches (10 cm) sides. You will use these to connect the 4 walls to each other.[20]
-
2Stand up the first 2 walls vertically. Line them up so that they form a right angle.[21]
-
3Position 1 of the square blocks in the bottom corner where the walls meet. It should overlap with the wooden brace planks.[22]
-
4Use your drill to bore holes in the square block. Then, use a hammer and nails to pin the square block to the walls and connect them.[23]
-
5Place another square block in the upper corner. It should also overlap with the wooden braces.[24]
-
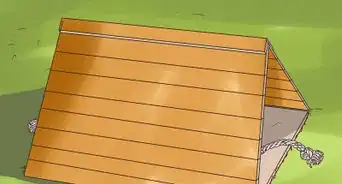
6Use the drill, hammer, and nails to pin the block down. This should leave you with the fort’s first secured corner. Repeat for the other 6 bottom and upper corners, using the remaining 6 square blocks—you should end up with a fully standing fort![25]
-
7Cut the square blocks in half diagonally to get rid of the corners. Since the corners are jutting out, cutting them off will make the fort safer for children to play in. For each block, use your saw to slice down from top to bottom, leaving a smooth triangle block behind.[26]


Community Q&A
-
QuestionHow do I make a fort if I don't have enough wooden planks?
 Community AnswerDo you have logs? I used wooden planks hammered into the ground and put logs in between the boards. Also, I built another fort by using all of the wood I had, then digging down 3-4 feet below that wood so that the fort was underground.
 -
QuestionHow do you make a fort with no supplies except sticks and bushes?
 Community AnswerIf you have long sticks, make a cone-shaped fort and cover it with brush. If you have a tree with a long branch sticking out, lean the sticks on the branch, then cover it with brush to camouflage it.
 -
QuestionCan I use sticks that are not straight if I can't find perfect ones?
 Community AnswerYes, as long as you are aware that if you use them there will be gaps in your walls.
Warnings
- Be careful while using a saw and drill; wear appropriate protective gear.⧼thumbs_response⧽
- Ensure that the wooden fort is completely safe before you let the kids in: check for any loose screws or nails, and make sure everything is completely secured.⧼thumbs_response⧽
Things You'll Need
- Half round fence posts
- Flat wooden planks
- Measuring tape
- Pencil or pen
- Woodworking bench or station
- Saw
- Drill
- Nails
- Hammer


References
- ↑ https://youtu.be/nV4U291Ul0Q?t=35
- ↑ https://www.talbertbuildingsupply.com/blog/when-should-i-use-pressure-treated-lumber
- ↑ https://youtu.be/nV4U291Ul0Q?t=60
- ↑ https://youtu.be/nV4U291Ul0Q?t=347
- ↑ https://www.bobvila.com/articles/types-of-saws/
- ↑ https://youtu.be/nV4U291Ul0Q?t=183
- ↑ https://www.bobvila.com/articles/997-how-to-saw-safely/
- ↑ https://youtu.be/nV4U291Ul0Q?t=147
- ↑ https://youtu.be/nV4U291Ul0Q?t=174
- ↑ https://youtu.be/nV4U291Ul0Q?t=174
- ↑ https://youtu.be/nV4U291Ul0Q?t=346
- ↑ https://youtu.be/nV4U291Ul0Q?t=346
- ↑ https://youtu.be/nV4U291Ul0Q?t=346
- ↑ https://youtu.be/nV4U291Ul0Q?t=346
- ↑ https://youtu.be/nV4U291Ul0Q?t=377
- ↑ https://youtu.be/nV4U291Ul0Q?t=440
- ↑ https://youtu.be/nV4U291Ul0Q?t=602
- ↑ https://youtu.be/nV4U291Ul0Q?t=602
- ↑ https://youtu.be/nV4U291Ul0Q?t=792
- ↑ https://youtu.be/nV4U291Ul0Q?t=730
- ↑ https://youtu.be/nV4U291Ul0Q?t=776
- ↑ https://youtu.be/nV4U291Ul0Q?t=776
- ↑ https://youtu.be/nV4U291Ul0Q?t=776
- ↑ https://youtu.be/nV4U291Ul0Q?t=730
- ↑ https://youtu.be/nV4U291Ul0Q?t=730
- ↑ https://youtu.be/nV4U291Ul0Q?t=741
- ↑ https://youtu.be/nV4U291Ul0Q?t=825
- ↑ https://youtu.be/nV4U291Ul0Q?t=1035
- ↑ https://www.thisoldhouse.com/yards/21016470/how-to-build-a-fort
- ↑ https://www.remodelaholic.com/25-diy-forts-to-build/
About This Article