X
wikiHow is a “wiki,” similar to Wikipedia, which means that many of our articles are co-written by multiple authors. To create this article, volunteer authors worked to edit and improve it over time.
This article has been viewed 31,349 times.
Learn more...
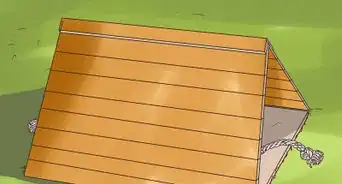
Have you ever tried to make a cool hangout spot in the woods but it isn't big enough, collapses, or doesn't fit in to the natural environment? This tutorial describes how to make a sturdy, large, and natural fort that's also easy.
Steps
Part 1
Part 1 of 4:
Building the frame for the fort
-
1Go to the general area you want your fort. This can be your backyard, a forested area, or really any place you want it.
-
2Look around for big boulders, thick fallen trees, a stream, and/or open space. These will be useful in building your fort.Advertisement
-
3Mark out the space you want your fort. It can be as big as you want. Start clearing away debris like leaves, grass, and sticks.
-
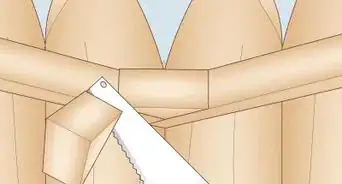
4Gather long sticks that are 6 to 12 inches taller than as tall as you want your fort to be. They don't have to be huge, in fact, skinny branches about as wide as a half dollar coin work very well.
-
5Make a hole in the ground as wide as your sticks and 5 to 12 inches deep around the edge of where you want your fort. Do this about every 6 inches. These will be the walls, so keep in mind that the boulders and fallen trees can act as walls for your fort, too. Use those when you can.
-
6Insert the sticks into the holes and make sure they stay upright on their own. Keep a space clear for the door.
-
7If the sticks do not stay upright, dig the holes deeper and make sure the thicker end is at the bottom.
-
8Gather more sticks of any width. These should be a minimum length of 15 inches (38.1 cm).
-
9Start the bottom of the upright sticks by the door. Place a 3 foot long stick with a similar width to the upright ones. Weave it in and out of the upright sticks. Do this the whole length of your fort. In, out, in, out, in, out, in, out, making sure you alternate.
- Most sticks will only go in and out of two sticks, so don't force them, or they will break. Try to keep from having two consecutive layers of sticks both facing in or out.
-
10Keep layering your sticks until you have created a solid wall all the way up. It should resemble a bird's nest.


Advertisement
Part 2
Part 2 of 4:
Making the insulation
-
1Ok. You have your walls and frame. Now, you want your insulation.
-
2Gather leaves, grass, sod, moss, or any plant that you can stuff into the frame. Pine straw insulates well, and it is very common in eastern coastal America (Florida - Maine.) Stuff it very tightly. Remember that these will eventually dry out and become thinner, so keep a little extra on hand.
-
3Once you have your basic leaves and moss and grass shoved into the frame, consider covering weak parts of your insulation with mud. This will stop anyone from peeking inside, stop extreme temperatures from getting in, and also provides a more professional look to the overall finish.
-
4If you do decide on mud, get a bucket like the kind you use to make sand castles at the beach or wash your car with. Fill it halfway with water (this is why it is handy to have a stream nearby). Fill the rest with dirt and a few torn up leaves. The mix should be the consistency of sludge. Then, using anything from your hands to a spoon, plop a bunch of the mixture onto the walls. Keep mixing this until you have all the weak spots covered. You can do the entire wall if you want. Let it dry.


Advertisement
Part 3
Part 3 of 4:
Adding a door
-
1Find a stick that spans across the door. Secure it by lashing twine, rubber bands or parachute cord to the rest of the fort so that it makes a door frame.
-
2Find an old towel or something similar. Tie that to the top stick.
-
3Dye the door to make it look more natural, if wished. This can be done with black walnut stains or paint.


Advertisement
Part 4
Part 4 of 4:
Adding the roof
-
1Every fort needs a roof. Gather more (yes, more) sticks if your fort is small. If it is larger, consider a tarp or tin roof.
-
2If you choose to continue, crisscross the sticks across the fort.
-
3Then do the same with smaller sticks to the bigger ones. The result should leave little shafts of light pouring into the fort.
-
4Layer leaves, grass and moss on top of the sticks and continue with mud, as for the insulation. If you often get snow in your area, try not to make the roof too heavy- It could collapse.
-
5Done!


Advertisement
Community Q&A
-
QuestionWould this work for camping?
 Community AnswerYes, you could easily set this up and camp in it, but I wouldn't camp in it for too long.
 -
QuestionWhat should I do if I can't find a lot of sticks?
 ZackTop AnswererIf there are no sticks at your location, bring them from another location or move to a location that has sticks.
 -
QuestionI am building a fort, but every time I build one it is destroyed, would this shelter be strong enough to defend against weapons?ZackTop AnswererThis type of fort can be built with materials that vary in strength. Weak materials will make a weak fort. Stronger materials may make it stronger against attacks by light things like snowballs or water balloons. However, it would not be strong enough to withstand an assault by weapons.
Advertisement
Warnings
- Be wary of an unexpected collapse in a poorly made fort.⧼thumbs_response⧽
- Be sure when you are building the frame that sticks don't come crashing down on your head, especially when using large logs or roots.⧼thumbs_response⧽
- Check to make sure the wood is not rotten or infested. Never use wood with a fungus growing on it.⧼thumbs_response⧽
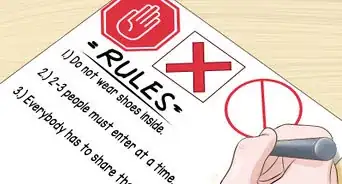
- Do not build your fort somewhere where you don't have permission to do so.⧼thumbs_response⧽
- Try not to exclude people from your fort.⧼thumbs_response⧽
Advertisement

About This Article
Advertisement