wikiHow is a “wiki,” similar to Wikipedia, which means that many of our articles are co-written by multiple authors. To create this article, volunteer authors worked to edit and improve it over time.
This article has been viewed 43,306 times.
Learn more...
Minecraft is a sandbox game that provides you with different materials like dirt, stone, water, ores, and even tree trunks that you can use as building blocks for whatever you want to construct. You can build a lot of things with these materials—houses, tools, armor, weapons, just to name a few. You can even make a nice, cozy igloo, but since ice isn’t readily renewable, you can create an ice farm to keep up a constant supply of ice. Minecraft is available in computer versions (PC, Mac, Linux) as well as in Xbox 360; keys have been provided for these platforms respectively.
Steps
Finding the Right Biome
-
1Launch the game. On the PC, Mac, and Linux edition, if you’ve installed the game correctly and enabled shortcuts, you can find the shortcut icon of Minecraft on your desktop. Simply double-click the icon, and it will open the launcher. You can then log into your account and press the “Play” button near the bottom of the window to launch the game, then press the “Singleplayer” option once the game loads. On the console edition, simply place the CD in and run it from here.
-
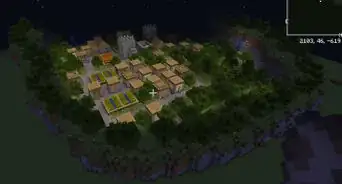
2Consider your Biome options. Before everything else, you will need to find a place where it’s constantly snowing. This is because ice only forms when there’s snowfall on a patch of water. Biomes like Cold Taigas, Ice Plains, Snowy Beaches, and Ice Spike Plains are your best bet for an Ice farm, since it’s constantly snowing there, though be prepared, since these areas are a bit tough to survive in. These biomes are normally somewhat difficult to survive in due to the lack of abundant resources.
- Other candidate Biomes are places like Taigas and Extreme Hills, which have snow the higher up you are in the biome, though it can be a bit tricky to climb, and falling off those areas can lead to instant death and loss of your items.
Advertisement -
3Explore the world to find the right Biome. Cold Taigas, Ice Plains, Snowy Beaches, and Ice Spike Plains are distinguished by the white layer covering the ground from the constant snowfall. Taigas and Extreme Hills can be distinguished by the dull, almost bluish coloration of the grass and the abundance of either Stone or Spruce Trees (trees with a very dark-brown wood and dark blue-green leaves). Normally, you can easily find these areas by exploring your world, and sometimes you’re lucky enough to be on one or near one when you first make the world.
- Each biome is randomly generated across the world though. You’ll only have to rely on the scenery to determine where you are, so there are no absolute guarantees that a certain direction leads to any of them, meaning you’ll have to explore extensively if you want your farm ready!


Gathering/Creating Tools
-
1Identify the items you need. At the very least, you need 1 Bucket and a tool with the enchantment Silk Touch. With the Bucket, you can gather the water needed to provide a steady stream of water to freeze, but you can’t harvest the resulting Ice without a tool (Shovel, Axe, or Pickaxe) with Silk Touch. This is because some blocks break too easily, and yield nothing when interacted with, so Silk Touch bypasses the sensitivity, so to speak, of the block and lets you obtain the block itself.
-
2Make a Torch. The most basic method asks for a singular Torch, and making a torch is also quite vital since it lights up your way and keeps monsters from spawning in the area it’s placed in. Simply take one piece of coal and a single stick, then upon opening your inventory (E key on the computer; triangle and Y on the Xbox), place the coal on the top row of the 2x2 crafting grid found next to your character. Place the stick below it. This will yield you 4 torches from the get-go.
-
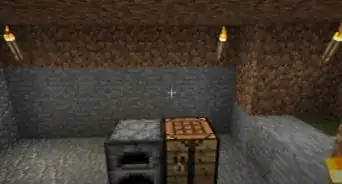
3Create a Bucket. Before crafting your bucket, though, you first need a crafting table. To create a crafting table, open your inventory and place four Wood Planks on all the slots of the 2x2 crafting grid. Your Crafting Table will appear in the result slot next to the grid. Place it on the ground by right-clicking or pressing the Left Trigger button on your controller. You can then pull up the Crafting menu by facing the table and right-clicking or pressing the X button.
- Now create a Bucket by arranging 3 Iron ingots in a V pattern on your Crafting Table like so:
i = iron
X = empty space
X X X
i X i
X i X
- Now create a Bucket by arranging 3 Iron ingots in a V pattern on your Crafting Table like so:
-
4Make a tool. Tools are easy enough to create, even in the earliest stage of the game. All you’ll need is, at most, your crafting table, 3 Cobblestone, and 2 Sticks. Here are the crafting recipes for all the tools: s = sticks m = stone/iron/gold/diamond X = empty space
- Axe
m m X
m s X
X s X - Pickaxe
m m m
X s X
X s X - Shovel
X m X
X s X
X s X
- Axe
-
5Create an Enchantment Table. While the tools themselves are easy enough to make, enchantments are much harder, and Silk Touch is the rarest enchantment of the bunch. To even consider enchanting, you’ll be needing an Enchanting Table, a somewhat late-game crafting station that lets you enchant different supplementary effects on your weapons and tools. To make an Enchantment Table, you’ll need four Obsidian, two Diamonds, and a Book. Diamonds and Obsidian can be very hard to acquire at the early stages of the game since you’ll actually need a Diamond Pickaxe to even harvest Obsidian.
- To craft the Enchantment Table itself, you’ll also need your trusty Crafting Table, and lay out your materials in this format:
o = obsidian
b = book
d = diamond
X = empty space
X b X
d o d
o o o
- To craft the Enchantment Table itself, you’ll also need your trusty Crafting Table, and lay out your materials in this format:
-
6Enchant the tool with Silk Touch. To enchant a tool with your table, first make sure your level is at least 30 to take full advantage of the enchanting mechanism. You can find out your current level by checking the small green number in the middle of the small tracking bar on top of the hotbar.
- Take your desired tool and place it on the left slot on the Enchantment Table’s crafting window, and on the PC, you also need to put at least 1 piece of Lapis Lazuli (a very rare resource you can sometimes find through mining very deep underground or from trading with villagers) on the right slot, and you’ll see that at the right, there will be three options presented. The topmost option costs the least amount of EXP, and the third option costs the most. Select whichever one looks most promising to you, or the one you can afford, and then the weapon will then start to glow a purplish light, signifying that you successfully enchanted it.
- It will take you a few tries before you can get Silk Touch, since it’s a rare enchantment.
-
7Enchant the tool through other ways. If you can’t make an Enchantment Table or don’t have enough resources to keep trying with that method, there are other available methods, like obtaining an Enchanted Book from either fishing, trading with Villagers, or exploring mineshafts, dungeons, temples, or strongholds. You can apply an Enchanted Book to your tool using an Iron Anvil.
- Sometimes, finding a Priest Villager (purple robes) and talking to him might luckily let him enchant a tool with Silk Touch. This is somewhat unreliable because not all Priests can enchant Silk Touch, and sometimes they require tools and objects you do not have on hand.
- Occasionally, Zombies will hold an enchanted tool, marked by the purple glow effect on it. Killing the Zombie will rarely give you the tool itself, but this is less reliable than the other methods. In any case, enchanting a tool might be the most difficult due to the rarity of this enchantment and the scarcity of the methods to obtain it.


Building the Farm
-
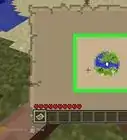
1Build a farm the simple way. The extremely simple way is to find a frozen river or patch of water, place a block on top of the ice (PC: press the number corresponding to your item in your hotbar, or use the mouse scroll button to select the item, then right-clicking on the area; Xbox: select items by pressing the Right and Left Bumper buttons, and place it by pressing the left trigger button), and then place a torch in the middle of it. This method is the simplest, and relies on the Torch’s ability to melt the water to provide a steady source of water. You can also place a torch on the shore and harvest the Ice forming at the fringes of the resulting path of water.
- This is a little ineffective compared to the next two methods since you run the risk of running out of water, or creating an un harvestable flowing patch of water if you’re not too careful.
-
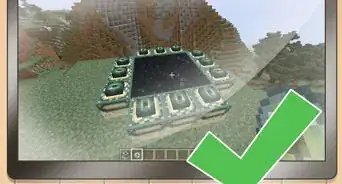
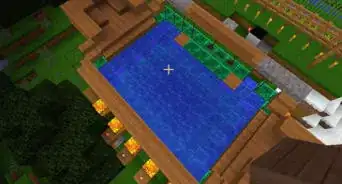
2Build a farm using a 5x5 area. This method is a bit more streamlined, but takes an area of at least 5x5 blocks. First, dig a square of land about 3x3 blocks big and 2 blocks deep. Fill the bottom of the hole with water until the whole pool is still. You can gather water with your bucket; just go up to some water with your bucket equipped, and select the water. The easiest and least time- and resource-consuming way of filling up your pool is by selecting your filled bucket again to place the water on the four corners of the pool. You can also craft multiple buckets and then fill them with water to minimize the effort of gathering water, but only if you have enough resources to do so.
- Slowly place some blocks in an alternating pattern around the top of the pool, which would cover strategic parts of the pool to keep it from freezing entirely. It should look a bit like this:
b = base block (dirt, cobblestone, sandstone, etc).
w = water
X = blank space
Pool:
b b b b b
b w w w b
b w w w b
b w w w b
b b b b b
Cover Layer:
b b b b b
b b X b X
b X X X X
b b X X X - This method is more efficient since it covers certain areas, so that when the ice is harvested, the water flows back in without danger of running out, making the ice an infinitely renewable resource.
- Slowly place some blocks in an alternating pattern around the top of the pool, which would cover strategic parts of the pool to keep it from freezing entirely. It should look a bit like this:
-
3Build a farm using a trench. The last method is yet another variation of this simple system, but streamlines the process even further and removes the possibility of errant flow patterns due to its design. Basically, you create a trench about 3 blocks wide and however long you want. Then fill in the trench with water.
- One way you can do this quickly is to place water at the corners of your pool then every two or three blocks along the trench, you place your water at the middle until you reach the end. At 2 blocks above your trench, create a capital I shape like so:
Pool
b b b b b
b w w w b
b w w w b
b w w w b
b w w w b
b w w w b
b w w w b
b w w w b
d d d d d
Cover Layer (must be two blocks above bottom of pool)
X X X X X
X b b b X
X X b X X
X X b X X
X X b X X
X X b X X
X X b X X
X b b b X
X X X X X
This streamlines the process considerably without using redstone, but also ensures the production is faster and more efficient than the first two methods.
- One way you can do this quickly is to place water at the corners of your pool then every two or three blocks along the trench, you place your water at the middle until you reach the end. At 2 blocks above your trench, create a capital I shape like so:


Harvesting the Ice
-
1Select your tool with Silk Touch. On the computer, you can do this by pressing the number corresponding to your tool in your hotbar, which can be located on the bottom of your screen, or using the mouse scroll button to select your tool. On the Xbox, you can select it by pressing the right and left bumper buttons, then placing it by pressing the left trigger button.
- If your tool is missing from the hotbar, press the inventory button to access your inventory, select the tool, and then place it on your hotbar. If your hotbar is full, click on the item you want to replace, place it in an empty slot in your inventory, and finally place your tool on the free slot on the hotbar.
-
2Go to the iced area you want to harvest. Ice resembles translucent pale-blue solid blocks and can be quite slippery when moving across it. The exposed areas of your pool must be fully frozen to take advantage of your farm. If only one or two blocks are frozen, depending on the size of your pool, it isn’t really worth it. So it’s best to wait for a while before picking a random block of Ice to gather.
-
3Left-click or press the Right Trigger button on the ice to gather your blocks. Once gathered, you can now use your ice to create different things, from skating rinks to traps to an igloo! Remember, once you place the ice, you’ll need the tool to gather it up again or else it will break. But even if you accidentally break the ice, your farm would ensure a steady supply of the material for as long as you play!