This article was co-authored by David Wilkins and by wikiHow staff writer, Eric McClure. David Wilkins is a Professional Body Piercer and the Owner of The Axiom Body Piercing Studio in Des Moines, Iowa. David has been working in the industry since 1994 and is knowledgeable about all aspects of the body piercing industry. He runs an educational YouTube channel specializing in sharing expert body piercings and tattoo information. He completed his apprenticeship in body piercing in Omaha, Nebraska.
There are 10 references cited in this article, which can be found at the bottom of the page.
This article has been viewed 48,670 times.
A gauge refers to the size of the hole needed for an earring or barbell, although the term is often used interchangeably with stretched ear piercings. Gauge sizing is pretty strange, so don’t worry if it feels a little confusing at first. Basically, the higher the gauge, the thinner the jewelry. For example, a 20-gauge plug is actually smaller than a 10-gauge plug. The scale ends at 00, and anything bigger than that is measured in millimeters or inches. Keep in mind, the only way to measure a gauge piercing is to measure the jewelry itself since there’s no accurate way to measure the opening in your skin.
Steps
Using a Gauge Wheel
-
1Get a gauge wheel to easily measure the gauge of your jewelry. A gauge wheel is a circular disc with holes cut out of the exterior edge. It kind of resembles a saw blade, except the holes are all different sizes and have measurements next to them. By finding the hole that matches your jewelry, you can measure the size of the gauge. Purchase a gauge wheel online or at a local hardware store, since they are also used by welders and metalworkers.[1]
- This is the easiest way to measure the gauge for a piercing, since it’s basically foolproof. So long as the gauge fits snuggly in one of the openings, you know it’s correct.
-
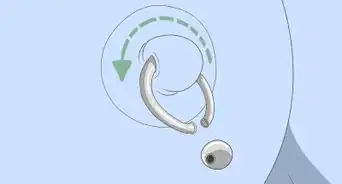
2Compare the cutouts on the gauge wheel to your jewelry. Hold the gauge wheel up next to the jewelry that you’re measuring. Rotate the wheel until you find a cutout that looks like a match for your jewelry. There’s no harm in getting it wrong, so don’t worry if you don’t match it perfectly the first time.[2]
- For plugs and tubes, hold them by the edges with the flat surface facing the same direction as the gauge wheel.
- For barbells, hold the bar straight up so that it’s perpendicular to the gauge wheel. Take the balls off of the barbell before doing this.
Advertisement -
3Try sliding your jewelry into the opening to see if it fits. Slide the plug, tube, or barbell into the opening that it looks closest to on the cutout. If it fits perfectly and snuggly in the opening, you found the size! The gauge measurement is the number printed next to the cutout circle.[3]
- Gauge wheels usually provide the measurement in the gauge size along with the millimeters or inches. You’ll need to look the conversion rate up online if it doesn’t, though.
- For plugs and tubes, the groove around the outside of the jewelry should rest against the metal, not the elevated lip on the front or back edges of the jewelry.
-
4Continue trying to match the gauge as needed until you find the size. If the jewelry fits, but it isn’t tight against the edges of the cutout, keep sliding the jewelry into progressively smaller openings until you find one that’s snug. If the jewelry didn’t fit because it’s too big, keep testing it with larger cutouts on the wheel until you find the size that’s perfect for your jewelry.[4]
Tip: The plug, tube, or barbell should fit cleanly but comfortably in the opening. You shouldn’t be able to freely move it around when it’s sitting in the cutout, and you shouldn’t need to shove it into a cutout to make it fit.


Using Calipers
-
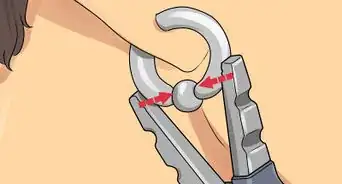
1Open your calipers and slide the jewelry in between the prongs. Calipers are basically a ruler with 2 prongs on it that slide to get accurate measurements. One of the prongs is fixed at 0 while the other prong is adjustable. Slide the movable prong out to create room for the jewelry. Hold your plug, tube, or barbell in between the jaws.[5]
- Keep a plug or tube flat between the jaws with the broad side facing up. Hold a barbell perpendicular to the ruler.
- Calipers will work to get an accurate measurement, but you may be off by fractions of an inch or millimeter if you don’t hold the jewelry perfectly flat.
-
2Close the jaws of the calipers around the thickest part of the jewelry. Hold the top of your jewelry flush against the ruler. Then, slide the movable prong into the jewelry until both of the prongs are pressing into the jewelry.[6]
- If you’re measuring a plug or tube, make sure the prongs are pressing against the middle of the tube or plug where the grooves are.
-
3Use the hash marks on the calipers to determine the gauge. The number above the hash mark on the movable prong is the gauge of your jewelry. Since calipers don’t list the gauge size on the ruler, simply type the measurement into a search engine online to pull up the gauge.[7]
- To make things easier, use the millimeters instead of the inches to find the gauge. The inches for gauge piercings are always given in fractions, which can make them kind of hard visualize on a ruler.
Variation: You can use calipers to measure the length of a barbell as well. To do this, slide the prongs inside of the 2 bars and push them out against the balls on either side. This will give you the overall length.


Using a Measuring Tape
-
1Line the top of the measuring tape up with the top of the jewelry. Grab a retractable measuring tape. Pull the end of the tape out a little bit and lock the tape by sliding the button on the front of the casing down. Set the top of your jewelry flush against the hook at the end.[8]
- If you’re measuring a plug or tube, hold the jewelry flat with the broad side sitting flush against the ruler.
- If you’re measuring a barbell, hold it parallel to the hook at the end of the measuring tape.
Tip: This is the least efficient way to measure gauge jewelry, especially if you have a plug or tube. For plugs and tubes, you’ll only be able to get an estimate for the size since there’s a groove in the middle of the jewelry for your ear to sit inside. This method is fine if you’re trying to get an idea of how big your piercing is, though.
-
2Read the measuring tape to determine the size of the gauge. Hold the jewelry steady and find the measurement. Make sure that you’re holding the jewelry symmetrically over the center of the measuring tape. If you aren’t measuring the widest part of the jewelry, your measurement may be a little off.[9]
-
3Subtract 1⁄16 in (0.16 cm) from each end if it’s a plug. If you have a plug or tube, you have to compensate for the groove in the middle of the jewelry where it sits in your ear. On most all plugs and tubes, this is 1⁄16 in (0.16 cm) on each end. Deduct 1⁄8 in (0.32 cm) from your total measurement to get the actual size of your gauge.[10]
- You may need to change the fraction in your measurement to subtract the 1⁄8 in (0.32 cm). For example, if your piercing is 7⁄16 in (1.1 cm), subtract 2⁄16 in (0.32 cm) instead of 1⁄8 in (0.32 cm) to get 5⁄16 in (0.79 cm).
- This gap is different on some plugs, tubes, and hooks. Realistically, you can only use this measurement as an estimate. The measurement should be accurate for a barbell, though!


References
- ↑ https://youtu.be/DLlnuwAcuJM?t=42
- ↑ https://youtu.be/PSUXUcep2gc?t=128
- ↑ https://youtu.be/BsOxAt88PBk?t=71
- ↑ https://youtu.be/BsOxAt88PBk?t=78
- ↑ https://youtu.be/PSUXUcep2gc?t=51
- ↑ https://youtu.be/PSUXUcep2gc?t=60
- ↑ https://youtu.be/PSUXUcep2gc?t=64
- ↑ https://youtu.be/PSUXUcep2gc?t=204
- ↑ https://youtu.be/PSUXUcep2gc?t=206
About This Article