X
wikiHow is a “wiki,” similar to Wikipedia, which means that many of our articles are co-written by multiple authors. To create this article, 25 people, some anonymous, worked to edit and improve it over time.
This article has been viewed 62,315 times.
Learn more...
If you're teaching a unit about ancient Egypt, it can be a fun and informative project for a class to preserve a chicken as a group, learning about the techniques and procedures performed during the rituals. Actually getting the hands-on experience can be memorable for late elementary school students, allowing them to participate, observe, and finish the project with assistance. Learn what materials you'll need and how to turn this into a fun project.
Steps
Part 1
Part 1 of 3:
Getting Started
-
1Set aside enough time to complete the project. Depending on how your class is structured, you'll probably need to set aside enough time on either side of a particular unit to complete the job. The total mummification of a chicken should take between 40 and 50 days, when done properly. Since it's unlikely that you'll want to spend that much of class time consistently teaching about ancient Egypt, it would probably make sense in your lesson planning to spread out lessons about it throughout the unit, during history time, however you choose.
- Alternatively, you could do a little infomercial magic and start a chicken ahead of time, leading up to your project, so it'll be ready for the students to finish themselves. You can still start one and let it slowly preserve over time, then check out later after the unit is over. Make the project fit your time constraints.
-
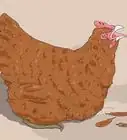
2Get the right supplies to complete the mummification process. The supplies necessary for classroom mummification are all available at most grocery stores, for relatively cheap. The most expensive ingredient will be the chicken itself.
- 1 raw chicken. Preferably, store-bought chickens should be smaller than three pounds to dry out more thoroughly and more quickly. Any larger will require larger and more materials, and will produce more of a smell upon mummifying the chicken.
- Isopropyl alcohol. You'll only need a small amount, used to blot the inside and outside of the chicken.
- Rubber gloves for the students. If you're going to have the students ever handle the chicken itself, it's necessary for them to wear rubber gloves and wash hands before and after.
- Raw herbs, like sage, rosemary, and thyme can be useful for performing a "ceremony" after the chicken has been preserved.
- A roll of gauze can be used to wrap the mummy at the end of the project.
- A plastic tub. It's important to have a Rubbermaid or other brand locking plastic tub to mummify the chicken in. This will produce an unpleasant odor, so keeping it in a relatively tight seal will help to keep it from stinking up the classroom.
- 50/50 mixture of salt and baking soda. You'll end up needing about 4 pounds total of this mix over the course of the project, depending on how big your chicken is.
Advertisement -
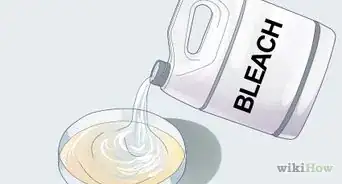
3Rinse the chicken thoroughly. When you're ready to start the project, it's important to rinse the chicken thoroughly and dry it out to eliminate bacteria and other particles on the outside of the chicken that may promote spoilage. If you have a sink in your classroom, do it in the sink and make sure you clean it thoroughly afterward.
- Rub down thoroughly with paper towel to eliminate any moisture, then blot the inside and outside of the chicken with a small amount of rubbing alcohol.
-
4Mix together the baking soda and salt. You'll need a steady supply of baking soda and salt over the course of the project, so you should probably buy a couple of one-pound bags of each to get started. You can mix them in a ziplock bag to keep the mixture fresh and easily accessible in the classroom, or make the mixing-together process part of the project that your students complete themselves.
- You'll be changing out the salt and baking soda every ten days throughout the project, so you could also have students bring in small amounts from home to make sure that you have enough to last throughout the project.


Advertisement
Part 2
Part 2 of 3:
Starting the Mummy
-
1Line the plastic tub with preserving mixture. Pour a small pile of the preserving mix in the bottom of the plastic tub, then lay the chicken on top of it. Cover the chicken completely with the mixture, both inside and outside, rubbing it thoroughly on all exposed sides of the chicken. Pour a little more on top to make sure it's thoroughly covered.
- If you have students helping you, make sure everyone wears rubber gloves and washes up thoroughly afterward.
-
2Keep in a cool, dry place. After covering the chicken with the mixture, snap your lid onto the plastic tub and keep the chicken in a cool, dark place. If your classroom has some cabinets tucked away, that'd be the perfect location for the make-shift preserving chamber. If you get a clear plastic tub, it can be nice to allow the students to see in and check out what's happening without having to open the tub.
-
3Replace the salt and baking soda every 7-10 days. Gradually, the salt and the baking soda will absorb the moisture from the chicken, leaving it dry and desiccated. When you start to see the salty crust looking hard and brown, it's time to change it. Remove the chicken from the tub and shake as much of the mixture off as possible, wiping it off from the inside, as well. Get as much of the old mixture out and off as possible, and discard it.
- Replace with fresh salt and baking soda, as before. You may elect to make this process part of the classroom activities, or just start doing it yourself to keep class time moving along. Alternatively, it might be nice to let small groups of students help in the changing out process, to give some hands-on time while other students stay busy doing other things.
-
4Have students observe the process and keep a record of the changes. Every time you take the chicken out and change the mixture, it's a good idea to let them observe it. How has the texture of the skin changed? How has the color changed? Let them feel the skin of the chicken and describe the way it has changed.
- Have each of the students keep the "Mummy journal" or some other kind of record keeping lab report documents to note their observations. This can be both fun and informative for students, giving them something active to do.
-
5Deodorize in the area around the box. Even if you've got a relatively-tight seal on your plastic tub, you might start to notice a kind of nasty odor in the area. It's a good idea to stay active about deodorizing to avoid stinking up your whole classroom. You could use car air fresheners, aerosol disinfectant spray, or other types of cleaners in the area, if you wish.
- Talk to the custodians and your supervisors at the school if you're going to be doing this project, to make sure nobody gets a disgusting surprise if they try to investigate the cabinets in your classroom.
-
6Remove the mummy after 40 days. After changing out the salt mixture four times, or so, the chicken should be well preserved, and you should be able to remove it from the mixture and wrap it up with the students to complete the project. Rub all the salt mixture from the body of the chicken thoroughly and have your students observe the finished product one more time.
- Depending on the moisture levels in your area, it may take more or less time to complete the job. Keep a close eye on the chicken to make sure it's not molding or otherwise spoiling, and it should be done after a little more than a month.


Advertisement
Part 3
Part 3 of 3:
Finishing the Project
-
1Thin some glue with water. To wrap the mummy, you'll wrap it in gauze strips, but those strips need to be soaked in hardening solution to make them stick and to form a hard, mummy-like carapace for the chicken. To create this mixture, thin some regular classroom glue with warm water, until it drips evenly from a spoon.
-
2Soak gauze strips in the glue mixture. Tear off enough gauze strips that are long enough to wrap all the way around the bulk of the chicken, and start soaking them in the glue mixture. You can also have students do this in small groups, if you like. You shouldn't have to soak them for long, just a few seconds, to get them coated evenly with the glue mixture.
-
3Wrap the mummy. Use gauze to wrap the chicken, starting by wrapping around the fattest part of the chicken, and letting students wrap around the individual legs and the other parts of the chicken. It looks better the more gauze you use, in general, and the students usually have a good time completing this stage in the process.
- Allow the carapace to dry thoroughly before moving on. The outer layer should be dry in 24 hours or so, during which you might put the chicken back into the plastic tub after cleaning it out.
- The chicken should be fine to sit out without worrying about spoiling, but just to be on the safe side, it might be a good idea to keep it in the tub, so you're not welcomed back to the classroom with an accidental horrible odor. It was common to use fresh herbs in the cavity of real mummies, helping to control odor and purify, which might be a nice step to add to the project for your students, as well.
-
4Decorate the outside. Let the students decorate the outside of the mummy with symbols, designs, and drawings, using paints. If you've been studying Egyptian symbols and mummification, you might have them use symbols they find, or make their own to represent the chicken and the chicken's life. Have fun with it, and let them design the project how they'd like.
- It can also be fun to make a shoebox sarcophagus, instead of the chicken itself. Have students each design their own, or design one as a class, and then lay your chicken to rest for good in the shoebox.
-
5Hold a classroom ceremony. When all is said and done, this can be a good ending day for your Egyptian unit, if you like. Have a class party, or hold some kind of ceremony outside to say goodbye to the chicken. Light incense, say your peace, and do other Egyptian-type activities to end the unit.


Advertisement
Warnings
- If you don't do the step with the salt correctly, it really stinks - literally.⧼thumbs_response⧽
Advertisement


About This Article
Advertisement