This article was co-authored by wikiHow Staff. Our trained team of editors and researchers validate articles for accuracy and comprehensiveness. wikiHow's Content Management Team carefully monitors the work from our editorial staff to ensure that each article is backed by trusted research and meets our high quality standards.
There are 10 references cited in this article, which can be found at the bottom of the page.
This article has been viewed 71,398 times.
Learn more...
Windows get stuck shut when fresh paint dries between the movable sash and the frame around it. These windows are relatively easy to open by breaking the paint seal with a putty knife. If you aren’t able to leverage the window open, pry the side stops off the window frame. You will then be able to repair any damage to the window to ensure it opens and shuts without further problems.
Steps
Breaking a Paint Seal
-
1Slide a putty knife into the interior joints around the window sash. Place the knife between the sash, which is the movable part of the window, and the wood stoppers on the wall. Tap the knife’s handle with a hammer as needed to push it further into the joint. Then, move the knife all the way around the window to break the paint seal.[1]
- If your window has a top and bottom sash, start with the lower one.
- A utility knife also works well for most windows, but may not be able to cut through thicker beads of paint. Another option is a specialty blade called a window zipper, available at many hardware stores.
-
2Break the paint seal on the window’s exterior with a putty knife. Go outside and place the putty knife between the window sash and the frame. Carefully drag it around the entire window. After cutting through the paint, you may be able to open the window by hand again.
- If going outside isn’t possible, leave the exterior alone and focus on what you are able to reach. You may need to put a little more effort into moving the window sash, but opening the window is still possible.
Advertisement -
3Loosen the interior joints further after attempting to lift the sash. Go back inside your home and try to lift the sash up with your hands. Make sure it is unlocked first. If it feels a little loose, slide a putty knife or paint scraper into the surrounding joints again. Break off as much of the obstructing paint as possible.[2]
- Be gentle when lifting the window. Forcing it is a sure way to break it. If it feels stuck, try something else.
-
4Attempt to lift the sash with a pry bar if it is still stuck. Set the pry bar against the corner of the window sash. Slide it underneath the sash’s bottom edge. Tap the pry bar with a hammer as needed to get it further into the joint. Then, gently try to leverage the window up.[3]
- If you feel the window loosening, try moving the pry bar. Work on the sash’s other corner before prying up the middle section. Sometimes applying force in a few different spots is enough to get the window open.
- To reduce the possibility of damage, stop prying the window if it feels stuck in place. Remove the window stops and possibly the sash itself to repair the window.
-
5Spray the window tracks with a dry lubricant. The best lubricants to use are labeled as “dry” or for use on sliding windows. They come in spray bottles, so all you have to do is point the nozzle at the tracks on either side of the window sash. Spray them with an even coating of lubricant to make the sash easier to open and shut.[4]
- Lubricants are available online or at many home improvement stores. Look for ones with graphite, Teflon, silicone, or similar products.
- Once you have lubricated the sash, continue opening and closing it. The more you use it, the more it loosens.
- Another way to lubricate the tracks is with a wax candle. Wipe the candle stub over the track for a mess-free lubricant.[5]


Loosening Window Stops
-
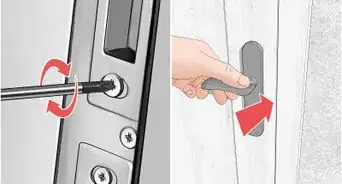
1Remove any screws around the window frame. Check the tracks to the left and right of the window sash. The sash rests on a pair of wood panels that allow it to move up and down. If these pieces are held in place by screws, you usually need a small Phillip-head screwdriver to remove them. Twist them counterclockwise until they pop out.[6]
- If you don’t see screws, the side panels are most likely being held in place by nails. You will need to pry the panels forward before pulling out the nails.
-
2Slide a putty knife behind the left window stop to begin removing it. Place the putty knife in the joint between the panel and the wall. Move the knife along the joint to break the paint seal. Drag the knife all the way to the top and bottom of each panel. If you need to, hammer the edge of the knife to force it through tough spots.[7]
- The knife will chip the paint a little, but the damage often isn’t significant and fixing the window is well worth it.
- Be careful when working in older homes. Many homes built before 1980 have lead paint. To avoid lead exposure, rent a vacuum with a HEPA filter from a home improvement store and use it to clean up paint chips. Wear a respirator mask with a HEPA filter for additional protection.
-
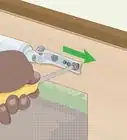
3Pry the window stop from the jamb with putty knives. Push the flat edge of a putty knife between the window stop and the wall. Wiggle the knife to move the stop away from the wall. Take your time and don’t force it if it feels stuck. For extra leverage, slide a second knife in place behind the first one.[8]
- For tougher stops, remove them with a pry bar. Set the pry bar between the 2 knives to protect the wood from damage. Hammer the end of the bar to wedge it in place.
- Use a putty knife or window zipper to break paint seals holding the ends of the stoppers to the window sill.
-
4Pull the nails out of the wall with a hammer. After you remove the window stops, locate any nails left on the wall. Use the claw end of a hammer or a similar tool to get them out of your way.
-
5Remove the opposite stop if the window is still stuck in place. Try to lift the window. With any luck, it will now be loose enough to open. If it doesn’t, break the paint seal on the other stop, then pry it off the wall.[9]
- Attempt to open the window by hand. Leveraging it with tools may also help, but be careful not to force it too much and damage it.
-
6Wiggle the window sash to free it from any remaining paint. Pull the sash gently towards you. Push the sash back, then pull it towards you again slowly. Do this a few times, then test the sash by attempting to lift it up.[10]
- Use a putty knife or window zipper as needed to help break the paint seal around the sash’s top and bottom edges.


Removing and Repairing a Window
-
1Cut the sash cords behind the window stop to remove the sash. The sash cords are hidden inside the wall. When you remove the stop on the right side, you will see what looks like a hidden compartment. Use a sharp knife or scissors to slice through the thick cords hanging there. Then, slide the window sash away from the wall.[11]
- The sash cords have weights on their ends. Hold onto the weights as you cut the cords to prevent them from falling.
-
2Scrape loose paint off of the window sash. Set the window sash down on a flat, stable surface. Most likely an old sash will have lots of debris and other material around its frame. Use a paint scraper or another tool to remove any excess material.
- If the window pane is in good shape, you don’t need to replace it. Leave the glazing compound, usually a green substance between the glass and frame, in place.
- Be wary of lead paint in older houses. Place the window on top of a plastic sheet that will collect falling dust. Work with a respirator fitted with a HEPA filter.
-
3Sand the sash frame smooth with 100-grit sandpaper. Wear down the frame until it looks roughly level. Avoid touching the glass with the sandpaper, since it could lead to scratches.[12]
- If you see any holes in the frame from rot, fill them in now with wood putty or epoxy, then sand the area flat again.
-
4Prime and paint the sash the frame. Spread a coat of wood primer over the entire frame, then let it rest for about 3 hours. After the primer has dried, open a can of water-resistant latex paint. Let the paint dry for at least 1 hour. If you need to apply a second coat of paint, wait 4 hours.[13]
- Think of what color the rest of the window frame is. Unless you plan on repainting the entire frame, match the color of the sash’s frame to it.
-
5Install new sash cords by hanging them on the pulleys. Purchase sash cords identical to the ones you took out of the wall. At the very top of the wall compartment, you will see a pair of pulleys. Loop the cords around the pulleys, then tie them to the weights you removed earlier.[14]
- Take the old cords with you when you go to buy new ones at a hardware store. Cords come in different sizes, so not all of them work well in your window.
- Add a few drops of oil or a lubricant like WD-40 to keep the pulleys in working order.
-
6Replace the window sash and stops on the wall. Set the window sash in place on the window. Then, return the stops to the wall. Nail them in place with brad nails about 3⁄4 in (1.9 cm) long, enough to secure the stops in place without piercing the compartment with the sash cords. Place the nails about every 10 in (25 cm) to complete the window.[15]
- Test the window sash thoroughly to make sure it opens. If it doesn’t open, the sash cords may be the issue and they are easier to adjust before you replace the stops.


Warnings
- Lead paint was used in many homes built before 1980. It is toxic when ingested, so take proper safety precautions such as laying out a plastic mat, wearing a respirator with a HEPA filter, and vacuuming up debris with a HEPA vacuum.⧼thumbs_response⧽
Things You’ll Need
Breaking a Paint Seal
- Putty knife
- Pry bar
- Hammer
- Dry window lubricant
Loosening Window Stops
- Phillips-head screwdriver
- Putty knives
- Pry bar
- Hammer
Removing and Repairing a Window
- Sharp knife or scissors
- Window sash cords
- Paint scraper
- 100-grit sandpaper
- Wood primer
- Latex paint
- 3⁄4 in (1.9 cm) brad nails
- Measuring tape
- Hammer


References
- ↑ https://www.mercurynews.com/2010/04/01/ask-an-expert-how-to-open-windows-that-were-painted-shut-2/
- ↑ https://www.youtube.com/watch?v=NMOiVAeG3gA&feature=youtu.be&t=127
- ↑ https://www.youtube.com/watch?v=jsgivH6kbkk&feature=youtu.be&t=131
- ↑ https://www.popularmechanics.com/home/interior-projects/how-to/a10204/7-things-your-windows-are-trying-to-tell-you-16615423/
- ↑ https://www.bobvila.com/articles/how-to-open-a-stuck-window/
- ↑ https://www.bobvila.com/articles/how-to-open-a-stuck-window/
- ↑ https://www.youtube.com/watch?v=jsgivH6kbkk&feature=youtu.be&t=167
- ↑ https://www.bhg.com/home-improvement/windows/window-repair/diy-replacement-windows/
- ↑ https://www.bhg.com/home-improvement/windows/window-repair/diy-replacement-windows/
- ↑ https://www.bobvila.com/articles/how-to-open-a-stuck-window/
- ↑ https://www.theguardian.com/lifeandstyle/2008/mar/01/diy.homes5
- ↑ https://www.youtube.com/watch?v=8Y87V2oI4Kg&feature=youtu.be&t=57
- ↑ https://www.finehomebuilding.com/2012/03/08/10-tips-to-paint-like-a-pro
- ↑ https://www.theguardian.com/lifeandstyle/2008/mar/01/diy.homes5
- ↑ https://www.theguardian.com/lifeandstyle/2008/mar/01/diy.homes5
About This Article