This article was co-authored by Andre Kazimierski. Andre Kazimierski is a Painting Specialist and the Founder and CEO of Improovy, an on-demand house painting service startup. With more than 15 years of experience, Andre and the Improovy team use data and technology to streamline the home improvement process for homeowners and painting contractors. Andre started in the painting industry as a sophomore at Depaul University in Chicago, working with one of the nation’s largest painting companies to launch new cities and territories across the Midwest. Years later, he started 3rd Gen Painting and Remodeling and had a successful exit after growing the company to two different states.
This article has been viewed 15,998 times.
Whether the paint on an old radiator is beginning to flake, it doesn’t match the color scheme of your new home, or you simply don’t like the way it looks, there are plenty of reasons to give your radiator a fresh coat of paint. While it might seem like a difficult chore, touching up your radiator is surprisingly easy. By properly preparing it and using the right types of primer and paint, you can get your standard, cast-iron radiator looking new once again.
Steps
Cleaning the Radiator
-
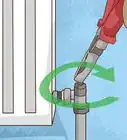
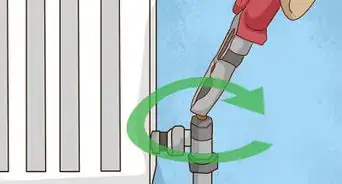
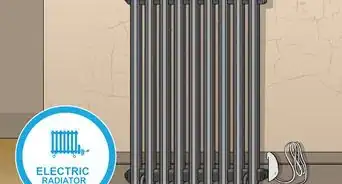
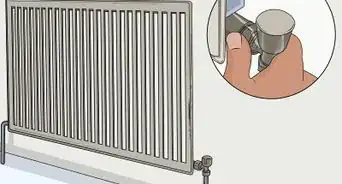
1Turn the radiator off completely. Rotate the control valve on the radiator until it is in the off position, and leave the radiator to cool down completely. Wait until the radiator is cold to the touch before you begin painting it.[1]
- Your radiator will need to stay off for a few days in order to let the primer and paint fully dry. Avoid painting your radiator in the colder months when you’ll need it to be on more often.
-
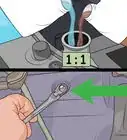
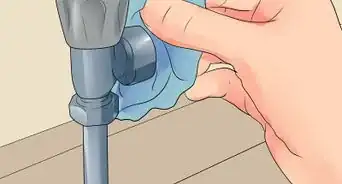
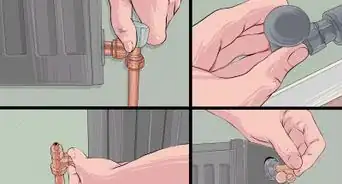
2Cover any valves or vents with masking tape. Spray paints and primers are the easiest way to paint your radiator but can be more difficult to control. Use masking tape or painters tape to completely cover and seal off the steam vent valve, the control valve, and anything else that the paint may block and damage.[2]
- While the paint may not stop the valves from working, it may dry and make them more difficult to turn on again once you’ve finished. For best results, avoid painting any parts that will need to move, or any openings into the radiator itself.
- There will likely be 2 valves on the inside of the radiator near the top that you should avoid painting over as they are used to bleed the radiator. The control valve will be on the side or top of the radiator and used to turn it on or off. If you're unsure, avoid panting anything other than the blades and top metal of the radiator.
Advertisement -
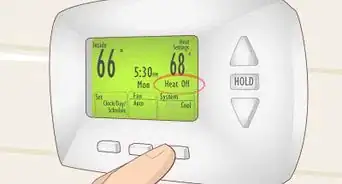
3Clean the radiator to remove dust. Use a clean, slightly damp cloth to give the radiator a quick wipe down and remove any dust or grime. Clean off the top section first before moving down and carefully cleaning between each of the blades of the radiator. Wash the cloth off if it becomes too clogged with dust.[3]
- You can also find specialized radiator brushes designed for cleaning in between the blades of the radiator. Ask at your local hardware store or look online to find one if you will be cleaning radiators often.[4]
-
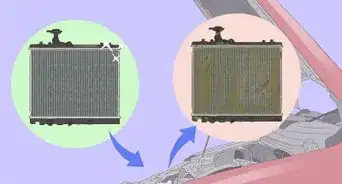
4Strip the radiator of any chipped or flaked paint. If it’s been a while since your radiator was painted, some of the paint may be flaking or peeling away from the surface. Use a putty knife or a metal bristle brush to remove any flaky paint and vacuum it up.[5]
- If your radiator is from before 1978, or you’re unsure when it was last painted, test the paint for lead before removing it. Use a lead paint test kit, which should be available from your local hardware store, to detect any traces of lead before proceeding.
- Lead paints need to handled very carefully, as they can be incredibly dangerous and potentially fatal if inhaled. Use a gel-based paint stripper designed for removing lead paint, or call in a professional to remove it for you safely.
-
5Sand down your radiator to remove any rust and create a smooth surface. Look over your radiator for any signs of rust or other dents in the surface. Use a coarse grit sandpaper, around 40- to 60-grit, to go over these areas and sand them smooth. Then use a finer grit sandpaper, around 80- to 120-grit, to go over the entire radiator and smooth out the surface.[6]
- This will help the primer and paint to adhere more easily and make your finished radiator look better.
- If you remove a lot of paint or dust from the radiator as you sand it, it may be a good idea to give it another wipe down with a clean cloth. Dust that comes off the radiator may stop your paint from adhering properly


Priming and Painting Your Radiator
-
1Cover the walls and floor around the radiator with a drop cloth. Lower a drop cloth or some large pieces of scrap paper behind the radiator and secure them to the wall with a piece of painters tape. Repeat the same process, working outwards from the radiator, until you have an area that covers at least 5 feet (1.5 m) in all directions from the radiator.[7]
- Cover as much area around the radiator as you can, as the aerosolized spray paint will travel much further than you may expect. It’s much easier to put up drop cloths or paper than it is to repaint a whole wall!
-
2Ventilate the area as much as possible. Both spray paint and spray primer can be very dangerous if inhaled, or if you are working in a space without proper ventilation. Open as many windows as you can in the room that you are working in to keep air circulating, and wear a ventilator mask and gloves for extra safety.[8]
- If you begin to feel light-headed at any point during the painting process, it may be a sign that there is not enough ventilation and that you are inhaling the fumes. Stop painting immediately and call a professional to paint the radiator safely.
-
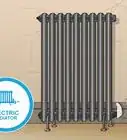
3Choose oil-based primer and paint that can resist high temperatures. When working with something like a radiator, both the paint and the primer you use will need to be oil-based and resistant to high heats. Ask at your local hardware store to find spray paints and primers that are oil-based, resistant to heat up to 390 °F (199 °C), and in the color you want.[9]
- Make sure that the color you choose for your radiator will work with the color of the wall that it is against. Try and find a color in a similar shade to make it blend in, or choose a contrasting color to make your radiator stand out a little more.
-
4Spray the radiator with an even coat of primer. Hold your can of spray primer roughly 10 to 16 inches (25 to 41 cm) from the radiator and press down firmly on the nozzle. Use a back and forth motion to coat the radiator in a single even layer, making sure to get in and around all of the individual blades.[10]
-
5Leave the primer to dry for up to 24 hours. It may take a lot of time for your coat of primer to dry completely. The primer will need to be dry to the touch and not sticky at all before you begin painting, so make sure you give it plenty of time. Check the manufacturer's instructions on the primer for specific advice if you're unsure how long your primer will take to dry.[11]
-
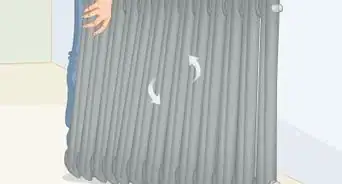
6Coat your radiator with a single layer of spray paint. After the primer has completely dried, it’s time to paint the radiator. Follow the same method as applying the primer to evenly coat the top of the radiator. Work across each of the blades, painting one side of all of them before finishing with the other side. Use short, sharp bursts of paint to touch up any exposed areas and let the paint dry.[12]
- It may help to practice using the spray paint on a scrap piece of cardboard first. This will give you a better feel of how to work with the paint before you begin on the radiator.
-
7Apply more coats to improve the look of your radiator. Once the first coat of paint has set after 15 minutes or so, evaluate the depth and overall appearance of the painted radiator. If you want the color to be brighter and more opaque, or want to cover up areas you may have missed with the first coat, follow the same method to apply a second coat of paint.[13]
- Keep applying coats of paint until the radiator looks the way that you want it to.
-
8Leave the paint to dry completely for up to 24 hours. Although you only need to wait 15 to 20 minutes to the paint to set between coats, you will need to leave it to dry completely before using the radiator once again. Give the paint at least 24 hours to dry, or check the manufacturer's instructions for more specific advice.[14]
-
9Remove the drop cloths and tidy up any stray paint. When the radiator is dry to the touch, you can take down and dispose of the drop cloths surrounding the radiator, as well as removing any remaining masking tape. As you do, take a look over the walls and floor around the radiator to check for any stray spray paint that needs to be removed.[15]
- Use paint stripper to remove any drops of paint on your walls or floor.
- Leave the paint to dry for at least 24 hours before turning the radiator on again. However, you can remove the drop cloths and tidy the area up after around 12 hours.
- Always follow the manufacturer’s instructions when letting the paint dry.


Warnings
- Do not strip any paint from the radiator without checking what it is first. Lead paint is very dangerous if not handled properly.⧼thumbs_response⧽
- Spray paint can be very toxic if inhaled. Always work with proper ventilation and safety equipment. If you feel light-headed at any point while painting, stop immediately.⧼thumbs_response⧽
Things You’ll Need
- Masking tape
- Cloth
- Putty knife or metal bristle brush
- Sandpaper
- Lead paint test kit
- Paint stripper
- Drop cloths or paper
- Painters tape
- Metal spray primer
- Metal spray paint

References
- ↑ https://www.bobvila.com/articles/how-to-paint-a-radiator/
- ↑ https://www.bobvila.com/articles/how-to-paint-a-radiator/
- ↑ https://thecraftsmanblog.com/how-to-paint-an-old-radiator/
- ↑ https://youtu.be/hbNS-ZfmtjA?t=18
- ↑ https://www.bobvila.com/articles/how-to-paint-a-radiator/
- ↑ https://www.bobvila.com/articles/how-to-paint-a-radiator/
- ↑ https://youtu.be/hbNS-ZfmtjA?t=46
- ↑ https://www.bobvila.com/articles/how-to-paint-a-radiator/
- ↑ https://www.bobvila.com/articles/how-to-paint-a-radiator/
- ↑ https://www.bobvila.com/articles/how-to-paint-a-radiator/
- ↑ https://www.bobvila.com/articles/how-to-paint-a-radiator/
- ↑ https://youtu.be/rNdqczjFyxc?t=59
- ↑ https://www.bobvila.com/articles/how-to-paint-a-radiator/
- ↑ https://www.bobvila.com/articles/how-to-paint-a-radiator/
- ↑ https://www.bobvila.com/articles/how-to-paint-a-radiator/
About This Article