X
This article was co-authored by Jeff Baldwin. Jeff Baldwin is a Residential Painter and the Owner of Baldwin Custom Painting. With two decades of painting experience, Jeff specializes in high-end residential and small commercial painting projects. Dedicated to quality craftsmanship, Jeff and Baldwin Custom Painting provide bonded/insured, licensed, and lead-safe certified services in residential painting, light commercial painting, and wood refinishing.
This article has been viewed 117,790 times.
Applying paint to textured ceilings is a pretty straightforward process. Whether using a roller or spray gun, you can paint your textured ceiling without the hassle or expense of a professional painter.
Steps
Part 1
Part 1 of 2:
Setting Up
-
1Cover the entire floor and any furnishings with as many drop-cloths or sheets as needed.
-
2Set up a ladder or scaffolding that is tall enough to allow you to reach the ceiling without straining.Advertisement
-
3Put on safety glasses to protect your eyes from loose texture and dripping paint.[1]
-
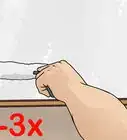
4Vacuum the ceiling using a hand-held vacuum cleaner with a soft-bristled attachment, being careful not to damage the texture.
-
5Tape around all the wall edges with painters tape if you are painting the ceiling a color that differs from the walls. If the walls and the ceiling will be the same color, you can skip this step.[2]
-
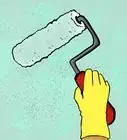
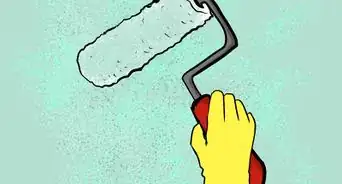
6Decide on your application technique.
- If you choose to use a roller, be sure to get one with a 1 inch (2.54 cm) thick nap to ensure full coverage.[3]
- A spray gun can also be used and may save some time but it might be necessary to practice on a different surface first to get a feel for the way the gun handles and how far you should hold the sprayer to the surface for the best coverage.


Advertisement
Part 2
Part 2 of 2:
Painting the Ceiling
-
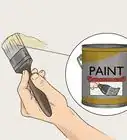
1Load textured paint into a paint pan, if you're using a roller, or a spray gun.[4]
- Textured paint is thicker than normal paint and is designed for textured surfaces. There are different varieties for different textures so be sure to choose the correct paint for your texture. For example, coarse paint for a coarse or popcorn ceiling.
-
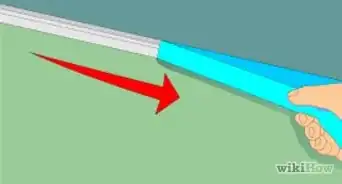
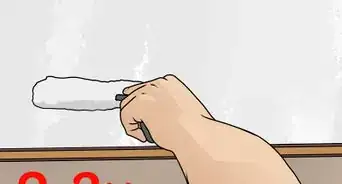
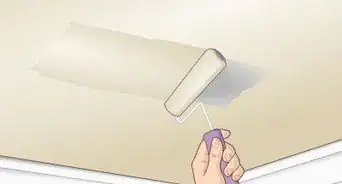
2Roll or spray the textured paint onto the ceiling.
- If using a roller, be sure to press gently and use slow, even strokes.
- If using a spray gun, spray lightly and evenly.[5]
-
3Continue painting until you have covered the entire ceiling. Don't worry if your coverage is not perfect. You will have the opportunity to catch any missed spots when you apply a second coat.
-
4Allow the paint to dry fully.
-
5Apply a second coat of paint, making sure to change the direction of your roller or sprayer. For example, if your first strokes were north/south, paint the second coat in an east/west direction.
-
6Allow the second coat to dry fully.
-
7Paint around the edges of the ceiling, close to the walls, with a paintbrush.
-
8Touch-up any missed spots with a paintbrush.
-
9Let the paint dry again.
-
10Remove tape and drop-cloths or sheets.


Advertisement
Community Q&A
-
QuestionIf I paint a crack on a textured ceiling, will I see it?
 Community AnswerAt first, you will not be able to see it; after it dries, it will start to show little by little.
 -
QuestionWhat kind of paint should I use on stucco ceilings?
 Community AnswerFor stucco, start with a coat of masonry sealant, then when it is dry, at least 2 coats of water based paint.
 -
QuestionOn a cathedral ceiling that is textured, the drywall tape across the center line is coming loose. Is there a way to reattach it?
 Community AnswerUse a small ladder and strong tape (duct tape). Climb up the small ladder and put the strong tape over the drywall tape.
Advertisement
Things You'll Need
- Drop-cloths or sheets
- Ladder or scaffolding
- Safety glasses
- Hand-held vacuum
- Painters tape
- Texture paint
- Roller with 1 inch (2.54 cm) thick nap or spray gun
- Paint pan
- Paintbrush


References
About This Article

Jeff Baldwin
Residential Painter
This article was co-authored by Jeff Baldwin. Jeff Baldwin is a Residential Painter and the Owner of Baldwin Custom Painting. With two decades of painting experience, Jeff specializes in high-end residential and small commercial painting projects. Dedicated to quality craftsmanship, Jeff and Baldwin Custom Painting provide bonded/insured, licensed, and lead-safe certified services in residential painting, light commercial painting, and wood refinishing. This article has been viewed 117,790 times.
How helpful is this?
Co-authors: 10
Updated: February 24, 2023
Views: 117,790
Categories: House Painting | Ceilings
Advertisement