This article was co-authored by Brandon Beckwith. Brandon Beckwith is a House Cleaning Specialist and the CEO of Reliable Housekeeping in Sacramento, California. Brandon and his team specialize in house cleaning such as maintenance cleaning, deep cleaning, move in/out cleaning, apartment cleaning, as well as commercial cleaning, window cleaning, and carpet cleaning. All members of the Reliable Housekeeping team receive background checks and professional training. Their family-owned and operated business is licensed, insured, and bonded.
There are 14 references cited in this article, which can be found at the bottom of the page.
This article has been viewed 17,724 times.
Kota stone is a type of fine-grained limestone that originates from the Kota region of Rajasthan, India. The mineral is a popular choice for floors and other decorative surfaces, thanks to its attractive natural coloration, resistance to dust and moisture, and affordability. While Kota stone is highly durable and almost effortless to maintain once installed, it does require an occasional polishing to look its best.
Steps
Performing Routine Polishing by Hand
-
1Pick up a polishing product that’s safe for use on natural stone. There are lots of different types of stone polishes out there, from powders and sprays to creams and waxes. All of them work the same way—they use tiny abrasive particles to gently remove imperfections from stone surfaces (with the help of a little elbow grease).[1]
- You’ll find a wide selection stone polishing products at hardware stores or home improvement centers. If you’re looking for a specialty product, you may need to search online.
- Avoid products formulated for harder types of stone, such as sandstone, granite, or quartz. These can scratch soft varieties of stone like Kota stone.
- Steer clear of polishes that list lemon juice, vinegar, or citric acid among their active ingredients, as well. These can also be hard on limestone.[2]
-
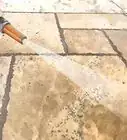
2Wipe your surface down with a dry cloth. It's important to remove dust, dirt, and food particles on the surface before polishing Kota stone. That way, you won't have to worry about making a mess or working foreign substances into the stone's pores.[3]
- Sweep stone flooring with a stiff-bristled broom or use a vacuum to suction up loose debris.
- You can also go a step further and scrub your surface with a cloth or sponge dampened with a mild soap solution. This won't generally be necessary unless it's especially dirty, though.[4]
Advertisement -
3Apply a small amount of polish to the surface you’re treating. If you’re using a spray, simply give the surface a few light spritzes. If you’re using a powder, dust the targeted area with a light coat and spray it with enough water to form a thin slurry. Waxes, creams, and liquid polishes can be applied directly to a folded cloth, which you'll need to do your buffing anyway.[5]
- Be careful not to use too much polish, as this could leave behind a greasy film or even cause etching or other damage.
- To get a better idea of how much polish you should use, check the directions provided on the packaging of the specific product you’re working with.
-
4Buff the surface thoroughly using smooth, circular motions. Take a soft, lint-free cloth and massage the polish into the stone, applying moderate pressure as you do. Focus on spreading a thin coat of polish evenly over the entire surface or section that you’re treating.[6]
- Microfiber cloths are ideal for polishing materials with delicate finishes like natural stone.[7]
- If you don’t have a suitable cloth on hand, you can also use a sturdy paper towel or the soft side of a kitchen sponge.
- To polish broad surfaces quickly and more efficiently, you also have the option of buying or renting a rotary power polisher and fitting it with a soft fabric polishing pad.
-
5Work in 2–3 ft (0.61–0.91 m) sections. Once you're finished with your first section, move over to a neighboring part of the surface and carry on. Re-apply a small amount of additional polish to your surface or cloth, if needed. Continue in this way until you've given the whole surface some attention.[8]
- Go easy on the polish following your initial application to avoid overdoing it.
Tip: Get in the habit of polishing your Kota stone every 6-12 months, or as often as desired to help retain its full luster.
-
6Wipe off any excess polish with a separate, clean cloth. Most quality stone polishes are specially formulated so as to not leave behind sticky residue. However, if the stone looks slick or filmy after polishing, give it a quick once-over with a fresh cloth or paper towel. This will help remove any lingering polish, leaving it looking glossy and new.
- If you’re using a paper towel, make sure it’s one that doesn’t shed small bits of paper. Otherwise, the stone may end up with a dull, dusty appearance.
-
7Rinse the surface with clean water if you used a powder. A single cloth or paper towel may not be able to pick up the wet, gritty slurry produced by mixing polishing powders with water. In this case, you'll need to wipe the stone with a wet sponge, or trickle some water directly onto your surface and use your cloth or sponge to "mop" it before sucking up the standing liquid with a wet vacuum.[9]
- Leftover polishing powder could cause weathering or discoloration if it's allowed to remain in contact with the stone.


Removing Scratches with a Machine Polisher
-
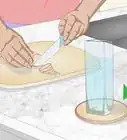
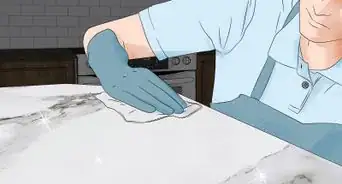
1Wash the surface with a pH-neutral stone cleaner. Application methods may vary depending on the product. With most stone cleaners, however, all you need to do is dampen a soft cloth or sponge, pour on a little of the cleaning liquid, and give your surface a good wipedown. Follow the instructions for the product you’re working with closely for best result.[10]
- Stone cleaners are available at most major hardware stores and home improvement centers, as well as select gardening centers and greenhouses.
- Stay away from abrasive cleaning tools like scrubbing brushes or the rough side of a kitchen sponge. These can easily strip the sealant from your surface, and could even damage the stone itself.[11]
Alternative: Make your own gentle cleaning solution by filling a small container with filtered water and adding a few drops of a mild, phosphate-free natural dishwashing liquid.[12]
-
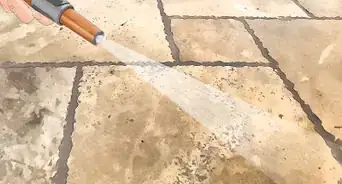
2Rinse the stone with water. Wet a separate cloth or sponge and use it to go over each part of the surface that you just cleaned. Alternatively, you can pour a little water directly onto the stone and use your cloth or sponge to distribute it before suctioning up the excess with a wet vacuum.[13]
- It’s important that you remove all lingering traces of cleaner or detergent. Otherwise, you may notice unsightly spots or streaks on your surface after you’ve polished it.
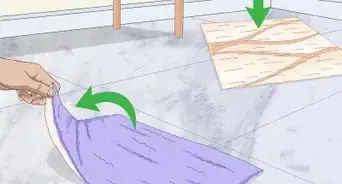
- Don’t allow your surface to dry completely. It’s generally best to polish softer varieties of stone like Kota stone while they’re slightly wet.
-
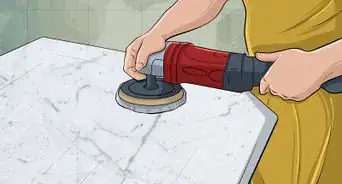
3Go over the damp surface with a 3,000-grit diamond polishing pad. Fit a rotary power polisher with the circular pad, set it to the lowest speed, and hold the pad flat against your surface. Move the polisher over the surface in loose, elliptical strokes, resting your free hand on the back of the tool to create steady pressure. The whirling pad will buff the stone to a smooth, reflective finish.[14]
- If you don’t have a power polisher, your polishing pad will also fit on an ordinary orbital sander.
- A full-sized floor polisher can save you time and energy when polishing Kota stone floors.[15]
- You can use a separate polishing product along with your power polisher if you like, but it’s not strictly necessary, since the polishing pad itself is slightly abrasive.
-
4Work in 2–3 ft (0.61–0.91 m) sections until you’ve covered the entire surface. Each time you start a new stroke, overlap the previous stroke by 4–6 inches (10–15 cm) to ensure that each part of the stone receives multiple passes. You’ll also be less likely to miss a spot with this technique.[16]
- The tracks left behind by the rapidly-spinning polishing pad should make it easy to see which sections you’ve already been over and which ones still require attention.
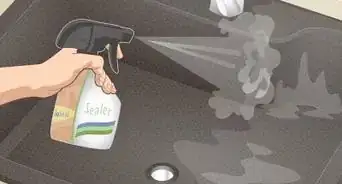
- Fill a spray bottle with water and keep it close at hand while you work. That way if your surface begins to dry out, you can simply spray it a few times to restore the protective layer of moisture.
-
5Wipe the stone clean with a wet sponge. Grab your rinsing cloth or sponge again and hold it under the faucet or dunk it in a container of fresh water to saturate it. Then, run it back and forth over the polished surface from edge to edge. This second wipedown will help pick up the powdery slurry that’s accumulated on your surface as a result of polishing.[17]
- Wring out and rewet your sponge periodically so you’re not just pushing wet dust and grit around.
- The best way to clean floors and other large surfaces is to use a wet vacuum with a squeegee attachment.[18]
- Allow your surface to air dry completely after wiping it. This shouldn't take more than a few minutes, in most cases.
-
6Repeat the process one or more times to get a smoother, glossier finish. When you’re done with your first round of polishing, you have the option of swapping out your polishing pad for one with an even higher grit and doing it all over again. Carry out your follow-up rounds the same way you did the first, proceeding one small section at a time and finishing with a wipedown with a wet cloth or sponge.[19]
- An ultra-fine 11,000-grit pad will work perfectly for subsequent rounds of polishing.
- Repeated polishings aren’t a must, but they’re strongly recommended if you want your surface to really sparkle.
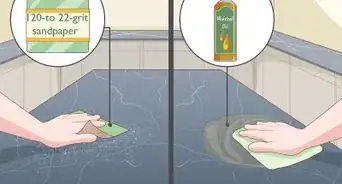
- If your Kota stone came in a rough finish, it may take as many as 7 rounds with progressively-higher grits to make your surface shine.


Warnings
- If not properly cleaned and maintained, Kota stone can become prone to flaking and chipping.⧼thumbs_response⧽
Things You’ll Need
Maintaining Kota Stone Surfaces
- Polishing wax, cream, powder, or spray.
- Soft, lint-free cloth
- Soft sponge (optional)
- Sturdy paper towels (optional)
Buffing out Scratches and Stains
- pH-neutral stone cleaner
- Soft cloth or sponge
- Water
- Rotary power polisher or orbital sander
- 3,000-grit diamond polishing pad
- Wet vacuum (optional)
- 11,000-grit diamond polishing pad (optional)
- Spray bottle (optional)


References
- ↑ https://homesteady.com/12450314/how-to-polish-limestone
- ↑ https://www.naturalstoneinstitute.org/default/assets/File/stone-professionals/commercial_care_clean.pdf
- ↑ https://www.howtocleanthings.com/how-to-clean-limestone/
- ↑ https://www.marmol.com/keeping-it-clean/tips-keeping-limestone-clean/
- ↑ https://homesteady.com/12450314/how-to-polish-limestone
- ↑ https://www.youtube.com/watch?v=Cqtvhj9Do2c&feature=youtu.be&t=18
- ↑ https://www.architecturaldigest.com/story/how-to-clean-kitchen-countertops
- ↑ https://homesteady.com/12450314/how-to-polish-limestone
- ↑ https://www.howtocleanthings.com/how-to-clean-limestone/
- ↑ https://www.seattletimes.com/sponsored/seven-tips-for-cleaning-natural-stone/
- ↑ https://usenaturalstone.org/5-common-mistakes-avoid-cleaning-natural-stone-surfaces/
- ↑ https://www.naturalstoneinstitute.org/default/assets/File/stone-professionals/commercial_care_clean.pdf
- ↑ https://homesteady.com/12450314/how-to-polish-limestone
- ↑ https://www.youtube.com/watch?v=O6y4lMuuxio&feature=youtu.be&t=161
- ↑ https://www.youtube.com/watch?v=kE18NRHqXlM&feature=youtu.be&t=35
- ↑ https://www.youtube.com/watch?v=Z0jU1aIU26Y&feature=youtu.be&t=93
- ↑ https://www.bobvila.com/articles/how-to-polish-marble/
- ↑ https://www.youtube.com/watch?v=guyvAuIkulA&feature=youtu.be&t=38
- ↑ https://www.youtube.com/watch?v=854nZiPRgTE&feature=youtu.be&t=369
About This Article