This article was co-authored by wikiHow Staff. Our trained team of editors and researchers validate articles for accuracy and comprehensiveness. wikiHow's Content Management Team carefully monitors the work from our editorial staff to ensure that each article is backed by trusted research and meets our high quality standards.
The wikiHow Video Team also followed the article's instructions and verified that they work.
This article has been viewed 34,134 times.
Learn more...
Natural feathers are great for arts and crafts, but don’t just throw them in a box as you might with artificial feathers. Bird feathers carry germs as well as parasites that feed on them, so make sure to clean any feathers you’ve collected thoroughly to kill off any nasty bugs. This not only ensures that you stay healthy, but that pests like mites don’t eat up and destroy your beautiful feathers before you’re ready to turn them into a work of art.
Steps
Sterilization
-
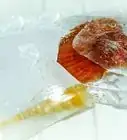
1Soak feathers in alcohol and peroxide for 30 minutes to sterilize them. Mix equal parts isopropyl alcohol and hydrogen peroxide in a container large enough to hold your feathers. Submerge the feathers in the solution and let them soak for at least half an hour.[1]
- The alcohol kills any active viruses and mites, while the peroxide kills bacteria and even brightens up the colors of the feathers for an added bonus.
- The higher the concentration of the alcohol and peroxide you use, the better. It’s fine to use rubbing alcohol if it contains at least 70% isopropyl alcohol.
-
2Wash feathers with mild dish soap and water to remove dirt and debris. Rinse each feather gently with clean water and carefully rub some dish detergent onto them, moving your fingers from the base to the tip of the feather with the grain of the plumes. Rinse the soap off the feathers thoroughly with clean water, rubbing your fingers along them from base to tip again to remove all the suds.[2]
- This cleans off any dirt and other substances clinging to the feathers.
- An alternative technique is to swish the feathers around in a container or sink full of soapy water, then rinse them off gently under running water.
Advertisement -
3Place the feathers in a warm, sunny place to air dry. Arrange the feathers in a single layer on a pan or in a container of some kind. Stick the container in a window sill or another spot where it’s nice and warm, dry, and sunny.[3]
- Alternatively, use a hair dryer to dry out each feather, especially if you don’t have anywhere warm to put the feathers to air dry quickly.
- If the feathers take too long to dry, they can grow mold and get fungus infections. Don’t leave them to air dry if the climate is cold and wet.
-
4Fluff up any matted or misshapen feathers back up by hand. Rub your fingers along the feathers, going with the grain from the base to the tip, to reshape them before you store them. This helps ensure they retain their natural, beautiful shape while in storage.[4]
- Note that some types of feathers with really delicate fluff, such as ostrich feathers, may be very hard to fluff up by hand after soaking and washing them. If you want these types of feathers for crafts, consider purchasing them pre-cleaned and fluffed from a commercial feather seller.


Storage
-
1Rub citronella oil on your hands to repel bugs. Citronella essential oil is a natural bug repellant and also has antifungal properties. Put a few drops of the oil in one of your palms and rub your hands together to coat them before you handle your feathers.[5]
- The oil transfers to the feathers while you pack them up to keep them fresh and repel any bugs that may be looking for a snack.
- Another option is to put a few drops of citronella oil on a clean cloth and place it into the bag with the feathers.
-
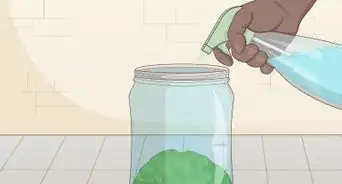
2Place dry feathers inside a sealable plastic bag and seal the bag tightly. Choose a sealable plastic bag, such as a zip-top bag, large enough to hold all the feathers you want to store. Gently slide the feathers into the bag, squeeze out any excess air, and close the top tightly to seal them inside and protect them against bugs and mold.[6]
- Use another type of sealable container as an alternative to a bag if you prefer.
- If you have feathers from different birds, put them in separate bags to isolate them from one another in case 1 bird had mites and the other didn’t and to keep them organized for your future crafts.
-
3Put bags of feathers in a dry place away from direct sunlight. Somewhere like a chest, drawer, or cupboard is a good spot to store your feathers. Tuck your feathers carefully away in your chosen storage place until you’re ready to use them for arts and crafts, so the colors of the feathers don't get faded by sunlight.[7]
- If you have any cedar planks or non-toxic pure cedar moth balls, stick some in with the bag for an extra layer of bug protection.
-
4Re-sterilize any feathers that develop loose fluff and tiny holes in storage. These can be signs of mites that you didn’t get rid of before or that somehow found their way to the feathers in storage. Isolate any feathers that develop these symptoms and repeat the sterilization process from the beginning.[8]
- For additional protection, sprinkle a small amount of flea powder into the bags with the feathers after you re-sterilize them to repel mites and beetles.


Warnings
- You might have heard that freezing feathers is another way to sterilize them, but this may not be 100% effective. To be safe, stick to the washing and soaking method of sterilization.[9]⧼thumbs_response⧽
Things You’ll Need
- Mild dish detergent
- Water
- Citronella essential oil
- Sealable plastic bags
- Isopropyl alcohol
- Hydrogen peroxide
-Step-11.webp)

References
- ↑ https://daragallery.wordpress.com/2013/07/22/sanitizing-feathers-for-crafts/
- ↑ https://www.featherfolio.com/blog/guide-to-feather-cleaning-and-care
- ↑ https://daragallery.wordpress.com/2013/07/22/sanitizing-feathers-for-crafts/
- ↑ https://www.featherfolio.com/blog/guide-to-feather-cleaning-and-care
- ↑ http://www.naturalfeathers.com/tag/how-to-care-for-feathers/
- ↑ https://daragallery.wordpress.com/2013/07/22/sanitizing-feathers-for-crafts/
- ↑ https://daragallery.wordpress.com/2013/07/22/sanitizing-feathers-for-crafts/
- ↑ https://www.featherfolio.com/blog/guide-to-feather-cleaning-and-care
- ↑ https://daragallery.wordpress.com/2013/07/22/sanitizing-feathers-for-crafts/
About This Article


-Step-11.webp)