This article was co-authored by wikiHow staff writer, Nicole Levine, MFA. Nicole Levine is a Technology Writer and Editor for wikiHow. She has more than 20 years of experience creating technical documentation and leading support teams at major web hosting and software companies. Nicole also holds an MFA in Creative Writing from Portland State University and teaches composition, fiction-writing, and zine-making at various institutions.
This article has been viewed 300,552 times.
Learn more...
This wikiHow teaches you how to record a Zoom meeting using your iPhone or iPad. Your iPhone or iPad's built-in screen recording feature makes it easy to record any Zoom meeting, whether you're hosting or simply attending. When you're hosting (or co-hosting) a meeting and using the licensed version of Zoom, you'll also have the option of recording to the cloud, allowing you to share the finished video with anyone who couldn't attend.
Steps
Recording as a Host
-
1Start a Zoom meeting. If you're hosting (or co-hosting) a Zoom meeting from your iPhone or iPad and have a licensed version of Zoom, you can use Zoom's built-in recording tools to save a video of your meeting to the cloud.[1]
- If you're using the free version of Zoom or you are not the host, you can still record your meeting using your iPhone or iPad's Screen Recording tool.
- Recording a meeting with this method saves the finished video to the cloud, not your iPhone or iPad's storage.[2]
-
2Tap the three-dot menu ••• . It's at the bottom-right corner.Advertisement
-
3Tap Record to the Cloud on the menu. You should now see "Recording" and a cloud icon at the upper-right corner of the screen. This will stay in the upper-right area as you continue to record.
- To pause the recording briefly, tap Recording and select Pause.[3]
-
4Tap Recording when you're ready to stop recording. It's at the top-right corner.
-
5Tap the stop button. A confirmation message will appear.
-
6Tap Stop to confirm. Once you stop recording, the video will begin to process, which can take a while (at least the length of your actual meeting time). Once the recording is processed, you'll receive an email from Zoom containing two links: one that allows you to view and manage the video, and another that allows you to share it with others.
- You can also find the finished video in the Recordings area of the Zoom dashboard.


Recording as a Participant
-
1Add the screen recording option to your Control Center. If you're not the host of the meeting (or if you don't have the paid version of Zoom), you can use this method to record your meeting. Here's how to add screen recording to your Control Center:
- Open your iPhone or iPad's Settings app.
- Tap Control Center in the third group of settings.
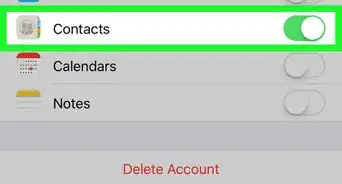
- If the "Access Within Apps" switch is not enabled (green), tap it to enable it now.
- If you see "Screen Recording" in the first section ("INCLUDED CONTROLS"), the feature is already in your Control Center and there's no need to make a change.
- If not, tap + next to “Screen Recording” in the "MORE CONTROLS" section. This adds it to the top section.
-
2Open Zoom on your iPhone or iPad. It’s the blue icon with a white video camera inside. You’ll usually find it on the home screen or in the App Library.
- If you’re not already signed into your Zoom account, sign in now.
-
3Select whether you’re starting or joining a meeting. You can record the screen whether you're joining or creating a meeting.
- Tap New Meeting if you’re the one hosting the meeting.[4] This brings you to a new screen, but don’t hit the “Start Meeting” button there yet.
- Tap Join (the blue icon with a blue and white “+” inside) if you’re joining someone’s meeting, and then enter the Meeting ID (provided to you by the meeting’s host). This brings you to a new screen but don’t hit the “Join” button there yet.
-
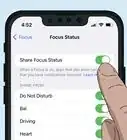
4Open your iPhone or iPad's Control Center when you're ready to record.
- If you're using an iPhone or iPad that doesn't have a separate Home button, swipe down from the top-right corner of the screen.
- If you do have a Home button, swipe up from the bottom of the screen.
-
5Tap the record button. It’s the circle inside of another circle. The button will display a brief countdown and then the screen will start recording.
-
6Close the Control Center. This returns you to the previous screen, which is the Zoom meeting.[5] The screen is now recording.
- If your phone or tablet has a Home button, press it to close the Control Center.
- If there's no Home button, swipe up from the bottom of the screen or just tap any blank area to close Control Center.
-
7Return to Zoom and join (or start) the meeting. The button you tap depends on whether you started a new meeting or are joining an existing one. The meeting will begin, and it's being recorded.
-
8Reopen the Control Center when you're ready to stop recording. As you did earlier, swipe down from the top-right if you don't have a separate Home button, or swipe up from the bottom if you do.
-
9Tap the record button to stop. It’s the same button you tapped earlier, except now it’s red. This ends the recording. You’ll find the finished video in your iPhone or iPad’s Photos app.


Community Q&A
-
QuestionWhere are the recordings stored?
 Community AnswerIf you have iOS 10, 11, 12, etc., they should be in the "Files" app. If you have lower than iOS 10, they will probably be on whatever app you recorded them on.
 -
QuestionWill it record audio if I am listening on headphones?
 Community AnswerIt will record it either way. It does not matter if you are listing with headphones.


References
- ↑ https://support.zoom.us/hc/en-us/articles/203066759-Recording-on-iOS-and-Android
- ↑ https://support.zoom.us/hc/en-us/articles/203741855-Cloud-recording
- ↑ https://www.youtube.com/watch?v=MkBS8atl850
- ↑ https://support.zoom.us/hc/en-us/articles/201362993-Getting-started-with-iOS
- ↑ https://support.apple.com/en-us/HT202769
About This Article

1. Start a meeting.
2. Tap the three dots.
3. Tap Record to the Cloud.
4. Tap Recording.
5. Tap Stop.
6. Tap Stop to confirm.