This article was co-authored by Chad Zani. Chad Zani is the Director of Franchising at Detail Garage, an automotive detailing company with locations around the U.S. and Sweden. Chad is based in the Los Angeles, California area and uses his passion for auto detailing to teach others how to do so as he grows his company nationwide.
There are 9 references cited in this article, which can be found at the bottom of the page.
This article has been viewed 93,351 times.
Removing unsightly scuff marks from your car’s vinyl surfaces is a simple task. You have a variety of options available, depending on the severity of the scuff. You can make your own vinegar-based cleaner or purchase a degreaser made for auto interiors. Spray your cleaner on the surface and use a magic eraser scrub pad to buff out the scuff. For deeper marks, you can order an easy to use scratch removing kit to make your vinyl panel good as new.
Steps
Using a Vinegar-Based Cleaner and Magic Eraser
-
1Create a homemade vinegar-based cleaner. If you don’t want to purchase a specially made degreaser or scuff remover, you can try making a homemade cleaner first. Combine equal parts of white vinegar and water. Pour the mixture into a clean spray bottle.[1]
-
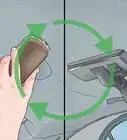
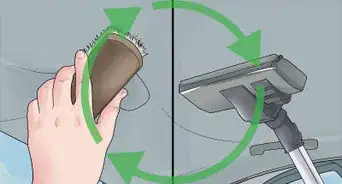
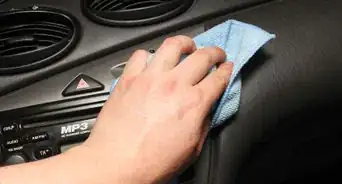
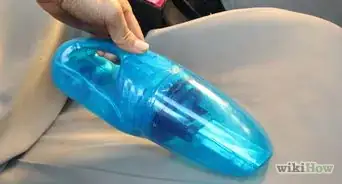
2Use a magic eraser to buff out scuffs. Whether a brand name or generic product, you can find magic eraser scrubbing pads at your nearest home goods, home improvement, or department store. They’re the easiest and most effective pad to use when buffing out scuffed or scratched vinyl. Further, they won’t wear away of the vinyl surface like a more abrasive pad would.[2]Advertisement
-
3Spray the cleaner onto the scuffed surface and wipe. Spray enough to saturate the scuffed portion of the vinyl panel. Use the magic eraser to wipe it down using long, even strokes. Wipe away residue with a microfiber towel when you're finished.
-
4Try adding baking soda to your cleaning solution. For deeper or more serious scuffs, you may need a little extra abrasion. Try adding enough baking soda to form a thin paste. If you've added a cup (240 mL) each of water and vinegar, try adding two or three tablespoons of baking soda. Mix well until the baking soda is well suspended.[3]


Using Degreaser on Surfaces Scuffs
-
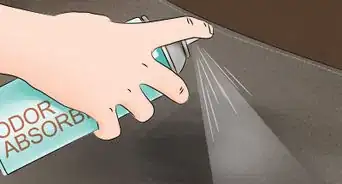
1Purchase an auto interior degreaser. Purchase a degreaser concentrate if you’ve already tried wiping the surface down with a homemade cleaner, or if you just want to use a professional-grade detailer. You can find degreasers for car interiors at your local automotive or home improvement store.[4]
- Since it’s a concentrated product, you’ll have to dilute the degreaser when you’re ready to use it.
-
2Dilute your degreaser in four parts of water. If you’re using a store-bought degreaser, you’ll need to dilute it before using it on your car vinyl. Mix one part degreaser with four parts of water. Then pour your solution into a clean spray bottle.[5]
-
3Spray the scuffed surface and scrub. Spray your diluted degreaser or homemade cleaner directly onto the scuffed vinyl.[6] Scrub with your magic eraser using smooth, even motions until you’ve removed the scuff.[7]
- For tight spaces that you can’t spray directly, you can spray the scrub pad. If the space is too tight for the scrub pad to access, try using a hard bristle toothbrush.
-
4Replace your pad as necessary. The vinyl surface texture will determine the number of scrub pads you’ll need. Smoother surfaces will most likely require only a single pad. If the texture is rougher or more rubberized, you’ll likely wear through a pad and will need to replace it as necessary until you’ve removed the scuff.[8]
-
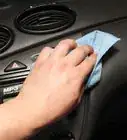
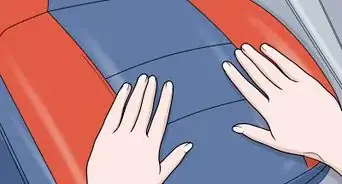
5Wipe away residue with a microfiber towel. When you’ve finished buffing out the scuff, you’ll be left with residual cleaner and light debris. Wipe it away using a dry microfiber cloth. Using microfiber will leave you with a lint-free finish.[9]


Dealing with Deeper Scuffs and Scratches
-
1Purchase a complete scratch removing kit. Consider purchasing a professional kit if the scuff is more than just superficial or if you’re dealing with scratched vinyl. The kit will include a glue to fill in the deep scuff or scratch, an activator to dry the glue, and a dye that matches your vinyl color.[10]
- You can order a scratch removal kit online for about 50 US dollars. Your kit will come with a factory-matched dye to blend in with your vinyl color. When you order your kit, you can search for your car’s make and model to identify the correct vinyl color.
-
2Sand the scratched area. Use a piece of 220 grit sandpaper to smooth over the scratch or deep scuff. Try to remove any roughness around the scratch so its edges are flush with the vinyl surface.[11]
- Some scratch removal kits provide sandpaper. If you don’t have any fine grain sandpaper on hand, you can check kits’ contents before ordering and purchase one that supplies sandpaper.
-
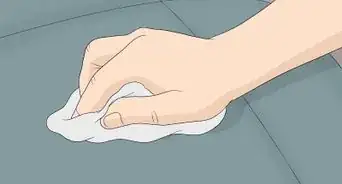
3Clean the area after sanding. Wipe down the area with a damp cloth. If the area is greasy or grimy, clean it with a homemade vinegar solution or store-bought auto interior cleaner. Use a clean microfiber towel to dry the area.[12]
-
4Apply glue to the scratch and spread. If the area is still at all damp after wiping it down with microfiber, wait for it to dry completely before applying glue. Dab a small amount of the superglue that came in the scratch removal kit. Smooth the glue over the scratch using a narrow palette knife.[13]
- If your kit provided a glue activator, apply it over the glue to instantly harden it.
-
5Sand and clean the glue when it’s dry. If you haven’t used an activator, wait for the glue to dry completely. Use your 220 grit sandpaper to smooth over the glued surface. Then wipe down the area with a damp cloth, and dry it with a microfiber towel.[14]
-
6Apply multiple light coats of factory-matched dye. The dye will come in an aerosol sprayer. Spray a light, even coat over the patched area, and hold a piece of cardboard under the area to help protect surrounding surfaces. Wait for the dye to dry, and reapply until you’ve achieved even coverage.[15]
- If you have a heat gun handy, you can use it to dry the dye faster. Hold it about 12 inches (about 30 cm) away from the dyed surface.


Things You'll Need
- White vinegar
- Clean spray bottle
- Magic eraser scrub pad
- Microfiber towel
- Auto interior degreaser
- Auto interior scratch removal kit (including superglue and factory-matched plastic dye)
- Fine grit sandpaper


References
- ↑ https://www.thebalance.com/homemade-car-cleaning-products-1387717
- ↑ https://www.youtube.com/watch?v=nZkFKNWrLcU&feature=youtu.be&t=16
- ↑ https://www.thebalance.com/homemade-car-cleaning-products-1387717
- ↑ https://www.youtube.com/watch?v=nZkFKNWrLcU&feature=youtu.be&t=215
- ↑ https://www.youtube.com/watch?v=nZkFKNWrLcU&feature=youtu.be&t=367
- ↑ https://www.youtube.com/watch?v=nZkFKNWrLcU&feature=youtu.be&t=405
- ↑ https://www.youtube.com/watch?v=nZkFKNWrLcU&feature=youtu.be&t=413
- ↑ https://www.youtube.com/watch?v=nZkFKNWrLcU&feature=youtu.be&t=325
- ↑ https://www.youtube.com/watch?v=nZkFKNWrLcU&feature=youtu.be&t=407
- ↑ https://scratchwizard.net/articles/how-to-repair-scratched-interior-door-panels/
- ↑ https://scratchwizard.net/articles/how-to-repair-scratched-interior-door-panels/
- ↑ https://scratchwizard.net/articles/how-to-repair-scratched-interior-door-panels/
- ↑ https://scratchwizard.net/articles/how-to-repair-scratched-interior-door-panels/
- ↑ https://scratchwizard.net/articles/how-to-repair-scratched-interior-door-panels/
- ↑ https://scratchwizard.net/articles/how-to-repair-scratched-interior-door-panels/
About This Article

If you need to remove scuff marks from your car vinyl, try using vinegar and a magic eraser. First, mix equal parts white vinegar and water. Spray the mixture onto the scuffed surface, let it soak in for a moment, then wipe it down with a magic eraser scrubbing pad. These pads are abrasive enough to buff out scratches, but won’t damage the vinyl. If you have more serious scuffs, try adding a little baking soda to your vinegar cleaning spray. Or, purchase a heavy-duty auto interior degreaser. In most cases, you’ll need to mix this concentrated cleaner with 4 parts water before using it. To learn how to sand car vinyl to remove scratches, read on!