This article was co-authored by Patrick Johns and by wikiHow staff writer, Hunter Rising. Patrick Johns is a Home Improvement Specialist and the Owner of CatchAll Handyman Services. With more than 28 years of experience, he has worked on a variety of home improvement projects, such as carpentry, plumbing, and door and window installations in both commercial and residential properties.
There are 15 references cited in this article, which can be found at the bottom of the page.
This article has been viewed 63,123 times.
Over time, the flat edges on a nut will wear down and round off, making it difficult to remove. Flat-edge and socket wrenches aren’t able to get a firm grip once it’s worn away, but there are other ways to take them off. If you have access to locking pliers, it will be the easiest to remove the nut. Make new flat edges on the nut with a file if you have the room to maneuver it. If the nut is still stuck, try using a blowtorch to loosen it up. No matter how you do it, you’ll easily be able to remove and replace the nut.
Steps
Using Locking Jaw Pliers
-
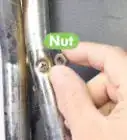
1Purchase a pair of locking jaw pliers from your local hardware store. Find a pair of pliers that have curved jaws and are serrated. These pliers work like vices that clamp objects tightly so they will not move when you let go of them.[1]
- Locking jaw pliers come in various sizes, so measure the width of the nut and choose a pair of pliers that have a larger-sized jaw capacity listed on the packaging.
- Ensure you have pliers with curved jaws instead of flat jaws. The curves will clamp onto the rounded nut easier.
- For larger sized nuts, you may need to use a pipe wrench. Simply tighten the jaws of the wrench around the nut and turn it counter-clockwise.
- Be aware that you may end up stripping the grooves on the nut, leaving marks and damaging the finish on it when using pliers.[2]
-
2Place the top jaw of the pliers against the nut and clamp them shut. Make sure most of the top jaw is in contact with the nut you want to loosen. This ensures that it will have the tightest grip. Squeeze the handles together to secure the pliers in place.[3]Advertisement
-
3Twist the bolt on the back of the pliers clockwise to tighten the grip. The pliers will have a metal bolt on the top handle of the pliers. Turn the bolt clockwise to make it tighter, or turn it counter-clockwise to make it looser. Tighten the pliers until they hold onto the nut by themselves.[4]
- If you have trouble locking the pliers, loosen the bolt slightly and try again.
-
4Hold the handles and turn the nut counterclockwise. Place your hand on the end of the handles so you have the most leverage. Use a firm amount of pressure to turn the nut counterclockwise. The nut should start to turn easily as long as it isn’t rusted.[5]
- Try using a lubricant like WD-40 if the nut won’t turn. Spray the nut and the threading so it is entirely lubricated.
-
5Release the pliers by depressing the paddle on the bottom handle. Hold onto the top handle with one hand while you push down on the metal paddle with the thumb on your other hand. This unlocks the pliers and makes them easy to remove.[6]
- Once the nut is loosened, you should be able to twist it by hand to remove it.


Filing the Nut
-
1Use short strokes with a metal file to flatten one side of the nut. Use a double-cut file or one that has 2 sets of diagonal teeth that overlap. Place the edge of the file against one of the rounded sides. Push the file forward while applying firm pressure so it shaves the metal from the nut. Continue filing until you have a flat edge on one side of the nut.[7]
- Wear safety glasses so you don’t get any metal shavings in your eye.
- Hold on to both sides of the file to get better leverage. Wear work gloves so you don’t hurt your hands.
- Move the file in one direction only. Moving it back and forth will only wear down the filing edge faster and make it more difficult to work with.
-
2File another flat edge on the opposite side of the nut. Make sure the flat edges are parallel with one another so you could securely hold the nut between the jaws of a wrench. Apply a firm amount of pressure to scrape away the metal. Remember to only file in one direction.[8]
- Use your non-dominant hand to support the file from the bottom while working on the opposite side of the nut.
-
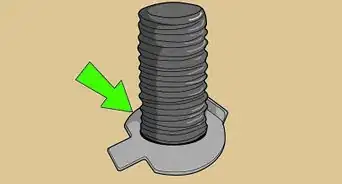
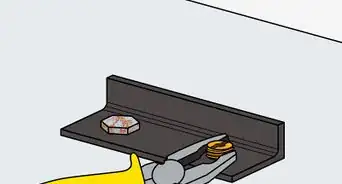
3Tighten a wrench onto the flat edges and turn the nut loose. Use a standard wrench with flat edges inside the jaws. Twist the tightening screw to make the wrench close around the nut so the jaws are gripping around the flat edges you just filed. Turn the nut counterclockwise to loosen it.[9]
- If the wrench still slips, try filing the edge more until it has a firm grip.
- Stick the blade of a screwdriver in between the wrench and the nut to use as leverage.[10]


Removing the Nut with Heat
-
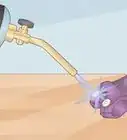
1Light a handheld propane torch with a striker. Point the tip of the torch away from your body and twist open the gas valve. You’ll hear the gas hiss as it releases. Place the striker over the torch nozzle and squeeze the striker to ignite the flame. Immediately turn the gas valve lower to get a smaller, more effective flame.[11]
- Propane torches can be purchased at your local hardware store.
- Wear safety glasses and work gloves to protect yourself from the flame.
- A multipurpose safety lighter will work in a pinch if you don’t have a striker.
-
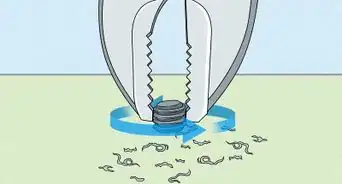
2Hold the torch so the flame contacts the nut for 30 seconds. Heat the nut evenly on every side. It will start to turn red or orange as it gets hotter and will loosen itself from the threading. After 30 seconds, turn off the torch by closing the gas valve.[12]
- Don’t use the torch if the nut is near any plastic or flammable materials.
- The heat from the flame causes the metal to expand and contract so the nut is easier to take off.
- Keep a fire extinguisher nearby in case there is an accident.
-
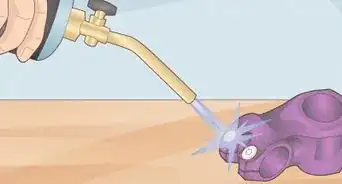
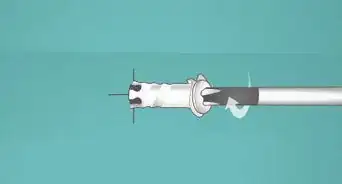
3Grab the nut with a pair of pliers and twist it loose. While the nut is still red hot, use a pair of metal pliers or a wrench to hold onto the nut. Turn it counterclockwise to loosen and remove it.[13]
- Wear sturdy work gloves to protect your hands if the heat transfers to the wrench or pliers.
-
4Drop the hot nut into water so it has a chance to cool. Hold the nut firmly with your wrench or pliers and drop it into a metal pot or an old coffee can filled with cold water. Submerging the nut will quickly cool it so you can handle it.[14]
- You may hear hissing or a metal clanking noise once you put it in the water, but this is a normal reaction.
- Don’t remove the nut fully unless you have a pot of water near you.
-
5Wait until the nut has cooled if you prefer to remove it by hand. If you don't have a metal container of water handy, you can remove the nut by hand. After loosening the nut with the wrench or pliers, let the nut sit for at least 10 minutes until it is cool enough to touch. Then, twist the nut by hand until it’s completely removed.[15]
- Don’t test the temperature of the nut with your bare hands. Wear thick work gloves.


Warnings
- Wear safety glasses when working with shaved metal or flames.⧼thumbs_response⧽
- Keep a fire extinguisher near your work area if you're working with an open flame.⧼thumbs_response⧽
- If you don't want to risk damaging the nut finish, cover it with a towel and turn it with an adjustable wrench instead of using pliers.[16]⧼thumbs_response⧽
Things You’ll Need
Using Locking Jaw Pliers
- Locking jaw pliers
Filing the Nut
- Metal file
- Safety glasses
- Work gloves
- Wrench
Using Heat to Loosen the Nut
- Propane blowtorch
- Safety glasses
- Work gloves
- Pliers


References
- ↑ https://youtu.be/jNYP2EmsDLo?t=20s
- ↑ Patrick Johns. Home Improvement Specialist. Expert Interview. 26 October 2021.
- ↑ https://youtu.be/jNYP2EmsDLo?t=38s
- ↑ https://youtu.be/jNYP2EmsDLo?t=46s
- ↑ https://youtu.be/R5d0Bgvjmlk?t=3m6s
- ↑ https://youtu.be/jNYP2EmsDLo?t=1m6s
- ↑ https://youtu.be/R5d0Bgvjmlk?t=5m42s
- ↑ https://youtu.be/R5d0Bgvjmlk?t=5m48s
- ↑ https://youtu.be/R5d0Bgvjmlk?t=6m9s
- ↑ https://youtu.be/M1s5FLhTagw?t=1m42s
- ↑ https://youtu.be/0x6yVVPx7Yo?t=3m39s
- ↑ https://youtu.be/R5d0Bgvjmlk?t=1m25s
- ↑ https://youtu.be/YRhcNsPBduI?t=23s
- ↑ https://youtu.be/9qSEfcIfYbw?t=1s
- ↑ https://youtu.be/R5d0Bgvjmlk?t=6m20s
- ↑ Patrick Johns. Home Improvement Specialist. Expert Interview. 26 October 2021.
About This Article

To remove a rounded nut, use a pair of pliers that have curved jaws and are serrated, such as locking jaw pliers, to turn the nut counterclockwise. Alternatively, you can use a file to flatten 2 sides of the nut so you can grasp it with a wrench to remove it. You can also use a propane torch to heat the nut on all sides for 30 seconds, grip it with pliers or a wrench, and turn it counterclockwise until it loosens enough that you can remove it. To learn how to lock a pair of jaw pliers into place to remove a rounded nut, keep reading!