X
wikiHow is a “wiki,” similar to Wikipedia, which means that many of our articles are co-written by multiple authors. To create this article, volunteer authors worked to edit and improve it over time.
The wikiHow Video Team also followed the article's instructions and verified that they work.
This article has been viewed 44,752 times.
Learn more...
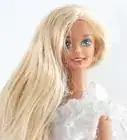
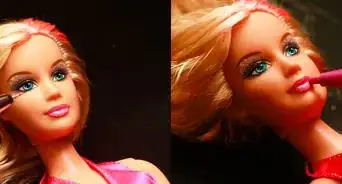
If you're not satisfied with the generic factory paint on an old Barbie, you can repaint it on your own. You can use pastels and colored pencils for a softer, more realistic look, or acrylic paints for a bold, stylized appearance.
Steps
-
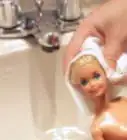
1Remove the factory paint. Using cotton swabs dipped in acetone, nail polish remover, or isopropyl alcohol, gently scrub off the factory paint. Get as much paint off as you can, as leftover can make a repaint difficult. Rinse the head immediately after the paint is gone to prevent damage to the plastic.
-
2Tie back the doll's hair. Keep all of the hair back and out of the doll's face, and covered with a cloth. This will prevent sealant from getting in her hair and making it sticky or stiff. Cover as much of the hair as you can, and pin it in place with a rubber band or hair elastic.Advertisement
-
3Apply two coats of spray sealant. Be sure to do this outside, as the chemicals used are very dangerous. Between each coat, let the head sit and dry for at least 15 minutes. You will need to spray the doll probably two or three more times in-between layers of painting, but this will be done at your discretion. Pay attention to when you need a fresh layer.
-
4Shade and blush with soft pastels, if you're using them. On a piece of printer paper, grind the pastels back and forth to scrape off powder, then paintbrushes to apply it to the head. Use pink and flesh-tone pastels to add blushing and depth to the face. Shade the cheeks with a natural pink, and use browns to darken the area around the doll's eyes and underneath her nose. If you want to, shade her cheekbones to look sharper. It's a good idea to seal after this layer.
-
5Fill in the whites of the eyes. With a white colored pencil or white paint, color in the doll's eyes in the shape that you want. You don't have to follow the sculpt outlines exactly, but you will need to work with the shape of the doll's head to make things look right.
- If you're using paint, as with every following layer, let the paint dry completely before continuing.
-
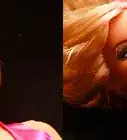
6Draw the eye outline and lashes. Use paint or pastel that's a darker shade of the doll's hair color to outline her eyes, following the shape that you defined with the white. Use the same color to add lashes around the outline, and an even darker shade to further define the lashes.
- If you're using paint, keep your brush strokes small and careful, avoiding thick, blocky lines.
-
7Color the irises and pupils. Choose a color for the doll's eyes, and fill in her irises. This is when you'll decide which direction the doll will be looking. Straight ahead is always fine, but it can add character to have her looking slightly off to the side. Black pencil will work for the pupil, but if you want something more striking, use small dots of black paint.
- Once the main eye is dry, use white paint to highlight the eyes. Small dots of white paint are good for highlighting the eyes. Use a very small brush, and dot just enough to make the doll's eyes look bright and alive. Don't use too much paint, as a big glob of it will just look sloppy. Start small; you can always add more.
-
8Outline the eyebrows. Use the pastels and a thin brush to make a soft outline for the shape of the doll's brows. It's important to outline first, as it's very easy to draw in brows that don't match if you rush. Go slowly, and fill in a shape that matches the doll's personality and desired expression.
-
9Fill in the brows and add an eye crease. With the same colored pencil that you used for the lashes, draw or paint the eyebrows with short strokes. You want to mimic individual hairs, not just a straight line across her forehead. Work very slowly and deliberately, as it's easy to wind up with brows that don't match.
- Above the upper outline of the eyes, add a small crease with a brown pencil (or black, if your doll has a dark skin tone) to give the eye more depth.
-
10Blush the lips with soft pastels or your paint. Using pink or red, blush the doll's lips to the desired shade. Vivid tones can look very good on Barbies, but a more natural look might be what works for you. It's very easy to overdo the lips, so go slowly and pay attention to what you're doing. Follow the doll's lip shape as closely as possible, as this makes it much easier to make the lips look right.
- If you want to add more detail, use a dark pink or red pencil to add small, vertical lines on the lips. Don't overdo it.
-
11Add freckles or beauty marks, if desired. If you want to, use small dots of brown or black paint to give the doll freckles or beauty marks. For freckles, scattered dots of multiple shades of brown look best, and for beauty marks, small, simple black dots are all you need.
-
12Apply the final coat of sealant. You will have needed to spray the head a couple of times throughout this process. Once you're all the way done painting, you'll need to add one final coat. Again, be sure to let the doll's head dry thoroughly before moving on to the next step.
-
13Gloss the eyes and lips. Using clear liquid gloss, paint the doll's eyes and lips. This adds shine that makes the doll look more alive, and it can make a huge difference in the final look. Let the gloss dry, and the repaint is done!
-
14Apply lashes, if desired. Lashes can be tricky to apply to small fashion dolls, but they can make a repaint really pop. If you choose to add lashes, carefully glue them along the upper outline of the doll's eye, using small pliers or tweezers to ease them into place. Craft glue works best for this. Make sure that the glue has fully dried before doing anything else with the doll.


Advertisement
Warnings
- Sealant is highly, highly toxic. Always spray it outside, and be very careful not to breathe it in. This warning is to be taken very seriously; the chemicals can cause severe respiratory problems, including lung cancer and other potentially fatal ailments.⧼thumbs_response⧽
- Doll repaints are not for children. Older teens may be able to do them, but it's not recommended to let younger children attempt proper repaints. The process is very delicate and difficult, and younger people may get very frustrated when the doll doesn't come out the way they want it to.⧼thumbs_response⧽
- If you make a mistake, you will likely have to start over. It's very difficult to fix errors during a repaint, so you'll either have to work around it or start from the beginning. Always work carefully to avoid unnecessary work if you mess up.⧼thumbs_response⧽
- Be aware that a repaint can potentially drop the value of the doll. Some people are willing to pay for the art of the repaint itself, but for collector's dolls, you will be losing a lot of value by altering the doll in such a dramatic way. Keep in mind that the finished doll may be something that only you will see value in.⧼thumbs_response⧽
- The final repaint will be more delicate than the original factory paint. Avoid touching the face whenever possible. The repaint can be chipped, rubbed off, or otherwise damaged fairly easily. Do not treat a customized doll like a toy, or allow small children to play with it. Poor care will result in a damaged repaint and more work if you want to fix it.⧼thumbs_response⧽
Advertisement
Things You'll Need
- Matte spray sealant
- Soft pastels, high-quality colored pencils, or acrylic paints and small paintbrushes
- Clear liquid gloss
- Printer paper
- Pencil sharpener
- (Optional) Doll lashes

About This Article
Advertisement