This article was co-authored by Barry Zakar. Barry Zakar is a professional handyman and the founder of Little Red Truck Home Services based in the San Francisco Bay Area. With over ten years of experience, Barry specializes in a variety of carpentry projects. He is skilled at constructing decks, railings, fences, gates, and various pieces of furniture. Barry also holds his MBA from John F. Kennedy University.
There are 7 references cited in this article, which can be found at the bottom of the page.
This article has been viewed 114,431 times.
Door trim, especially wood trim exposed to the weather, can rot and become damaged over time. It’s not too difficult to replace, but you do need to be able to use a miter saw. The old trim is easy to pull off with a pry bar. Then, cut the new trim to size and nail it in place. When you’re finished, stain or paint the trim to match it with the rest of your house.[1]
Steps
Removing Old Trim
-
1Cut through the caulking with a utility knife. Work your knife’s blade under the outside edge of the trim. You may also cut through some paint while doing this, but that’s okay. Cut all the way around the trim to free it.[2]
- Make sure to cut all the way through the caulking to avoid damaging the paint when you pry off the trim.
-
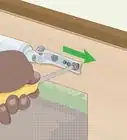
2Use a pry bar to pull off the trim. Slide the edge of the pry bar under the trim near a nail. You can tap a hammer against the back of the bar to help wedge it in. Pull back one piece of trim at a time, taking care not to damage the walls and door jamb. It doesn’t matter which side you start on, as long as you remove all the pieces you want to replace.[3]
- To protect the walls, hold a scrap of wood against the wall and rest the back of the pry bar against it as you work. There’s not really a way to protect the jamb besides being very careful when leveraging the trim.
Advertisement -
3Scrape off any remaining caulking with a knife. Use the utility knife or a chisel to remove any old caulk left over. You may also need to scrape down thick layers of paint to level out the space where the new trim will rest.[4]


Cutting the New Trim
-
1Measure the new trim against the door. First, purchase some trim from the home improvement store. Most trim comes in 8 or 10 ft (2.4 or 3.0 m) sections. Use your old trim as a sizing guide or hold the new trim against the door frame.[5] Mark the measurements with a pencil so you know how to size the trim.[6]
- You can always measure out the space around the door with a tape measure if the other options aren’t possible. Measure out the length and width of the trim space on all sides of the door to find out how much trim you need.
- Narrower trim can be a good choice for simplicity and appearance, but make sure you leave enough material to cover the gap between the door frame and wall.
- Wider trim stands out more, but it’ll cover more of the wall. Make sure you have enough space for it.
-
2Put on ear and eye protection before sawing. Cover your eyes with a pair of polycarbonate safety glasses. Miter saws are loud, so also put on a pair of earmuffs or foam earplugs. Avoid putting on gloves or any other loose clothing that could get caught in the saw.[7]
-
3Cut the trim pieces with a miter saw. Set the miter saw to cut at an angle of exactly 45°. Line up the trim and cut from the inside edge diagonally upwards to the outside edge. Cut a large piece of trim into the top piece and one of the sides.[8]
- It’s okay to leave the trim a little long at first. You can adjust this as needed later.
- It’s helpful to practice using the miter saw on scrap wood first. You are usually able to adjust the saw more than you expect to get a better-fitting joint.
-
4Cut the side trim to length. Line up the side pieces of trim against the door. If the trim is long, measure up from the bottom to mark how much length needs to be removed. Cut the bottoms of the side trim pieces evenly so they match and fit on the door frame.[9]
-
5Cut the top trim to the appropriate size. Hold the header against the 2 side pieces. This piece has miter joints on both sides, which should fit snugly against the rest of the trim. If you have to reduce the header, make sure the miter is set at a 45° angle. Redo the cut until the header fits in place.


Installing the New Trim
-
1Position the trim against the wall. Place the pieces without attaching them to double-check the fit. Pay attention to how the header piece fits on top of the side pieces. Make any adjustments needed by further cutting down the size of the trim.[10]
-
2Nail the side trim in place. Use a finish nailer to secure the trim. On the inside part, which covers the door jamb, use 4d or 1.5 in (3.8 cm) finishing nails. On the outside part, which attaches to the wall, use 6d or 2 in (5.1 cm) finishing nails to secure the trim.[11]
- Avoid placing the nails close to the ends of the trim.
- Depending on the thickness of your trim, you may need larger nails. Hold the nails up to the trim to see if they're long enough to go all the way through to the wall.
-
3Drill and nail the header in place. Stand on a stepstool to reach the top part of the door. Place the top trim, checking one last time to make sure it’s the right size. When finished, attach it the same way you did the other pieces.[12]
-
4Pre-drill holes in the trim’s corners. Push the trim pieces together to tighten them a little more. Measure about 1 in (2.5 cm) from the sides of the header. Drill a 1⁄16 in (1.6 mm) hole down through the top of the header. Measure down the side pieces and drill a hole through each from the outside edge.[13]
- Hold a piece of cardboard against the wall to prevent your tools from damaging it.
-
5Nail the trim pieces in place. Stick 3d or 1.25 in (3.2 cm) nails in each hole. Start on one side of the door. Alternate striking the top and side nails so that the trim doesn’t fall out of alignment. When finished, move on to the other side.[14]
-
6Caulk the holes, joints, and edges of the trim. The holes and miter joints can be filled with painter’s putty, wood filler, or a paintable acrylic or silicone caulk as needed. Spread it using a putty knife or your fingers. Then go around the outside of the trim, squeezing a small bead of caulk between the trim and the wall. Run your finger along the bead of caulk to smooth it out, then wipe it clean on a wet rag.[15]
- You’ll need to let the caulk dry before painting or staining. Check the label information to find out how long this takes.
-
7Sand, prime, and paint the door frame.[16] Sand the door frame lightly to make it smooth and even. You can further customize your trim by staining or painting it. The trim can be colored with primer and a layer of paint. You can also retain the appearance of wood trim by using a commercial staining product to color it.[17]
- Use an oil or latex-based primer before painting over wood.


Things You’ll Need
- Tape measure
- Miter saw
- Safety glasses
- Hearing protection
- Drill
- Hammer
- Pry bar
- Utility knife
- Nails
- Caulk
- Wood putty for wood trim
- Trim


References
- ↑ Barry Zakar. Handyman. Expert Interview. 20 August 2020.
- ↑ https://www.todayshomeowner.com/video/how-to-remove-and-replace-exterior-door-casing/
- ↑ https://thriftdiving.com/how-to-replace-and-paint-an-exterior-diy-door/
- ↑ https://www.todayshomeowner.com/video/how-to-remove-and-replace-exterior-door-casing/
- ↑ Barry Zakar. Handyman. Expert Interview. 20 August 2020.
- ↑ http://www.bhg.com/home-improvement/door/door-repair/how-to-install-exterior-door-trim/
- ↑ http://www.finewoodworking.com/2009/04/01/safety-manual-miter-saw
- ↑ https://www.familyhandyman.com/carpentry/trim-carpentry/interior-trim-work-basics/view-all/
- ↑ http://www.bhg.com/home-improvement/door/door-repair/how-to-install-exterior-door-trim/
- ↑ https://www.todayshomeowner.com/video/how-to-remove-and-replace-exterior-door-casing/
- ↑ https://www.familyhandyman.com/carpentry/trim-carpentry/interior-trim-work-basics/view-all/
- ↑ http://www.bhg.com/home-improvement/door/door-repair/how-to-install-exterior-door-trim/
- ↑ https://www.familyhandyman.com/carpentry/trim-carpentry/interior-trim-work-basics/view-all/
- ↑ https://www.familyhandyman.com/carpentry/trim-carpentry/interior-trim-work-basics/view-all/
- ↑ https://homesteady.com/how-6705923-exterior-door-window-trim-replacement.html
- ↑ Barry Zakar. Handyman. Expert Interview. 20 August 2020.
- ↑ https://www.todayshomeowner.com/video/how-to-remove-and-replace-exterior-door-casing/
About This Article

Replacing a door trim involves removing the old one, cutting your new trim to the right size, and nailing it to the doorjamb. Start by cutting the caulk from your door trim with a utility knife. Then, use a pry bar to remove each side of the trim. Slide the bar in near each nail to help you lever it away from the jamb. Once you’ve removed the trim and any leftover caulk, measure your door jamb to help you cut the new trim. You’ll need a miter saw to cut the corners at 45 degree angles so the pieces fit together. When you’ve cut all of the trim pieces, use 1.5-inch finishing nails to secure the inside part of the trim to the jamb. On the outside part, which attaches to the wall, use 2-inch finishing nails. After you’ve finished nailing the trim in place, apply caulk over the nail holes and around the edge to make the trim look flush. For more tips, including how to paint and stain your new door trim, read on!