This article was co-authored by April Jordan. April Jordan is a Sustainability Specialist and the Founder of The Ethical Edit, a blog dedicated to making ethical fashion and lifestyle changes accessible by sharing easy-to-digest sustainability information and ethical and sustainable brand reviews. With over five years of experience in sustainability and over five years in the marketing and communications field, April is passionate about using her skills to make the world a better place.
There are 8 references cited in this article, which can be found at the bottom of the page.
This article has been viewed 41,167 times.
Aluminum cans are a household waste problem. All the canned food and soda sold results in perfectly reusable metal going to landfills. While you can recycle your cans, you can also use them for simple household crafts. Reuse your aluminum cans by taking them apart to make candle holders, coasters, jewelry, and belts.
Steps
Making a Votive Candle
-
1Wash out the can. Add some of your dish soap to the can and rinse it out well with water. This helps remove any of the sticky residue from the can’s contents. After you cut off the top of the can, you’ll have a chance to check for any leftover food or drink and wash the can again.
-
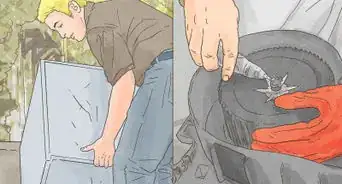
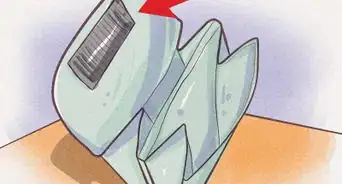
2Place a knife against the can’s top. To make the candle, you need to remove the top part of the can. One way to do this is with a pointed or sharp kitchen knife. If it’s a drink can, place the point in the groove between the rim of the can and the opening.[1]
- Keep the can on the table and the knife pointed into it to avoid getting poked. Children should have an adult do this for them.
- Larger aluminum cans are often open enough that you can fit in the candle and avoid cutting.
Advertisement -
3Tap the knife with a hammer. Use a household hammer to gently tap the knife and force it into the aluminum. Repeat this around the edge of the can until you can remove the can’s top. If there are sharp edges, use the edge of a knife or sandpaper. Rub the knife or sandpaper over it to smooth down the edges.
- Another way to cut the can is to make a slice on the outside using an x-acto knife and then cut around with scissors, but beware of sharp edges.
-
4Decorate the can. A can used for a candle can be decorated in many ways. One way is to first poke holes in a pattern using a nail and then coat the can in spray paint. You can then drop in a small candle to get a patterned light. Another option is to cut the can into a large circle and smaller petals, gluing them into a flower. This kind of decoration can be used as a base to hold a candle.[2]
- Use a tea candle or LED light to avoid heating the can while in use.
- Cans with the tops cut off and decorated can also be used as pencil holders.


Creating Drink Coasters
-
1Clean the can. Wash out the inside of the can with soap and water. Remove any leftover liquid from the can. You can check and wash the can again after you cut it open.
-
2Cut off the top and bottom. The part of the can you want to save is the flat middle. To cut the can, take craft scissors designed to be used on tin. You can also make a cut with an x-acto knife and then cut around the can.
- Be careful of sharp edges.
-
3Cut down the seam. Find the seam on the middle portion of the can. This is where the metal was soldered together to create the can’s shape. In a soda can, it will often be by the ingredient section on the label. Once you have found it, cut down it through the length of the can. Unroll this portion and flatten it against a surface.[3]
-
4Glue the square to a tile. The tiles can be found for cheap at a home improvement store. The size you need depends on the size of your coasters, but four by four inches (10.16 cm) is a standard size. A good glue, such as a silicone glue, can be bought at any craft store. Rub the glue over the back of the metal, then press the metal flat over the top of the tile. Let the glue settle overnight.
-
5Varnish the edges. The next day, use a brush to apply varnish over the metal to protect it. Dip the brush into the varnish and spread an even coating over the top of the coaster. This prevents the metal from peeling after use. Another option for this is to stitch or glue fabric over the edges of the metal.[4]
-
6Add felt pads. Find packs of small felt pads at the craft store. Peel them off from their protective backing and attach the sticky side to the bottom of the tile. The felt will protect your table from scratches.


Crafting Earrings
-
1Cut off the ends of the can. Jab in a sharp pair of scissors or make a cut with an x-acto knife to start. Scissors can then be used to cut around the can until the end is removed.
-
2Cut down the seam. Examine the remaining part of the can for the seam where the metal was welded together. Cut down the length of the seam until you can lay the aluminum flat.
-
3Punch out shapes. Consider the design you want the earring to be. Lay out the leftover piece of metal, then use a hole punch to make the shape. Keep the metal against a flat surface as you work. Simple shapes include butterflies and flowers.[5]
- The hole punch dulls the edges, but use sandpaper or an emery board to file down any sharpness.
-
4Make a small hole for hanging. Imagine how the shapes will hang as an earring. Where you put the hole for the chain determines this. Once you’ve decided, use a pushpin to poke a small hole through the aluminum.
-
5Run a chain through the hole. A small length of chain or jump ring from the craft store are useful here. Use small pliers or tweezers to open one end of this connector, then push an end through the hole. Close the loop when you are done.
-
6Attach the chain to an earring back. Pull open the earring back, using pliers if necessary. Run the chain or jump ring through it, then close the loop. Your earrings will be ready to wear.
- Chains, rings, and backs can be recycled from old jewelry you have around the house.


Making a Pop Tab Belt
-
1Gather soda tabs. The amount of tabs you need depends on how big the belt will be. Plan for about three tabs per inch (2.54 cm). A waist size of 25-30 inches (63.5-76.2 cm) amounts to about 110 tabs.[6]
-
2Tie a loop in the center of a chord. Get nylon cord from the craft store, making sure it’s long enough to double around your waist. In the center of the cord, tie a knot as big as a pop tab, leaving a loop on the outside end. This loop will be used to secure the belt during use.
-
3Put on the first tab. Work from the backs of the tabs. Thread one end of your cord through the top. Thread the other end through the bottom. Push the tab all the way back to the end of the cord.
-
4Cross over a second tab. When you add the second tab over the first tab, the cords should be reversed. The bottom cord should go through the top hole and the top cord should go through the bottom hole. When you push the tab next to the first one, the cords should form an X.[7]
-
5Add a third tab below the second one. The third tab should be below the second one. String the top strand of cord through the top hole and the bottom strand through the bottom hole.
-
6Continue alternating tabs. The fourth tab should go on top of the last one and the cords should cross over again to form an X. The fifth tab should go under the fourth tab with straight cords again. Repeat this pattern until the belt is long enough.
-
7Tie shut the belt. All you have to do now is tie the free ends of the cord together. Make a couple of knots to keep it secure. You can also run it through a button first. Trim off excess cord. To wear the belt, put this end through the loop made earlier.


Expert Q&A
Did you know you can get expert answers for this article?
Unlock expert answers by supporting wikiHow
-
QuestionHow can I repurpose an empty can?
 April JordanApril Jordan is a Sustainability Specialist and the Founder of The Ethical Edit, a blog dedicated to making ethical fashion and lifestyle changes accessible by sharing easy-to-digest sustainability information and ethical and sustainable brand reviews. With over five years of experience in sustainability and over five years in the marketing and communications field, April is passionate about using her skills to make the world a better place.
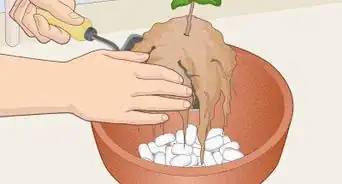
Sustainability SpecialistA lot of people use them for crafts or holding small items like push pins, cosmetics, or pens. You can even punch holes in the bottom and use them as a planter. This can be really fun (I've done it myself!), especially if you paint the can, add a bit of braided twine or pretty chain, put a long-leafed plant inside and hang it up. Just be mindful of how and where the water will drip down to, and make sur eyou create some sort of drainage system for your plant.
Support wikiHow by unlocking this expert answer.
Warnings
- Cutting aluminum often leaves sharp edges. Wear gloves for protection and file down sharp edges.⧼thumbs_response⧽
Things You’ll Need
Votive candle:
- Aluminum can
- Knife or scissors
- Hammer
- Spray paint
- LED or tea candle
Coasters:
- Aluminum can
- Scissors or x-acto knife
- Silicone glue
- Varnish or fabric
- Felt pads
Earrings:
- Aluminum can
- Scissors or x-acto knife
- Hole puncher
- Jump rings or small chain
- Earring back
Belt:
- Pop tabs
- Nylon cord
- Scissors


References
- ↑ http://persephonemagazine.com/2011/03/the-lazy-ladys-guide-to-diy-soda-can-votive-candle/
- ↑ http://www.hometalk.com/17794838/recycled-soda-beer-cans-candle-holder?expand_all_questions=1
- ↑ http://www.theidearoom.net/diy-soda-can-coasters
- ↑ https://www.favecrafts.com/Green-Crafting/Soda-Can-Coasters
- ↑ http://www.beadinggem.com/2011/04/how-to-make-riveted-recycled-soda-can.html
- ↑ http://makezine.com/2011/04/26/remake_it_soda_can_tab_belt_or/
- ↑ https://snapguide.com/guides/make-a-soda-tab-belt/
- ↑ April Jordan. Sustainability Specialist. Expert Interview. 22 September 2020.
- ↑ April Jordan. Sustainability Specialist. Expert Interview. 22 September 2020.
About This Article