This article was co-authored by wikiHow Staff. Our trained team of editors and researchers validate articles for accuracy and comprehensiveness. wikiHow's Content Management Team carefully monitors the work from our editorial staff to ensure that each article is backed by trusted research and meets our high quality standards.
There are 12 references cited in this article, which can be found at the bottom of the page.
wikiHow marks an article as reader-approved once it receives enough positive feedback. In this case, 87% of readers who voted found the article helpful, earning it our reader-approved status.
This article has been viewed 229,900 times.
Learn more...
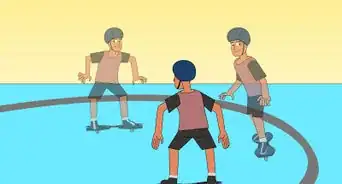
RipStiks are similar to skateboards, but they have 2 wheels instead of 4 and you twist your body to move them rather than pushing with your foot. Maneuvering the RipStik may seem hard at first, but with some practice and help from a friend, you can easily learn how to ride it. To get on the board, place your non-dominant foot on the nose, push off with your dominant foot, and put your dominant foot on the board. Always wear safety gear, ride on solid ground, and get ready to rip!
Steps
Learning the Basics
-
1Put on a helmet, elbow pads, and knee pads to stay safe. Buckle the helmet onto your head and fasten the Velcro on your elbow and knee pads. When you ride a Ripstik, you can move at rather fast speeds and have the potential to fall and hurt yourself. To prevent hurting your head, arms, and legs, wear a helmet and protective padding.[1]
- It’s also helpful to have a pair of sneakers with rubber soles. They help you stabilize your feet on the board.
-
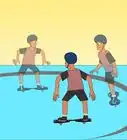
2Have a friend help you balance if you need help getting on the board. It is much easier to balance if you have a friend who can support your weight as you stand on the board. Grasp their shoulder as you get balanced, then let go of them when your footing feels secure.[2]
- If you don’t have a friend, lean on a wall or railing to help you get on the board.
Advertisement -
3Put your RipStik on a smooth, flat surface. To get started, find a flat paved surface to practice on. This can be a sidewalk, driveway, or empty parking lot, for instance. Place the RipStik on the ground so it rests on its side. The board should face you and the wheels should point away from you.[3]
- Avoid riding through areas with cracks, speed bumps, water, and sand. Any of these may throw off your balance and cause you to fall.
-
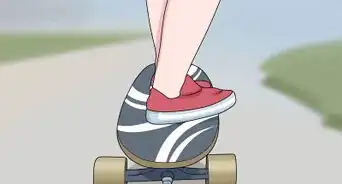
4Place your non-dominant foot on the nose of the board. The front of the board is slightly more narrow, and this is called the “nose.” If your right foot is your dominant foot, place your left foot at the nose of the board. When you ride a RipStik, the nose must be facing forward.[4]
- Riding with your left foot in front is referred to as riding "regular." Riding "goofy" is when you ride with your right foot on the nose of the board.
- The larger end called the tail of the board.
-
5Push off with your dominant foot and place it on the tail. After one of your feet is centered on the nose, use your other foot to gain some momentum, and then square your foot on the center of the board. Move your foot in one quick motion so you can easily find your balance. At this point, both feet should be centered on each end of the board.[5]
- You’ll find that speed equals stability when riding a RipStik, so pushing with one of your feet will help you get balanced.
- If a friend is helping you, they can let go at this time.
- If you are struggling to maintain your balance, try pushing off with a bit more force and moving your foot to the board faster. You can also try bending your knees slightly to help you stay in position.
-
6Reposition your footing if your feet are not centered. When you ride a RipStik, your feet must be in the middle of both the nose and tail sections. If they aren’t, simply stop the RipStik and try again.[6]
- If your feet aren’t centered, you won’t be able to control the board, make a turn, or gain speed correctly.
-
7Maintain your balance as the board is moving. It’s much easier to stay on the RipStik once the board starts to move. Adjust your weight into a comfortable position and let the board glide forward. Keep your feet centered as you ride to move straight.[7]
- This may take some practice, but with time, this motion will feel more and more comfortable.
- If you are having trouble balancing, try bending your knees slightly or practice somewhere near a wall or railing so you can get stability.
-
8Step off the RipStik when you want to stop. Getting off of the RipStik is simple. All you need to do is take your dominant foot off the board, followed by your non-dominant foot. If you are going slowly, you can do this rather effortlessly.[8]
- If you are concerned about your speed, move the foot on the nose of the board towards one side to come into a 90-degree turn, and then remove your foot. This slows the board down before you get off of it.


Gaining Speed and Turning
-
1Twist your hips back and forth to move the RipStik faster. When riding a RipStik, you don’t have to push with your foot like you do when riding a skateboard. Simply wiggle the nose and the tail simultaneously by twisting your hips and shoulders back and forth. Move slowly to gradually increase speed, or twist your body quickly to go really fast.[9]
- When doing this, your body moves in a snake-like motion.
-
2Shift your weight on your front foot from side to side to make a turn. The direction of your turn depends on which foot you have in the front. For instance, if your left foot is on the nose of the board, adjust your weight towards the toe-side of your foot to move to the right. To turn toward the left, distribute your weight to the ankle-side of your foot.[10]
-
3Move your feet in opposite directions to make a sharp turn. If you want to make a turn that’s greater than 90-degrees, adjust the foot on the tail of your board the opposite way you angled your front foot. For instance, if you lean toward the left to distribute your weight toe-side, twist your back foot towards the right.[11]
- This may take some practice, but by moving your back foot the opposite way of your front foot, you can easily manipulate the RipStik.
-
4Practice this over time to perfect your turning technique. Riding a RipStik looks easier than it is, and it takes some practice to be able to get on the board, speed up, and turn with ease. If you can, practice for 30 minutes every day until you feel comfortable hopping on for a ride.[12]
- The more you practice, the easier riding a RipStik will be.


Community Q&A
Did you know you can get answers researched by wikiHow Staff?
Unlock staff-researched answers by supporting wikiHow
-
QuestionIs it easier to ride a skateboard or a RipStik?
 wikiHow Staff EditorThis answer was written by one of our trained team of researchers who validated it for accuracy and comprehensiveness.
Staff AnswerwikiHow Staff EditorStaff AnswerThe unusual method of propulsion you need to ride a RipStik may take longer to master than the basic pushoff style that you use on a skateboard. Additionally, many people find it easier to balance on skateboards.
Support wikiHow by unlocking this staff-researched answer.
-
QuestionHow do you extend a RipStik?wikiHow Staff EditorThis answer was written by one of our trained team of researchers who validated it for accuracy and comprehensiveness.
Staff AnswerwikiHow Staff EditorStaff AnswerThe RipStik isn’t really designed to be extended. You’d have to remove the torsion bar and replace it with a new, longer one.Support wikiHow by unlocking this staff-researched answer.
-
QuestionWhat’s the difference between a RipStik and a RipStik Mini?wikiHow Staff EditorThis answer was written by one of our trained team of researchers who validated it for accuracy and comprehensiveness.
Staff AnswerwikiHow Staff EditorStaff AnswerThe Mini is smaller and easier to maneuver, making it ideal for kids and beginners.Support wikiHow by unlocking this staff-researched answer.
Things You’ll Need
- RipStik
- Helmet
- Elbow pads
- Kneepads
- Hard surface
Warnings
- Avoid riding on roads with traffic so you don’t have to worry about cars, bikers, or joggers. Stick to closed roads or empty parking lots.⧼thumbs_response⧽
- When you are first starting out, avoid riding your Ripstick on hills or steep areas. You can gain much more speed than anticipated, which can be hard to control.⧼thumbs_response⧽

References
- ↑ https://youtu.be/8khnGyKuHg8?t=2m10s
- ↑ https://youtu.be/c8TpIIPKXv0?t=58s
- ↑ https://youtu.be/8khnGyKuHg8?t=2m14s
- ↑ https://youtu.be/8khnGyKuHg8?t=3m15s
- ↑ https://youtu.be/8khnGyKuHg8?t=3m39s
- ↑ https://youtu.be/8khnGyKuHg8?t=3m55s
- ↑ https://youtu.be/c8TpIIPKXv0?t=2m24s
- ↑ https://www.razor.com/tv/no-channel/how-to-ride-a-ripstik/
- ↑ https://youtu.be/IXM6vfzJXXc?t=3m39s
About This Article
To ride a RipStik, start by placing your non-dominant foot on the front of the board and pushing off with your dominant foot. Then, once both of your feet are on the board and you're moving, keep your feet centered and bend your knees slightly to maintain your balance. If you want to go faster, twist your hips back and forth instead of pushing off with your foot like you would on a skateboard. To turn, shift your weight on your front foot toward the direction you want to go. To learn how to stop on a RipStik, scroll down!