This article was co-authored by wikiHow Staff. Our trained team of editors and researchers validate articles for accuracy and comprehensiveness. wikiHow's Content Management Team carefully monitors the work from our editorial staff to ensure that each article is backed by trusted research and meets our high quality standards.
There are 10 references cited in this article, which can be found at the bottom of the page.
This article has been viewed 59,904 times.
Learn more...
Rubber coated metal seems like something only a factory could make, but lately, rubber coating has found its way into more and more do-it-yourself projects, like coating cars and dipping home accessories. In fact, you probably have most of the materials you need sitting in your basement or garage right now. In this article, we’ll show how to prep your metal for coating and walk you through using both rubber coating dip and rubber spray. If you’re ready to burn rubber and get going, keep scrolling!
Things You Should Know
- Clean old coating off the metal, removing rust and scratches with sandpaper before washing it with soap and water and drying the metal off completely.
- Spread out newspapers and wrap a wire around the part of the metal you won’t dip before dipping it slowly in liquid rubber 3 times and letting it dry.
- Wear protective gear, and shake the can before spraying on liquid rubber, coating the metal several times, and letting it dry in between coats.
Steps
Cleaning the Metal
-
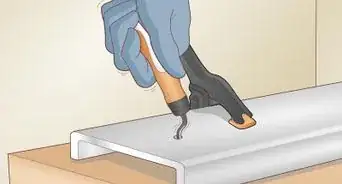
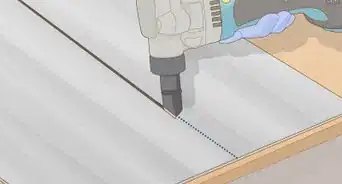
1Cut off any old coating on the metal. Using a utility knife, cut a line along any old rubber coating that’s still on the metal. Once you’ve cut the length of the rubber, it should peel off easily. If not, use the utility knife to carefully scrape it off.[1]
- Be careful not to scratch the metal beneath as you cut through the coating with the knife.
-
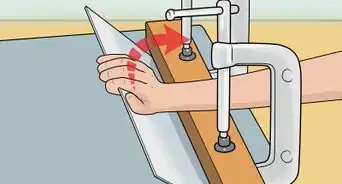
2Remove rust with sandpaper or steel wool. Scrub the metal with a low-grit sandpaper or steel wool to remove any rust. You can also purchase a rust removal product at a hardware store and either immerse the metal in it, or apply the product via spray or gel.[2]Advertisement
-
3Rub the metal with fine-grit sandpaper. Once the rust is gone, move to a fine-grit sandpaper to even out any scratches you made in the metal with the coarser sandpaper. If you used a rust removal liquid or gel and there are no scratches in the metal, you can skip this step.[3]
-
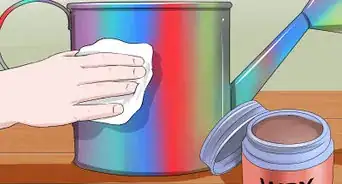
4Wash the metal with soap and water. Use water and a mild soap to wash away any remaining dirt and grime on the metal. You may need to use a scrubber sponge to get it fully clean.[4]
- If the metal is sticky or gunky, wipe it down with a product like Goo Gone, then wash with soap and water.
-
5Dry the metal thoroughly. The metal shouldn’t have any moisture on it, or the rubber coating won’t adhere properly. Wipe the metal with a dry, microfiber cloth, getting into all the cracks and crevices. If you’re coating something with lots of little spaces you can’t get the towel into, allow the metal to air dry overnight.
- You can also aim a heat gun at these spots to dry them more quickly. Hold the gun a few inches away from the metal and move it in small circles or lines so you’re not heating the same spot for too long.


Using Liquid Rubber Dip
-
1Purchase a liquid rubber product. Visit a hardware or home improvement store and purchase a liquid rubber-coating product like Plasti-Dip. There are a variety of colors to choose from, which makes it popular for use on exterior car parts.[5]
-
2Spread out a tarp or newspaper to catch any drips. Find a flat, sturdy work surface either on a table or on the floor and lay down a tarp, dropcloth, or some newspaper. This will catch any drips when you pull the metal out of the liquid. Since you'll be hanging the metal to dry, place a dropcloth under where you'll be hanging it too.
- Avoid working outside on a windy or humid day, since this can affect the way the rubber dries.[6]
-
3Wrap thick wire around part of the metal you won't dip. The metal will need to hang to dry, so wrap some sturdy wire around it at a spot where the wire won’t slip and where you don’t want any rubber coating. Leave a few extra inches of wire attached so you can hang it up later.[7]
- Purchase wire at a craft or hardware store. Flexible jewelry wire or picture-hanging wire will work.
- If you want the entire object coated, consider spraying it rather than dipping it to get more even coverage.
-
4Pour the liquid rubber into a shallow, disposable container. If your metal is too wide to fit into the product’s container, pour the liquid rubber out into a plastic container that can fully hold whatever you’re dipping. Use a container you’re comfortable throwing away or repurposing, since you shouldn’t attempt to reuse it for any food storage.
- If the metal object will fit into the product’s container, there’s no need to pour it out.
- If the object is very large or unwieldy, it may be best to spray it rather than dip it.
-
5Immerse the metal into the liquid slowly. Dip the the metal object down into liquid rubber at a rate of 1 inch (2.5 cm) every five seconds, immersing it up to a few centimeters below where you want the coating to end. Hold it in the liquid for a few seconds before slowly pulling it out at the same rate.[8]
- Hold onto the object by the wire you wrapped around it, or by a part you don’t plan to coat.
-
6Hang the metal to dry for 30 minutes. Wrap the wire that you twisted around the metal over a clothesline or another piece of wire you’ve strung between two objects. Be sure there’s a tarp, some newspaper, or a disposable container underneath it to catch any drips. Let the metal dry for at least 30 minutes before you remove it.[9]
-
7Repeat the dipping process two more times. Dip the metal into the liquid rubber at least twice more, allowing each coat to dry for 30 minutes before applying the next one. Immerse the metal 1 or 2 centimeters further each time so that your final coat covers all the previous coats where the rubber ends.[10]
-
8Allow the final coat to dry overnight. Once you’ve applied your final coat, leave the rubber to dry and harden overnight, or for at least four hours before you attempt to use the object. Wait until it’s completely dry to remove the wire.[11]


Using Liquid Rubber Spray
-
1Purchase a liquid rubber spray product. Visit a hardware or home improvement store and buy liquid rubber in a spray can. Choose from a variety of colors and finishes to customize the metal however you’d like.
-
2Cover your work area with a tarp or newspaper. Lay down a tarp or dropcloth where you plan to work so that you don’t spray the product onto the floor. You can also lay down some newspaper, but be sure to tape it down so that it doesn’t move while you’re spraying.
- Avoid spraying outside on a windy day since the product could wind up on you or nearby objects.
-
3Tape off areas of the metal you don’t want coated. Use painter’s tape to cover any areas on the metal that you don’t want coated in rubber. You can also tape a plastic dropcloth to the object if there’s a large area you don’t want to get sprayed.
- If you’re spraying a car rim, you can wedge playing cards under the edge of the rim all the way around the wheel so you don’t spray the tire.[12]
-
4Wear protective gear. To protect yourself from inhaling any of the rubber spray, wear a safety mask. You can also put on rubber gloves if you’re concerned about getting any paint on your hands.
-
5Shake the can for one minute. Without touching the nozzle, shake the can up and down for about one minute to thoroughly mix up the contents and get the can ready to spray.[13]
-
6Spray on one coat from a distance of 6 to 10 inches (15 to 25 cm). Holding the can upright, press down on the nozzle and spray the metal from 6 to 10 inches (15 to 25 cm) away. Keep the can moving and just spray a thin layer of rubber over the entire surface you want coated.[14]
-
7Let the metal dry for 30 minutes. Allow the metal to dry for about 30 minutes in between coats. Don’t remove any of the tape or plastic covering the metal during this time.[15]
-
8Repeat the spraying process six to eight times. Continue to apply thin layers of rubber to the metal, and let each layer dry for 30 minutes before applying the next one. Do this about six to eight times, or until you’re happy with the look of the finish.[16]
-
9Finish one side before flipping it to coat the other. If you need to spray it at a different angle or spray the other side, wait until all coats have dried on the first side. Then, 30 minutes after your final coat, turn the object and begin applying coats to the other side.
-
10Allow the rubber to harden overnight. Leave your metal where it is with its new rubber coating, and let it dry overnight, or for at least four hours. Do not remove any tape or plastic protective barriers until the rubber is dry and hard.[17]


Things You’ll Need
- Utility knife
- Wire
- Liquid rubber coating
- Tarp or newspaper
- Painter’s tape

References
- ↑ https://www.youtube.com/watch?v=DwHglysGMDE&feature=youtu.be&t=47
- ↑ https://www.bobvila.com/articles/how-to-remove-rust/#.WYU6SK2ZN8c
- ↑ https://www.bobvila.com/articles/how-to-remove-rust/#.WYU6SK2ZN8c
- ↑ http://nickscarblog.com/diy/the-ultimate-plasti-dip-guide-tips-ideas-more-for-cars
- ↑ http://nickscarblog.com/diy/the-ultimate-plasti-dip-guide-tips-ideas-more-for-cars
- ↑ https://www.youtube.com/watch?v=DwHglysGMDE&feature=youtu.be&t=150
- ↑ https://www.youtube.com/watch?v=DwHglysGMDE&feature=youtu.be&t=110
- ↑ https://www.hunker.com/12184523/how-to-use-plasti-dip
- ↑ https://www.youtube.com/watch?v=DwHglysGMDE&feature=youtu.be&t=166
- ↑ https://www.youtube.com/watch?v=DwHglysGMDE&feature=youtu.be&t=173
- ↑ https://www.youtube.com/watch?v=DwHglysGMDE&feature=youtu.be&t=182
- ↑ http://www.carsonelove.com/how-to-plasti-dip-rims
- ↑ http://www.carsonelove.com/how-to-plasti-dip-rims
- ↑ http://www.carsonelove.com/how-to-plasti-dip-rims
- ↑ http://nickscarblog.com/diy/the-ultimate-plasti-dip-guide-tips-ideas-more-for-cars
- ↑ http://nickscarblog.com/diy/the-ultimate-plasti-dip-guide-tips-ideas-more-for-cars
- ↑ http://www.carsonelove.com/how-to-plasti-dip-rims
About This Article