This article was co-authored by wikiHow Staff. Our trained team of editors and researchers validate articles for accuracy and comprehensiveness. wikiHow's Content Management Team carefully monitors the work from our editorial staff to ensure that each article is backed by trusted research and meets our high quality standards.
The wikiHow Video Team also followed the article's instructions and verified that they work.
This article has been viewed 19,491 times.
Learn more...
Seasoning is a great way to prevent metal parts from rusting and corroding. Unlike a traditional cast-iron Dutch oven, you don’t have to season a ceramic or enamel Dutch oven much. Just a quick boil to seal the coating is all you need when the oven is brand new. Some enamel Dutch ovens have an exposed iron rim, so you’ll need to season that to prevent rusting. Once it's sealed and seasoned, your Dutch oven is ready to use!
Steps
Sealing the Coating
-
1Fill the Dutch oven with water and put the lid on to cover it. Leave 1–2 in (2.5–5.1 cm) of space at the top so the water doesn’t overflow when it starts boiling. Then put the lid on the oven.[1]
- This boiling process isn’t technically seasoning. Instead, it helps seal the coating on the ceramic to make the oven more durable.
- You generally only have to do this once when the oven is brand new. After this, the coating should be totally sealed.
-
2Bring the water to a rolling boil over medium-high heat. Place the oven on the stove and put on a medium-high or high heat. Keep the oven covered and continue heating it until the water boils. Keep it on a strong, rolling boil.[2]
- It’s fine to lift the lid occasionally to check the water.
- Generally, you shouldn’t use a high flame on a Dutch oven if you use a gas stove. However, it’s okay to do it occasionally if you’re just boiling water.[3]
Advertisement -
3Keep boiling the water until it evaporates and is only 1 in (2.5 cm) deep. Once the water is boiling, it should start evaporating. Leave the oven on the stove at the same heat to burn the water off. Check occasionally and boil the water until there’s only about 1 in (2.5 cm) left.[4]
- Don’t let all the water evaporate, because heating a Dutch oven with nothing in it is bad for the coating.[5]
- If the water starts boiling over or overflowing, turn the heat down a little.
-
4Let the oven cool and dump the water. Turn the heat off and leave the oven alone. Once it’s cool enough to handle, pour out the water and dry the pot with a dish towel.[6]
- Don’t touch the oven right away unless you’re wearing oven mitts! It’ll be very hot and you’ll get burned.
- You can also wash the oven after this so it’s clean for your next use.
-
5Air-dry the oven completely before storing it. Any excess moisture could ruin the coating inside the oven. After drying the oven with a dish towel leave it out to air-dry more. When it's totally try, then you can store it normally.[7]


Seasoning Iron Parts
-
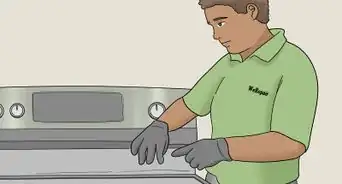
1Wash the Dutch oven with soap and a brush. Use warm, soapy water and clean the whole Dutch oven. Then scrub it well with a stiff dish brush. When you’re done, dry the oven completely with a towel.[8]
- This seasoning process is only for Dutch ovens with exposed iron parts, like around the rim.[9] If your oven is totally covered with ceramic or enamel, then you don’t have to do this.
- This process isn't permanent, so you might have to do it again if the iron starts looking dull. This means the protective layer is wearing away.
-
2Rub a thin layer of shortening or vegetable oil on any iron parts. Pour either vegetable oil or melted shortening onto a paper towel and rub it all over any metal spots. Some iron could be exposed around the rim of the lid and pot, so be sure to check here.[10]
-
3Place a pan on the middle shelf of your regular oven to catch the oil. You'll have to bake the Dutch oven inside your regular oven to season it. Slide a baking sheet or oven-safe pan onto the middle shelf. This is important so the oil doesn’t drip all over the inside of your oven.[11]
- Use a sheet of aluminum foil for this if you don’t have extra pan.[12]
-
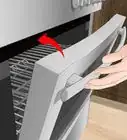
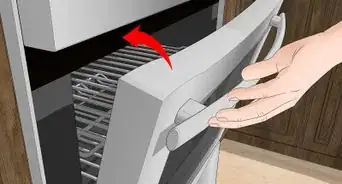
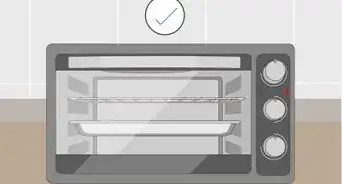
4Put the Dutch oven and lid on the top shelf upside down. Simply flip the Dutch oven and lid and slide them into the oven. It’s important to keep the oven and lid upside down so the oil drips out and doesn’t burn on the enamel.[13]
- You might have to move your oven racks around a bit if the Dutch oven doesn’t fit on the top shelf.
-
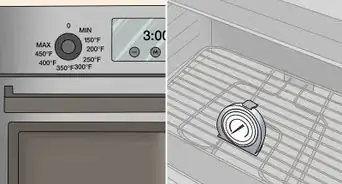
5Bake the Dutch oven for 1 hour at 375 °F (191 °C). Set your oven to 375 °F (191 °C) and let the Dutch oven bake. Leave it for 1 hour to fully season the iron. When it's done, turn the heat off.[14]
- It’s normal for oil to smoke a bit, so you might want to crack a window in your kitchen.
-
6Let the Dutch oven cool for 30 minutes before taking it out. The Dutch oven will be extremely hot, so don’t touch it right away! Leave it in the oven for 30 minutes to cool off. After that, it should be cool enough to move and put away.[15]
- It might still be a little hot after 30 minutes, so it’s still a good idea to wear oven mitts.
- Make sure the heat is off or the Dutch oven won't cool down.


Things You'll Need
Sealing the Coating
- Water
- Stove
- Oven mitts
- Dish towel
Seasoning Iron Parts
- Water
- Dish soap
- Dish brush
- Dish towel
- Vegetable oil or shortening
- Oven
- Pan or foil
Warnings
- Never try to handle the Dutch oven before it's cool. These hold a lot of heat and you could get a serious burn.⧼thumbs_response⧽

References
- ↑ https://www.kitchensanity.com/cookware/how-to-season-a-dutch-oven/
- ↑ https://www.kitchensanity.com/cookware/how-to-season-a-dutch-oven/
- ↑ https://www.thekitchn.com/dutch-oven-cooking-mistakes-253862
- ↑ https://www.kitchensanity.com/cookware/how-to-season-a-dutch-oven/
- ↑ https://www.thekitchn.com/dutch-oven-cooking-mistakes-253862
- ↑ https://www.kitchensanity.com/cookware/how-to-season-a-dutch-oven/
- ↑ https://www.thekitchn.com/dutch-oven-cooking-mistakes-253862
- ↑ https://www.tasteofhome.com/article/how-to-season-a-dutch-oven/
- ↑ https://youtu.be/tIWVyfcxL6A?t=1
- ↑ https://www.tasteofhome.com/article/how-to-season-a-dutch-oven/
- ↑ https://www.tasteofhome.com/article/how-to-season-a-dutch-oven/
- ↑ https://www.southernliving.com/food/how-to/how-t0-season-a-cast-iron-skillet
- ↑ https://www.tasteofhome.com/article/how-to-season-a-dutch-oven/
- ↑ https://www.southernliving.com/food/how-to/how-t0-season-a-cast-iron-skillet
- ↑ https://www.tasteofhome.com/article/how-to-season-a-dutch-oven/
- ↑ https://www.tasteofhome.com/article/how-to-season-a-dutch-oven/
About This Article