This article was co-authored by wikiHow staff writer, Jessica Gibson. Jessica Gibson is a Writer and Editor who's been with wikiHow since 2014. After completing a year of art studies at the Emily Carr University in Vancouver, she graduated from Columbia College with a BA in History. Jessica also completed an MA in History from The University of Oregon in 2013.
There are 8 references cited in this article, which can be found at the bottom of the page.
This article has been viewed 40,394 times.
Learn more...
A beautiful table runner can really make your table arrangements stand out or lend a pop of color. Learning how to make your own runner also puts you in charge of choosing your own fabric, colors, sizes, and decorative elements. Start by sewing a classic rectangular table runner before adding piping, cording, or fringe. You'll soon have unique table runners for every occasion!
Steps
Cutting and Pinning the Fabric
-
1Determine how long and wide you want the runner to be. Decide which table you want to use the runner on and consider if you want the runner to hang over the ends of the table. Place a measuring tape or yardstick across the table to visualize how big you want the runner to be. Then, write down your measurements and add 1 inch (2.5 cm) to the length and width numbers.[1]
- For example, you might want a 2 by 8 feet (0.61 m × 2.44 m) runner, so you'd write down 25 by 97 inches (0.64 m × 2.46 m) after adding the 1 inch (2.5 cm) to each measurement.
-
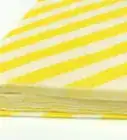
2Lay your fabric flat and mark the measurements on it with a fabric pencil. Spread your choice of fabric on a work surface and lay the measuring tape or yardstick across it. Use a fabric pencil to mark the measurements you made.[2]
- You can use any type of fabric you like. Keep in mind that heavier fabrics will make the runner lay flat.
- The fabric pencil will dissolve in the washing machine.
Tip: If you're working with cotton fabric, it's a good idea to prewash and dry the fabric before cutting it. This will prevent the table runner from shrinking when you wash it later.
Advertisement -
3Use a sharp pair of shears to cut 2 identical rectangles. Slowly cut along the lines you just marked on the fabric in order to make equal pieces. Try to cut in smooth lines so the raw edges aren't too jagged.[3]
- If you prefer, place a cutting mat under the fabric and use a rotary cutter to cut the fabric.
-
4Stack the fabric and pin the edges of the pieces in place. Ensure that the right sides of the fabric are facing each other and the wrong side of the fabric is facing you. Then, insert sewing pins around the edges of the fabric so they go through both pieces.[4]
- Stagger the sewing pins so they're about 5 to 6 inches (13 to 15 cm) apart.


Sewing the Runner
-
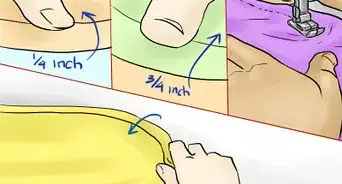
1Use a straight stitch to sew around the edges of the runner. Leave a 1⁄4 inch (0.64 cm) seam allowance as you sew from the first pin all the way around the runner. Stop sewing when you reach the last pin. This will leave a gap that's big enough for your hand to fit through.[5]
- It's important to leave the gap so you can push the corners out when you turn the fabric right side out.
Tip: When you reach a corner, raise your presser foot and turn the whole runner 90-degrees. Then, put the presser foot back down and continue sewing.
-
2Trim the excess fabric from each corner. Instead of leaving each corner a sharp 90-degree angle, use your scissors to trim the excess point from each. Ensure that you don't cut across your stitches.
- Trimming the corners will eliminate excess bulk so your corners can become pointy.[6]
-
3Turn the runner right side out and push each corner out. Reach your hand into the gap you left on the side of the runner and grab the fabric. Pull the runner until it's right side out. Then, take something pointy, such as a chopstick or knitting needle, slide it into the runner, and gently push it into each corner.[7]
- Don't push too hard as you form the corners or you might damage your stitches.
-
4Straight stitch the gap closed using a sewing machine. Tuck the unfinished hem of the gap inside the runner and use your machine to straight stitch across it. If you'd like an extra durable runner, straight stitch around the perimeter again.
- If you stitch around the perimeter 1 more time, leave a 1⁄4 inch (0.64 cm) seam allowance.
-
5Iron the runner before you put it on the table. Read the care instructions for the fabric you used so you know what temperature to turn your iron to. Place the runner on your ironing board and press it with the iron so it lays flat.
- It's also important to learn the care instructions for the fabric so you know how to wash and dry the table runner.


Trying Variations
-
1Use quilting squares or remnants to make a patchwork runner. If you like the rustic look of a quilt, sew squares or fabric scraps onto a piece of batting. Ensure that the batting is the size you want the runner to be. Then, sew the fabric onto the batting and hem the edges.[8]
- You can make the patchwork runner as complicated or as simple as you like. For a simple one, keep your squares or remnants large so there's less to sew.
-
2Cut the ends of the runner before you sew it to create points. Instead of cutting your fabric pieces into large rectangles, taper both ends before you finish the edges so they come to triangular points.[9]
- For an extra decorative touch, attach a pom pom to the end of each point.
-
3Attach tassels to pointed ends for an elegant runner. Make 2 tassels using thin cords, yarn, or embroidery thread. Then, stitch each tassel onto the pointed end of the runner so they dangle below the fabric.[10]
- If you don't want to make the runner pointed at the ends, you could attach several tassels across each flat end instead.
-
4Add piping to the edges for a decorative look. Remove your sewing machine's presser foot and replace it with a piping foot. The piping foot has 2 grooves underneath it that will hold your piping in place as you stitch it around the edges of your runner.[11]
- Piping is also called cording.
Tip: You could also purchase fringe that you cut to fit each side of the runner. Then, straight stitch it along each edge.
-
5Use a different fabric to make a border that stands out. To add color or texture to your runner, choose another fabric that complements the main body of the runner. Then, cut the fabric into strips that are as long as each side of the runner. You can make them as wide as you'd like the borders to be before you straight stitch them along the edges.[12]
- To make a thin border, cut the strips around 1 inch (2.5 cm) wide. For a wide border on a large runner, the strips could be closer to 3 inches (7.6 cm).
- For an extra colorful border, use a few different colors for each strip of fabric.


Warnings
- Although you can make no-sew table runners by ironing fusible bonding web between the fabric, the fusing can disintegrate as you wash the runner.⧼thumbs_response⧽
Things You'll Need
- Fabric
- Thread
- Scissors
- Sewing Machine
- Iron and ironing board
- Ruler or measuring tape

References
- ↑ https://www.apartmenttherapy.com/easy-home-diy-project-how-to-sew-a-table-runner-apartment-therapy-tutorial-197730
- ↑ https://abeautifulmess.com/2018/01/diy-modern-table-runner.html
- ↑ https://abeautifulmess.com/2018/01/diy-modern-table-runner.html
- ↑ https://abeautifulmess.com/2018/01/diy-modern-table-runner.html
- ↑ http://www.nancyzieman.com/blog/sewing-2/absolute-easiest-way-to-sew-pillow-corners/
- ↑ https://abeautifulmess.com/2018/01/diy-modern-table-runner.html
- ↑ http://www.nancyzieman.com/blog/sewing-2/absolute-easiest-way-to-sew-pillow-corners/
- ↑ https://feltmagnet.com/textiles-sewing/Easy-Quilted-Table-Runner
- ↑ http://www.plumdoodles.com/how-to-make-a-table-runner-with-pointed-ends-tipsy-tuesday-16/
About This Article