This article was co-authored by wikiHow staff writer, Hunter Rising. Hunter Rising is a wikiHow Staff Writer based in Los Angeles. He has more than three years of experience writing for and working with wikiHow. Hunter holds a BFA in Entertainment Design from the University of Wisconsin - Stout and a Minor in English Writing.
There are 17 references cited in this article, which can be found at the bottom of the page.
This article has been viewed 1,123 times.
Learn more...
If you want happy and healthy plants, sterilizing the soil can help create the perfect growing environment for them to thrive. Soil that you’re reusing and even potting mixes from the store could contain pests, fungi, weed seeds, or diseases, but heating the soil sterilizes it before you plant anything. You can even sterilize soil from your garden to make your own potting soil. Just keep reading to learn all of the easiest ways you can sterilize small amounts and large patches of soil so your plants grow in strong!
Things You Should Know
- To sterilize soil in your oven, put it on a metal baking pan and cover it with foil. Heat the soil to 180 °F (82 °C) for 30 minutes.
- To use your stove, put the soil in glass jars and top them with foil. Put the jars in a pot with boiling water for 30 minutes.
- If you want to use your microwave, heat the soil on full power for 90 seconds. Check that the soil reaches 180 °F (82 °C) with a thermometer.
- To sterilize garden soil without baking it, till and wet the soil bed. Cover the soil with a clear plastic tarp and let the sun heat the soil for 4–6 weeks.
Steps
Oven
-
1Preheat your oven between 180–200 °F (82–93 °C). Put one of the oven racks in the middle position. Let your oven heat up completely.[1]
- Avoid using any temperatures higher than 200 °F (93 °C) since it could break down the soil and make it toxic for plants.
-
2Place a 4 in (10 cm) layer of moist soil on a metal baking pan. Add your soil to the baking pan up to a depth of 4 inches (10 cm) to ensure it sterilizes properly. If the soil feels dry, use a spray bottle to mist it until it feels moist so it creates steam as it bakes. Smooth out the surface of the soil to create an even layer.[2]
- Instead of a metal baking pan, you could also use any heat-safe container, such as clay pots or ceramic cookware.
Advertisement -
3Cover the pan with a layer of aluminum foil. Pull the aluminum foil tightly over the top of the pan. Secure the foil to the edges of the pan so steam doesn’t escape from inside.[3]
- If the pan has a lid, you can use it instead of foil.
-
4Put an oven-safe meat thermometer through the foil. Place the thermometer in the center of the pan. Poke the end of the thermometer through the foil so it sticks in the soil.[4]
-
5Heat the soil to 180 °F (82 °C) for at least 30 minutes. Put the pan of soil in the middle of the rack and let it heat up. Once the soil reaches temperature, leave the pan in the oven to kill any pests, weeds, or diseases left in the soil. Take it out of the oven after 30 minutes and let it cool completely.[5]
- Leave the aluminum foil over the soil until you use it.
- Run the vent fan on your oven while you bake the soil to get rid of any bad odors.


Stovetop
-
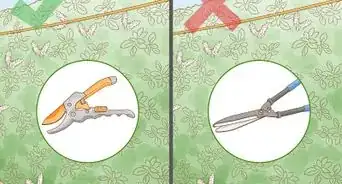
1
-
2Put 4 in (10 cm) of soil in glass jars. Use jars that are short enough to fit inside of your pot. Scoop the soil into your jars and smooth out the surface.[7]
- If the soil feels dried out, spritz it with some water from a spray bottle before putting it in the jars.
- If you don’t have glass jars, you can instead use small metal trays or clay pots.
-
3Seal the tops of the jars with aluminum foil. Pull the aluminum foil tightly over the jars and press down the edges to form a tight seal. That way, steam will get trapped and heat the soil so it kills all the pests and diseases inside.[8]
-
4Arrange the jars of soil on the rack and put on the lid. Space the jars out on the rack so they have a little space between them. Steam will rise up between the jars to heat them evenly from all sides.[9] Set the lid on your pot so it’s slightly tilted and leaves a small opening for steam to escape.[10]
- Avoid stacking containers on top of one another since it could take longer to sterilize the soil.
- If too much pressure builds up inside the pot, it could cause the glass jars to break.
-
5Bring the water to a gentle boil for 30 minutes to sterilize the soil. Put the pot on your stove over high heat until the water starts to boil and steam starts to form. Turn the heat down to medium and let the water boil for another 30 minutes. Then, let the jars cool down completely before using the soil.[11]
- Put lids on the glass jars once they’re cool so you can store the soil until you need to use it.
- You don’t need to use a thermometer to check the temperature since the steam is hot enough to sterilize the soil.


Microwave
-
1Pour 2 lb (0.91 kg) of moist soil into a microwave-safe container. You can use a shallow glass or plastic container, or a microwave-safe plastic bag. Scoop your soil into the container and level out the surface so it’s even.[12]
- Avoid using any metal containers or aluminum foil in your microwave since it could create sparks.
-
2Heat the soil in your microwave on full power for 90 seconds. Keep the container open when you heat it. Let the microwave run for the full cycle so the soil can heat completely through.[13]
- If you have a smaller microwave that uses less than 1,000 watts, then heat the soil for 2 ½ minutes instead.[14]
-
3Check that center of the soil is 180 °F (82 °C) with a thermometer. Stick your thermometer into the middle of the soil and wait for the temperature reading. If the soil is at least 180 °F (82 °C), then it’s sterile and ready to use.[15]
- If the soil is under temperature, put it back in your microwave for another minute. Then, check it with your thermometer again.
- Seal the container with the soil or transfer it to an air-tight container until you’re ready to use it.


Pressure Cooker
-
1Set a wire rack and 2 c (470 ml) of water in a pressure cooker. If your pressure cooker doesn’t have a built-in rack, set a wire rack inside to raise the soil off the bottom. Add 1–2 cups (240–470 ml) of water to the pressure cooker.[16]
-
2Fill glass jars with up to 4 inches (10 cm) of soil. Use as many jars as you can fit inside your pressure cooker. Scoop the dirt into the jars loosely so the soil isn’t compacted. Smooth out the surface of the soil at the top of the jar. Cover the jars with a tight layer of aluminum foil to seal them.[17]
- If you don’t have any glass jars, it’s okay to use any heat-safe container, such as a metal tray or clay pot.
-
3Spread the jars out on the pressure cooker’s rack and secure the lid. Leave room between the jars so steam can rise between them and heat the soil evenly. It’s okay if the bottoms of the jars are in the water as long as the tops aren’t submerged.[18] Look for the pressure valve near the middle or edge of the lid, and turn it until it’s completely open.[19]
- Keeping the valve closed right away causes too much pressure to build up before it’s warm enough to sterilize the soil.
-
4Heat the soil for 15 minutes at 10 lb (4.5 kg) of pressure. Turn on your pressure cooker and let it heat up. Once steam starts escaping out from the valve, close it and let the pressure build up to 10 lb (4.5 kg). After 15 minutes, turn off your pressure cooker and let the glass jars cool completely.[20]
- Keep the aluminum foil over the jars until you’re ready to use the soil as potting mix.


Solarization
-
1Sterilize your soil during the hottest parts of the summer. Check your local weather and wait until the middle of summer when there are long sunny days. You don’t have to wait for specific temperatures to solarize your soil. The heat of the sun will sterilize the soil a little quicker than if it were cloudy.[21]
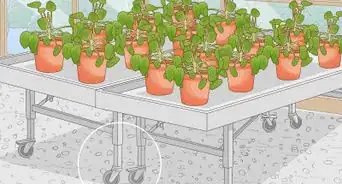
- Solarization works best to prepare soil in a large outdoor garden since there’s a lot of soil to treat.
-
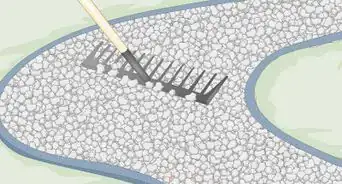
2Break apart the soil with a tiller. Use a tiller on the topsoil of the area where you’re planting your plants. Since you loosened the soil, it’ll be easier to heat and sterilize evenly.[22]
- Check with local hardware stores to see if you can rent a tiller.
- If you don’t have a tiller, you can manually break apart the soil with a shovel.
-
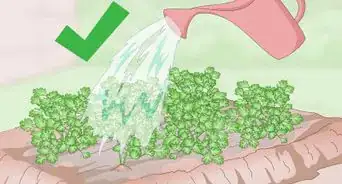
3Wet the soil to a depth of 12 in (30 cm). Use a watering can or your garden hose on your soil. Wet the soil enough so that it feels damp to the touch but not so water puddles up on the surface.[23]
-
4Cover the patch of soil with a clear plastic tarp. Set the tarp on the soil’s surface and pull it tightly.[24] Bury the edges of the tarp under a layer of soil or hold the edges down with stones to keep the soil sealed tightly inside.[25]
- You can increase the temperature of the soil by double-layering the tarp. Just put plastic bottles or PVC pipes between the layers.
- Avoid using black tarps since they absorb and deflect the heat away from the soil.
-
5Leave the soil to sterilize for 4–6 weeks. Keep the soil sealed underneath the tarp throughout the summer so the heat builds up inside. After a few weeks of being in high temperatures and sunlight, the pests and diseases in the soil will die out so you can start planting.[26]
- In cooler coastal climates, it may take up to 8 weeks to completely sanitize your soil


Warnings
- Avoid using hydrogen peroxide to sterilize soil since it could help promote weed and fungi growth.[27]⧼thumbs_response⧽
Things You’ll Need
Oven
- Metal baking pan
- Aluminum foil
- Meat thermometer
Stovetop
- Large pot with lid
- Wire rack
- Glass jars
- Aluminum foil
Microwave
Pressure Cooker
- Pressure cooker with rack
- Glass jars
- Aluminum foil
Solarization

References
- ↑ https://extension.okstate.edu/fact-sheets/non-chemical-methods-for-controlling-diseases-in-the-home-landscape-and-garden.html
- ↑ https://cals.arizona.edu/cochise/mg/its-not-just-dirt
- ↑ https://youtu.be/hOPUqfz9BUA?t=152
- ↑ https://cals.arizona.edu/cochise/mg/its-not-just-dirt
- ↑ https://extension.colostate.edu/topic-areas/yard-garden/nonchemical-disease-control-2-903/
- ↑ https://extension.colostate.edu/topic-areas/yard-garden/nonchemical-disease-control-2-903/
- ↑ https://avrdc.org/download/misc/How-to-sterilize-potting-soil-for-seedling-production.pdf
- ↑ https://extension.colostate.edu/topic-areas/yard-garden/nonchemical-disease-control-2-903/
- ↑ https://extension.okstate.edu/fact-sheets/non-chemical-methods-for-controlling-diseases-in-the-home-landscape-and-garden.html
- ↑ https://extension.colostate.edu/topic-areas/yard-garden/nonchemical-disease-control-2-903/
- ↑ https://avrdc.org/download/misc/How-to-sterilize-potting-soil-for-seedling-production.pdf
- ↑ https://youtu.be/cnNTs4F6lWA?t=391
- ↑ https://extension.okstate.edu/fact-sheets/non-chemical-methods-for-controlling-diseases-in-the-home-landscape-and-garden.html
- ↑ https://youtu.be/cnNTs4F6lWA?t=407
- ↑ https://youtu.be/cnNTs4F6lWA?t=420
- ↑ https://cals.arizona.edu/cochise/mg/its-not-just-dirt
- ↑ https://extension.colostate.edu/topic-areas/yard-garden/nonchemical-disease-control-2-903/
- ↑ https://youtu.be/cnNTs4F6lWA?t=230
- ↑ https://extension.colostate.edu/topic-areas/yard-garden/nonchemical-disease-control-2-903/
- ↑ https://extension.okstate.edu/fact-sheets/non-chemical-methods-for-controlling-diseases-in-the-home-landscape-and-garden.html
- ↑ https://extension.okstate.edu/fact-sheets/non-chemical-methods-for-controlling-diseases-in-the-home-landscape-and-garden.html
- ↑ https://extension.colostate.edu/topic-areas/yard-garden/nonchemical-disease-control-2-903/
- ↑ http://ipm.ucanr.edu/PMG/PESTNOTES/pn74145.html
- ↑ http://ipm.ucanr.edu/PMG/PESTNOTES/pn74145.html
- ↑ https://avrdc.org/download/misc/How-to-sterilize-potting-soil-for-seedling-production.pdf
- ↑ http://ipm.ucanr.edu/PMG/PESTNOTES/pn74145.html
- ↑ https://www.researchgate.net/publication/357329053_Selection_of_Effective_Method_of_Soil_Sterilization_for_AM_Fungal_Studies
About This Article