This article was co-authored by wikiHow staff writer, Christopher M. Osborne, PhD. Christopher Osborne has been a wikiHow Content Creator since 2015. He is also a historian who holds a PhD from The University of Notre Dame and has taught at universities in and around Pittsburgh, PA. His scholarly publications and presentations focus on his research interests in early American history, but Chris also enjoys the challenges and rewards of writing wikiHow articles on a wide range of subjects.
The wikiHow Video Team also followed the article's instructions and verified that they work.
This article has been viewed 216,119 times.
Learn more...
While a simple drawstring isn't as fancy as a decorative pants wrap or bow, it's important to tie it correctly if you want to keep your pants or shorts from falling down! While a simple shoelace knot works for a 2-string drawstring, tying a “taut line hitch” knot instead makes it much easier to loosen and tighten the drawstring as needed. If your pants have a single-loop drawstring, use your fingers to shape the loop into 2 separate sections, then tie the sections by using a classic shoestring knot.
Steps
Tying a Taut Line Hitch
-
1Cross the 2 string ends to create an X shape. Grasp each string with your same-side hand and hold the strings taut, pointing forward. Cross the left-hand string (that is, the string in your left hand) under the right-hand string. Looking down from above, the strings will form the shape of an X.[1]
- Hold each string about 6–8 in (15–20 cm) from where it emerges from the waistband. If the strings are shorter than 6 in (15 cm) in length, it will be difficult (but not impossible) to tie this knot.
- These directions assume that you’re wearing the pants and are looking down to tie them. You can, however, just as easily tie this knot when someone else (or no one) is wearing the pants.
-
2Feed the left-hand string into the opening near the waistband. Looking down, you’ll see a triangular opening between your waistband and the cross of the X. Place the tip of the left-hand string into this opening from above and pull the string’s entire slack through the opening.[2]
- Maintain a taut hold of the right-hand string with your right hand.
Advertisement -
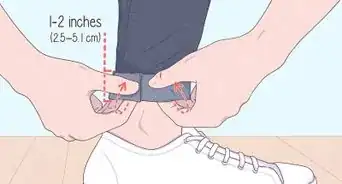
3Wrap the left-hand string around and back into the opening. Bring the tip of the left-hand string under the right-hand string, back over the top of the right-hand string, and then once again into the triangular opening between the waistband and the cross of the X. Pull the slack of the left-hand string partially but not fully taut.[3]
-
4Wrap the left-hand string around the right-hand string again. Repeat the exact same maneuver as in the previous step. Put this second wrap right up against the first wrap, on the waistband side of it—that is, so that the first wrap is closest to the cross of the X.[4]
- Pull the slack of the left-hand string partly but not completely taut once again.
-
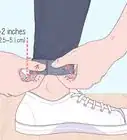
5Lay the left-hand string over the right-hand string above the X cross. Make this new intersection point about 1.5 in (3.8 cm) beyond the center of the X. A small loop will form between this new intersection point and the original crossover.[5]
-
6Bring the left-hand string around and through the newly-created loop. Wrap the loose end of the left-hand string over and around the right-hand string so that it emerges up into the loop you just made. Maintain a good grip on both strings—and don’t worry, you’re almost finished![6]
-
7Pull on the left-hand string to make the knot taut. Tug on the end of the left-hand string until you eliminate all the slack and create a snug wrap around the right-hand string. At this point, you’ll see 3 snug, side-by-side wraps—the 2 you made in the triangular opening, and the one you just made through the loop.[7]
- The remaining length of the right-hand string will be quite a bit longer than the short remaining stub of the left-hand string.
-
8Slide the knot up and down the right-hand string to adjust it. Maintain a taut hold on the right-hand string, then pinch the 3 wraps—which combine to create the knot—between the thumb and first 2 fingers of your left hand. Slide the knot towards your waistband to cinch up the drawstring, and slide it away from your waistband to loosen the drawstring.[8]
- You don’t have to untie this knot in order to pull down your pants. Simply slide the knot to loosen it, then cinch it again after you pull your pants back up. You can even leave the knot in place permanently, although it may eventually work itself loose when placed in the wash.
- While it’s easy to tighten and loosen this knot with your fingers, the knot won’t easily loosen due to pressure placed on your waistband—for instance, by sitting down or by eating a big meal!
- If there’s an excessive length of the right-hand string sticking out when you cinch up the knot, just tuck it into your waistband.
Dealing with a Single Loop String
-
1Pull the string loop out so it makes an oval shape. Looking down at your waistband, use both hands to hold the exposed part of the string loop away from your pants. Create a single oval-shaped loop that’s parallel to the floor.[9]
- A single loop pants string has no “end.” As the name indicates, it’s a single, continuous loop of string, some in the waistband of the pants, some sticking out from the front of the waistband.
- These directions assume you have the pants on and are looking down to tie the knot.
-
2Divide the oval into 2 equal “bunny ear” loops. With your hands holding either side of the oval loop, use your fingers to press the top of the loop towards your belly button. Once the top of the loop touches your waistband, you’ll have created 2 equal loops—still parallel to the floor—that look like a pair of bunny ears.[10]
-
3Squeeze the long sides of each “bunny ear” together. While keeping the top of the original loop pressed to your waistband, use your hands to squash both “bunny ear” loops into single, long strands. Your goal is to turn what is actually a single loop of string into what is essentially 2 separate strings.[11]
- Pretend that each bunny loop is a single piece of string that you'll be tying together to make a knot.
-
4Tie a basic shoelace knot with the 2 strings you created. Remember to use each squeezed-together “bunny ear” as if it’s a single end of a shoelace. Then, tie away![12]
- First, do the traditional “under, over, through, and pull” maneuver to tie a simple knot against the front of the waistband.
- Then, use either the “around the tree trunk” (by forming 1 loop) or the “bunny ears” (2 loop) technique to complete the shoelace knot—go with whichever one you learned in kindergarten!
- Work slowly and deliberately. This makes it easier to differentiate between the loops you’re intentionally making (in order to do the shoelace knot) and the loops you’re trying to keep squashed together so they function as single strings.


References
- ↑ https://youtu.be/aBTetBgjRC8?t=55
- ↑ https://www.animatedknots.com/midshipmans-hitch-knot
- ↑ https://youtu.be/aBTetBgjRC8?t=55
- ↑ https://youtu.be/aBTetBgjRC8?t=55
- ↑ https://youtu.be/aBTetBgjRC8?t=60
- ↑ https://youtu.be/aBTetBgjRC8?t=60
- ↑ https://youtu.be/aBTetBgjRC8?t=60
- ↑ https://www.animatedknots.com/midshipmans-hitch-knot
- ↑ https://youtu.be/AnAmuoQTOFI?t=15
About This Article

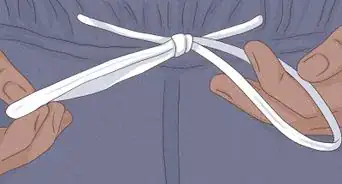
To tie a two-end drawstring on your pants, first cross one string over the other to make an x shape. Then, pull the left-hand string up through the opening at the bottom of the x. Wrap the left-hand string over and under the right-hand string and back up through the bottom opening. Now, wrap the left-hand string around the right-hand string again, and lay the left-hand string over the right-hand string above the intersection of the x. Finally, bring the left-hand string around and through the new loop, and pull on the left-hand string to make a knot. Slide the knot up and down along the right-hand string to loosen or tighten your pants. To learn how to tie a single loop pants string, scroll down!