This article was co-authored by Keith Souza. Keith Souza is a Home Improvement Specialist and the Owner of Vaulted Hammer Handyman Services. He specializes in home repair, home automation, and yard maintenance. Keith holds an AAS in Electronics Technology from Heald College.
There are 7 references cited in this article, which can be found at the bottom of the page.
This article has been viewed 51,546 times.
Whether you intend to install a new lawn or improve an old one, tilling readies the soil for new seeds. To till, you’ll need to clear the lawn of debris and existing greenery. Spread fertilizer to provide nutrients for the new seeds. When you dig up the lawn with a shovel or rototiller, the fertilizer will mix with the aerated soil[1] , helping you achieve a lush lawn that’s the envy of the neighborhood. Before you start, you should call 811 'Digline' to request utility locations at least 2 days prior to beginning to dig and follow all directions completely.[2]
Steps
Removing Debris
-
1Pick up debris on the lawn surface. Your lawn collects a lot of junk over the years and it’s time to remove it. Sticks from nearby trees, rocks, and large weeds are all easy enough to spot and remove. Don’t forget to pick up litter left behind from a BBQ or the neighbor’s children.
- If you have underground sprinklers, locate and flag all heads, valve boxes, controller wiring, and any other sprinkler parts. If you don't do this, you run the risk of damaging your irrigation system.[3]
-
2Dig up rocks still in the soil. A beautiful lawn deserves flat land, but rocks get in the way of tilling. Dig under rocks and any visible roots you spot. Set them aside, far away from your lawn. As you work, stay vigilant for any rocks hidden under the surface and remove them too.[4]Advertisement
-
3Fill the holes in your lawn. If you're not planning on cutting sod, purchase topsoil at a gardening store and use it as filler. Alternatively, scrape dirt from higher points on your lawn. When you’re finished, rake over these areas to even out the soil.
- This is a good time to take a few soil samples for testing to ensure proper nutrient levels and proper PH balance.


Cutting Grass into Sod
-
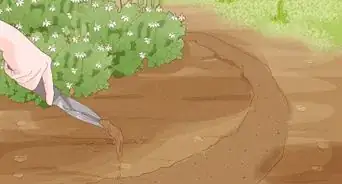
1Dig up the perimeter of the lawn. Cutting sod means removing the top layer of the soil. Since this leaves the soil bare, it’s perfect for creating a clean garden bed ready for prep work prior to planting. Start by outlining the area you wish to dig with spray paint. Push a spade about six inches deep (15.2 cm) along these boundaries. This is deep enough for the spade to cut under grass and weed roots.[5]
- You may also rent a sod cutter from a home improvement store. It’ll do the same job as your spade and save you some work if you don’t mind spending some money.
- Sodding is easier when the soil is damp but not saturated to the point of puddling. Wait for a light rain to pass.
-
2Divide the sod into one-foot strips. Use a yardstick or your judgment here. Walk along one edge of the sod, measuring out no more than twelve inches (30.5 cm) at a time. Mark each spot by pushing your spade down like you did before. Now you’ll need to dig lines all the way across to the other side. Make the lines as straight as possible. It’s tricky, but you can lay a string or hose to guide you.[6]
- For best results, use a half moon shaped manual edging tool.
-
3Cut the sod strips into smaller pieces. If you were to roll up the sod now and try carrying it, you’d throw out your back. Instead, take the time to divide the sod further. Measure between one and three feet (30-90 cm) along the length of the strips. Use your spade to dig down again, splitting the strips. Continue doing this until all the strips are divided.
-
4Roll up the sod. Go back to the edge of the sod. Try to pick up one of the strips. Your spade can help you lift it. If you see any roots clinging for dear life, sever them from the remaining soil with your spade or a sharp knife. Once the sod is free, roll it up like carpeting. Every strip after this first one will be easier to roll, so keep going and roll them all.
- Sod from a healthy lawn makes a great base for your lawn or garden. Either compost it or turn it upside down over the cleared area before you begin tilling.
- Unwanted sod may be taken to a waste center that accepts organics. Any city dump is bound to take it, but you may also be able to find home or business owners that will buy it for compost.


Killing Old Vegetation
-
1Spray a glyphosate-based weedkiller over the lawn. Killing the old lawn may feel tragic, but it is the simplest way to clear a large space and start fresh. Glyphosate weedkillers such as Roundup kill grass as well as weeds. If weeds overran your old lawn, it’s important to get rid of them before you till. Make sure you cover nearby plants with plastic and keep family away while spraying.[7]
- Please note: The WHO considers glyphosate to be a probable human carcinogen. Its use is prohibited in some states and countries. Please check with your local laws and use caution if handling this chemical.
- Be sure to follow all directions properly and wait the recommended time to allow the weed killer to dissipate before beginning prep work.
- If you don’t get rid of the weeds now, tilling can spread them further. Don’t let them take over your new lawn!
-
2Kill the remaining grass by covering it. Go to the home improvement store and purchase black poly film or a similar lawn coloring. Drape this covering over your lawn and hold it down with stakes and bricks. Watch as the grass turns brown after a few weeks. When the grass is dried out and fully brown, remove the covering.[8]
- This option is good for when you don’t want to mess with chemicals or rent a sod cutter. However, be sure to leave it on long enough to kill the entire root systems of the unwanted vegetation, or it may grow back in time.
-
3Rake out the dead grass. You’ll need a sturdy rake and some muscle power for this. Clear all the plant matter off the soil. It sounds like a lot of effort, but think of the workout you’ll get. At the end of the day, your reward is flattened soil ready to grow you a luscious lawn.


Tilling the Soil
-
1Water hard soil to soften it for tilling. Softening the soil will make your job much easier. A light rain will serve you well, but weather is unpredictable. For bone-dry summer soil, break out the garden hose. Spray water until the soil is moistened about two inches (7.6 cm) deep. Dig down that far and check to see that the soil is moist rather than soggy.
- Roll some of the soil between your fingers. Moist soil clumps together when rolled but falls apart when you press it flat.
-
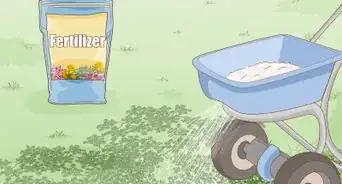
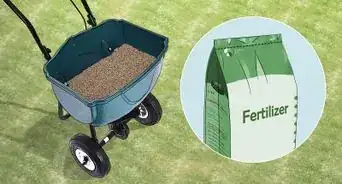
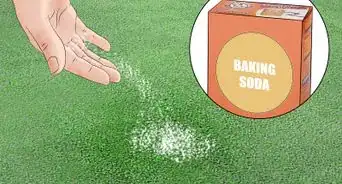
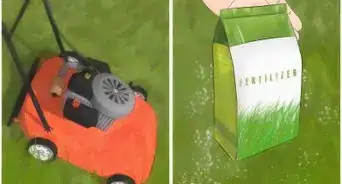
2Spread fertilizer and amendments over the soil. Cover the soil with the substances you want to mix into it. Any amendments you find useful, such as new topsoil or sand for hard, slow-draining lawns, go first. Spread them an inch (2.5 cm) thick. Regardless of what you do, cover the area with two inches (5.1 cm) of fertilizer or compost. Look for store-bought products formulated for new lawn growth.[9]
- You may spread these by hand and even them with your rake, but a machine spreader saves a lot of time.
-
3Set the rototiller to cut soil six to eight inches deep. Rototillers are machines that break up and overturn soil. Rototillers can be rented at a reasonable cost from a home improvement store. Look on the side of the rototiller for a depth bar. Adjust it so it’s set between six and eight inches (15.2-20.3 cm).[10]
- If you don’t want to rent a rototiller, you can dig up the lawn with a spade or shovel. Unless you’re digging a small garden patch, this takes a lot of labor, so the rototiller is worth the cost.
-
4Till the lawn from east to west to start. Imagine the rototiller is a lawnmower, because you’ll use it the same way. Run the rototiller over one edge of the lawn. When you get to the end, turn around and go back, staying next to the first line you completed. Continue the pattern until you’re finished. Don’t leave any gaps between the lines.
- It’s best to avoid tilling near any trees you have. The rototiller can damage their roots.
-
5Till the lawn from north to south to finish up. Go over the lawn a second time to ensure the dirt is well-broken. This time, go in the opposite direction. If you went from left to right before, go from top to bottom this time.
-
6Smooth over the soil with a rake. Drag the rake prong-side down. Level out the soil and it’ll be ready for planting.


Expert Q&A
-
QuestionWhat is the purpose of tilling?
 Keith SouzaKeith Souza is a Home Improvement Specialist and the Owner of Vaulted Hammer Handyman Services. He specializes in home repair, home automation, and yard maintenance. Keith holds an AAS in Electronics Technology from Heald College.
Home Improvement SpecialistTilling helps aerate your soil. It also gives you a chance to add extra nutrients and amendments, like manure, fertilizer, and mulch. -
QuestionWhat happens when you till soil?Keith SouzaKeith Souza is a Home Improvement Specialist and the Owner of Vaulted Hammer Handyman Services. He specializes in home repair, home automation, and yard maintenance. Keith holds an AAS in Electronics Technology from Heald College.
Home Improvement SpecialistTilling soil just involves digging up the soil and turning it around. This gives the dirt some room to breathe. -
QuestionIs a sod cutter worth it?
 Benjamin HansenBenjamin Hansen is a Landscape Contractor and the Owner of Artscape Gardens, a boutique landscaping company in Los Angeles, California. With over 12 years of experience, Benjamin specializes in transforming properties into aesthetic, functional, and drought-tolerant oases. Benjamin uses color scheme, dimension, and water conscious spaces to inspire the design and installation of soft scape, hardscape, patios, pathways, irrigation, drainage, fencing, concrete, lighting, and electrical work. Artscape Gardens covers all areas of the C-27 landscape contractor classification.
Licensed Landscape ContractorDefinitely! I'm not a big fan of roto-sodding overall, because it will trigger more weed germination than you want in an instance of resodding. Also, even when we're doing what's called a lawn-to-garden conversion, it's going to trigger more wheat germination for that new garden region. So I tend to recommend a sod cutter.
Things You’ll Need
- Rake
- Spade
- Plastic lawn covering
- Weedkiller
- Fertilizer
- Rototiller
- Spreader
- Correct seed for your area


References
- ↑ Keith Souza. Home Improvement Specialist. Expert Interview. 20 August 2021.
- ↑ Keith Souza. Home Improvement Specialist. Expert Interview. 20 August 2021.
- ↑ Keith Souza. Home Improvement Specialist. Expert Interview. 20 August 2021.
- ↑ http://www.popularmechanics.com/home/lawn-garden/how-to/a9557/7-steps-to-seeding-a-new-lawn/
- ↑ https://dengarden.com/landscaping/How-I-Turned-a-Weed-Filled-Lawn-Into-a-Garden-Plot
- ↑ http://www.finegardening.com/4-ways-remove-sod
- ↑ http://plantscience.psu.edu/research/centers/turf/extension/home-lawns/lawn-establishment
- ↑ https://www.familyhandyman.com/landscaping/lawn-care/lawns-how-to-reseed/
- ↑ http://www.popularmechanics.com/home/lawn-garden/how-to/a9557/7-steps-to-seeding-a-new-lawn/
About This Article