This article was co-authored by Ndeye Anta Niang. Ndeye Anta Niang is a Hair Stylist, Master Braider, and Founder of AntaBraids, a traveling braiding service based in New York City. Ndeye has over 20 years of experience in African hair including braiding box braids, Senegalese twists, crochet braids, faux dread locs, goddess locs, kinky twists, and lakhass braids. Ndeye was the first female of her tribe in Africa to move to America and is now sharing her knowledge of African braids passed on from generation to generation.
This article has been viewed 16,922 times.
Buns and ponytails are a great way to keep your hair out of the way as you go about your day. They can get boring after a while, however. Instead of going with the standard style, why not step things up a bit, and add an upside down braid to it? The process can be tricky at first, but once you get the hang of it, it is quite simple!
Steps
Making a Basic Upside Down Braid
-
1
-
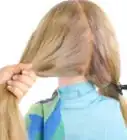
2Lean forward and gather the hair at your nape. Split the gathered hair into three sections. Cross the left section under the middle one, then cross the right section under the middle one.[3]
- A Dutch braid will give you more volume. If you want a sleeker style, do a French braid by crossing the left and right strands over the middle one.
Advertisement -
3Begin to Dutch braid the hairs at your nape. Gather some hair from your hairline and add it to the left strand. Cross the left strand under the middle one. Repeat the process for the right strand and hairline.[4]
-
4Continue to French braid until you reach the part. Keep gathering hair from your hairline and adding it to the left and right strands. Keep the sections small and the stitches tight.[5]
-
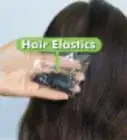
5Secure the braid, then gather everything into a ponytail. Secure the braid with a clear hair elastic first. Next, gather all of your hair and add it to the braid, making a ponytail. Tie it off with another clear elastic.[6]
- You can also use a hair tie that matches your hair color to tie off the ponytail.
-
6Secure the ponytail with a hair tie. Once the ponytail is secure, you can remove the hair tie holding the regular braid from before. Use your fingers to unravel that braid so that your ponytail is nice and smooth.[7]
-
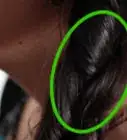
7Give the Dutch braid more volume, if desired. You can do this by gently tugging on the outer loops forming the Dutch braids.[8] You don't be able to do this if you did a French braid, however.
-
8Leave your hair as it is for something quick and sleek. For a fancier style, gather a thin section of hair from under the ponytail, then wrap it around the hair tie to hide it. Secure the strand with a bobby pin.[9]
- For something fancier, braid the thin strand before you wrap it around the ponytail.
-
9Twist your ponytail into a bun for an up-do. Use bobby pins to secure the bun. For something fancier, braid the ponytail first, then coil it into a bun. If your hair isn't very long, get a bun maker, and do the following:
- Pull your ponytail through the bun maker. Push the bun maker over the hair tie.
- Distribute your hair over the bun maker to hide the spongy material
- Pull a hair tie over the bun, cinching the hair underneath it.
- Wrap and the loose hairs around and under the base of the bun.
- Secure everything with bobby pins.
-
10Finish off with a light misting of hairspray. This is especially important if you did a bun. Remember to mist the upside down braid as well.[10]


Making a Double Upside Down Braid
-
1Create two deep side parts from your hairline to your nape. Use the handle of a rattail comb to create a deep part on the left side of your head, going from your left temple down to your nape. Gather the hair from the outside (thinner area) of the part, and clip it out of the way. Repeat this step for the right side.[11]
-
2Begin to French braid the top part of your hair. Gather the hair from your hairline (between the two side parts) and split it into three sections. Cross the left section over the middle one, then cross the right section over the middle one.[12]
-
3Continue to French braid towards your crown. Gather some hair from the part, and add it to the left section. Cross it over the middle section, then repeat the process on the right side. Continue French braiding until you reach the crown of your head, just behind your ears.[13]
- Keep the sections small and the stitches tight.
- Smooth down any stray hairs. Try to be as neat as possible.
-
4Braid for a few stitches, then secure the braid with a hair tie. Do a regular braid for this part, without gathering any extra hair into the left and right strands. Don't worry about making this perfect; you will be undoing this braid later.[14]
-
5Lean forward and begin to French braid the hairs at your nape. Lean forward so that all of your hair falls across your face. Gather the hair from your nape, right between the two side parts. Split it into three sections, then begin to French braid like before.[15]
-
6Continue to French braid until you reach the upper braid. Once again, keep the sections small and the stitches tight. Smooth down any stray hairs. You will have to feel your way for this, unless you can find someone to braid your hair for you.[16]
-
7Gather all your hair into a ponytail. Add the top braid to the rest of the hair from the bottom braid. Unclip the hair from the left and right sides of your head, and add them to the ponytail as well. Use a brush or comb to smooth the hairs down and hide the parts.[17]
-
8Secure the ponytail with a hair tie. Once the ponytail is secure, you can remove the hair tie holding the regular braid from before. Use your fingers to unravel that braid so that your ponytail is nice and smooth.[18]
-
9Leave your hair as it is for a quick, chic style. If you want to step things up a bit, take a thin section of hair from under the ponytail, then wrap it around the base of the tail to hide the hair tie. Secure the thin strand with a bobby pin.[19]
- For more texture, braid the thin strand first.
-
10Twist your ponytail into a bun if you want an up-do. Secure the bun with bobby pins when you are done. If you want more texture, braid the ponytail first, then twist it into a bun. You can also use a bun maker by doing the following:
- Slide your ponytail through a bun maker/hair doughnut. Nestle the bun maker over the hair tie.
- Spread your hair over the bun maker so that you can't see it.
- Wrap a hair tie around the base of the bun, cinching the hair under the bun maker.
- Wrap and tuck the loose hairs around the base of the bun to hide them.
- Secure everything with bobby pins.
-
11Set your style with hairspray. It would be a good idea to do this, even if you stuck with a simply ponytail. Remember to spray the bottom braid as well![20]


Expert Q&A
-
QuestionIs sleeping in braids bad for your hair?
 Ndeye Anta NiangNdeye Anta Niang is a Hair Stylist, Master Braider, and Founder of AntaBraids, a traveling braiding service based in New York City. Ndeye has over 20 years of experience in African hair including braiding box braids, Senegalese twists, crochet braids, faux dread locs, goddess locs, kinky twists, and lakhass braids. Ndeye was the first female of her tribe in Africa to move to America and is now sharing her knowledge of African braids passed on from generation to generation.
Hair Stylist & Master BraiderNot necessarily. If your braids aren't too tight and you don't sleep directly on top of them, they can actually protect your hair. Braided hair is insulated and if you toss and turn a lot when you sleep, the braids can help prevent breakage. -
QuestionDo I have to have a partner do it?
 Community AnswerIt is easier if you have someone helping you, but you can do this on yourself too.
Things You'll Need
- Brush
- Rat-tail comb
- Clear hair elastics
- Bobby pins (for buns)
- Hair ties (optional, for ponytails)
- Hairspray


References
- ↑ http://camillestyles.com/beauty-and-style/beauty-tutorials/upside-down-braided-bun
- ↑ http://www.allure.com/story/upside-down-french-braid
- ↑ http://camillestyles.com/beauty-and-style/beauty-tutorials/upside-down-braided-bun
- ↑ http://camillestyles.com/beauty-and-style/beauty-tutorials/upside-down-braided-bun
- ↑ http://camillestyles.com/beauty-and-style/beauty-tutorials/upside-down-braided-bun
- ↑ http://camillestyles.com/beauty-and-style/beauty-tutorials/upside-down-braided-bun
- ↑ http://camillestyles.com/beauty-and-style/beauty-tutorials/upside-down-braided-bun
- ↑ http://www.barefootblonde.com/2014/08/upside-braided-bun/
- ↑ https://www.youtube.com/watch?v=K6X6xFxOqbk
- ↑ http://www.barefootblonde.com/2014/08/upside-braided-bun/
- ↑ https://www.youtube.com/watch?v=JnUO5unOhoU
- ↑ https://www.youtube.com/watch?v=JnUO5unOhoU
- ↑ https://www.youtube.com/watch?v=JnUO5unOhoU
- ↑ https://www.youtube.com/watch?v=JnUO5unOhoU
- ↑ https://www.youtube.com/watch?v=JnUO5unOhoU
- ↑ https://www.youtube.com/watch?v=JnUO5unOhoU
- ↑ https://www.youtube.com/watch?v=JnUO5unOhoU
- ↑ https://www.youtube.com/watch?v=JnUO5unOhoU
- ↑ https://www.youtube.com/watch?v=K6X6xFxOqbk
- ↑ http://www.barefootblonde.com/2014/08/upside-braided-bun/
- ↑ http://www.allure.com/story/upside-down-french-braid
- ↑ http://www.barefootblonde.com/2014/08/upside-braided-bun/
About This Article