This article was co-authored by wikiHow Staff. Our trained team of editors and researchers validate articles for accuracy and comprehensiveness. wikiHow's Content Management Team carefully monitors the work from our editorial staff to ensure that each article is backed by trusted research and meets our high quality standards.
There are 13 references cited in this article, which can be found at the bottom of the page.
This article has been viewed 64,812 times.
Learn more...
Form tubes make it easy to pour concrete support footings for mailboxes, fence posts, decks, and other structures. After digging a hole in the correct dimensions for the support, slide the form tube into the hole and fill it with concrete, making sure the concrete mix is properly consolidated to eliminate air pockets and other defects. The concrete will cure within 48-72 hours, at which time it will be strong enough to stand up to the strain of construction.
Steps
Digging the Hole for the Footing
-
1Figure out how deep the support needs to sit. Refer to your local building codes to find the depth requirements for the concrete support footings of structures being built in your area. Most of the time, footings will need to reach below the topsoil frost line to prevent them from shifting as the ground freezes and thaws.
- Search by state, province, or territory to pull up a copy of your local building codes online.[1]
- Some building codes may also specify that the support footings for a certain type of structure be a certain diameter, which may determine the size of the form tubes you use.
- Plan on digging about 6 inches (15 cm) deeper than the building codes require. The deeper the hole, the more solid the support will be.
-
2Dig a hole for the support. Use a post hole digger to scoop out the soil where you plan to place the footing. The hole should be slightly wider than the diameter of the form tube. Having an additional 1–2 inches (2.5–5.1 cm) of space on either side will allow you to fit the tube in without difficulty.[2]
- Avoid digging the hole too wide or too deep. This will only increase the amount of backfilling you'll have to do later.
Advertisement -
3Fill the bottom of the hole with 2–6 inches (5.1–15.2 cm) of gravel. For most projects, a medium-sized all-purpose gravel will provide the best results. A layer of gravel will promote runoff, which can protect the footing from slipping or weathering and increase its lifespan.[3]
- If you live in an area that receives high annual rainfall, pour the gravel a little thicker to prevent water from pooling at the base of the footing.
-
4Compact the gravel with a wood post. Use the blunt end of the post to tamp the gravel down flat. This will force the piece closer together, offering increased stability and creating a more level base.[4]
- To ensure that the footing sits perfectly straight, it's important that the bottom of the hole be as level as possible.


Cutting the Form Tube
-
1Mark the desired depth on the outside of the form tube. Stretch a tape measure along the side of the tube and use a carpenter's pencil to draw a line indicating the depth measurement. You'll be sawing along this line to cut the tube to the right size.[5]
- Concrete form tubes can be purchased at most major home improvement centers. They typically come in 4' lengths, which you cut to size yourself depending on the needs of your project.
- Form tubes are available in diameters of 6 inches (15 cm), 8 inches (20 cm), 10 inches (25 cm), and 12 inches (30 cm). Make sure the tube you're using meets the size requirements outlined in your local building codes for the structure you're putting up.
-
2Use a handsaw to cut the tube to length. Lay the tube on its side and line up the teeth of the saw blade with the marking you just made. Saw straight through the tube using smooth, precise strokes, steadying it with your free hand while you work. It may help to do your sawing on grass or another soft surface to keep the tube from rolling or sliding.[6]
- You can also fire up a reciprocating saw to make cleaner cuts and shave a little time off your project.[7]
- If you live somewhere with particularly wet conditions, consider adding 4–6 inches (10–15 cm) to the length of the form tube. The added height will place the footing a few inches above the soil so that your lumber won't be directly exposed to standing water.[8]
-
3Insert the form tube into the support hole. Slide the tube in with the sawed-end down so that the upper end is straight and level. Once you've got the tube in the hole, press down firmly from the top to sink it deeper into the gravel base.[9]
- Place a level across the opening of the tube to make sure it's sitting flush before moving on.
-
4Backfill the support hole. Push the loose dirt in around the form tube using your shovel. Pile any remaining soil up around the edges and tamp it gently. With the hole filled, the tube should sit upright on its own.[10]
- A freestanding tube will be much easier to fill with concrete.


Adding the Concrete
-
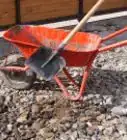
1Fill the form tube halfway with concrete. Shovel the wet concrete mix into the tube a little at a time to avoid making a mess. It should come to a stop roughly 12 inches (30 cm) from the top of the tube.[11]
-
2Consolidate the concrete using a hand trowel. Jam the tip of the trowel into the surface of the concrete repeatedly. Agitating the concrete will work out air pockets, dry spots, and other inconsistencies. Continue consolidating until the concrete has settled completely inside the tube.[12]
- You can also use a piece of rebar to reach down further into deep support holes.
- If left untreated, even small air pockets can lead to serious structural defects like cracking and crumbling.
-
3Finish filling the form tube to the top. Scoop enough of the remaining concrete mix into the tube to bring it just above level. As a rule, it's a good idea to overfill the tube by about 1–2 inches (2.5–5.1 cm). When smoothed, this will create a rounded upper surface that's more attractive and encourages drainage.[13]
- Avoid piling the concrete on too high. There only needs to be a slight rise near the center of the footing.
-
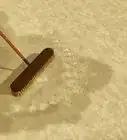
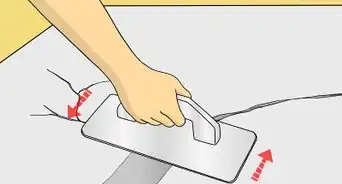
4Consolidate and level the concrete. Churn the concrete thoroughly once again to prevent voids from forming in the top half of the footing. Then, smooth the surface with the flat side of your trowel. By the time you're done, the concrete should be free of lumps, depressions, or seams.[14]
- Tap the side of the tube with your trowel or shovel a few times to free any air trapped beneath the surface of the concrete.[15]
-
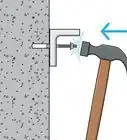
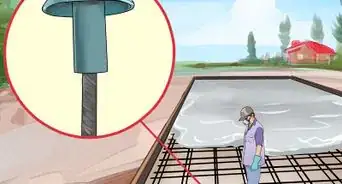
5Install any necessary deck hardware. If the structure you're building calls for a post base or bracket, the best time to insert it is while the concrete is still wet. Press the hardware gently into the surface, making sure it's centered and oriented correctly. Once the piece is in place, use your trowel to correct any noticeable imperfections in the surrounding concrete.[16]
- The concrete will dry with the hardware inside, anchoring it permanently into place.
-
6Allow the concrete to cure for at least 24 hours. After it's had a full day to set up, the footing should be strong enough to support the weight of your building materials. If you're using a standard strength mix, it may need as long as 3 days to harden to the point where it can hold up to strain. Avoid disturbing the concrete in the meantime.[17]
- Quick-setting concrete formulas begin to cure within 30-40 minutes, which can come in handy if you're on a tight schedule.[18]
- Plan your project for a stretch of days with clear, dry weather. Excess moisture may cause drying times to increase.


Things You'll Need
- Concrete form tubes
- Concrete mix
- All-purpose gravel
- Post hole digger
- Handsaw or reciprocating saw
- Shovel
- Hand trowel
- Tape measure
- Level
- Carpenter's pencil


References
- ↑ https://www.buildingsguide.com/blog/resources-building-codes-state/
- ↑ https://www.packagepavement.com/how-to-projects/using-quikrete/quick-tubes-use/
- ↑ https://inspectapedia.com/decks/Deck_Pier_Install.php
- ↑ https://www.youtube.com/watch?v=MCa_87Dkw1M&feature=youtu.be&t=69
- ↑ https://www.youtube.com/watch?v=MCa_87Dkw1M&feature=youtu.be&t=77
- ↑ https://www.quikrete.com/athome/video-deck-footings.asp
- ↑ https://inspectapedia.com/decks/Deck_Pier_Install.php
- ↑ https://www.packagepavement.com/how-to-projects/using-quikrete/quick-tubes-use/
- ↑ https://www.youtube.com/watch?v=MCa_87Dkw1M&feature=youtu.be&t=82
- ↑ https://www.youtube.com/watch?v=PFO-Pp5WhDw&feature=youtu.be&t=29
- ↑ https://www.thisoldhouse.com/how-to/how-to-pour-concrete-deck-footing
- ↑ http://www.concreteconstruction.net/how-to/materials/consolidating-concrete_o
- ↑ https://www.youtube.com/watch?v=MCa_87Dkw1M&feature=youtu.be&t=116
- ↑ https://www.quikrete.com/athome/video-deck-footings.asp
- ↑ https://www.thisoldhouse.com/how-to/how-to-pour-concrete-deck-footing
- ↑ https://www.youtube.com/watch?v=PFO-Pp5WhDw&feature=youtu.be&t=81
- ↑ https://www.thisoldhouse.com/how-to/how-to-pour-concrete-deck-footing
- ↑ https://www.todayshomeowner.com/video/using-fast-setting-concrete-for-setting-posts/
About This Article