This article was co-authored by wikiHow staff writer, Nicole Levine, MFA. Nicole Levine is a Technology Writer and Editor for wikiHow. She has more than 20 years of experience creating technical documentation and leading support teams at major web hosting and software companies. Nicole also holds an MFA in Creative Writing from Portland State University and teaches composition, fiction-writing, and zine-making at various institutions.
The wikiHow Tech Team also followed the article's instructions and verified that they work.
This article has been viewed 65,249 times.
Learn more...
This wikiHow teaches you how to watch and create Instagram stories on your phone or tablet. Stories are ongoing collections of photo and video moments that people share throughout the day. Each Instagram user has their own story that might include music, special effects, polls, quizzes, stickers, and more. Video clips can only be 15 seconds long, but they can be combined with other clips and photos to create a collage effect. Each post to a user's story is visible for up to 24 hours before disappearing.
Steps
Watching Stories
-
1Open Instagram on your phone or tablet. Before you create your own story, it's a good idea to check out other peoples' stories to get the hang of what's going on. Just remember that watching stories is not anonymous—the person who posted the story will be able to see that you've viewed it.
- If you're already familiar with other peoples' stories, check out Creating a Story.
-
2Tap the house icon. It's at the bottom-left corner of the screen. This takes you to your feed.Advertisement
-
3Tap a user's profile image in the story reel. If someone you're following has posted a story within the last 24 hours, it will appear in the row of round user icons running along the top of your feed. Swipe across the icons to see what's available, then tap a user to play their first story post.
- People can post multiple photos and videos to their stories. When you start watching someone's story, you'll see all of their story posts in order. Instagram will then show you the next user's story. You'll always know whose story you're watching because the person's username will appear at the top of the screen.
- If you don't hear sound on a video, press your phone or tablet's volume-up button once to enable it.
- You can also view someone's story from their Instagram profile. Just navigate to the person's profile to see if there's a pink ring around their photo. If you see that ring, tap the photo to watch their story.
-
4Navigate the story posts. To start the current post over again, tap the left side of the screen. To skip to the next, tap the right side.
- If you want to skip a user's remaining story posts altogether and move to the next user, swipe left across the current story.
- To stop watching all stories, tap the X at the top-right corner of the screen.
-
5Tap Send Message to reply to a story. In addition to adding text, you can also choose from several emoji reactions.
- If you don't see the option to reply, it's usually due to the user's privacy settings.
- To send a story to another user, tap the paper airplane icon at the bottom of the screen. If you don't see this icon, the user doesn't allow their stories to be shared.
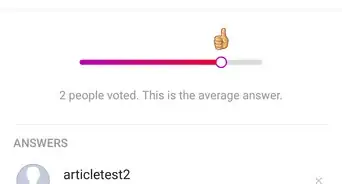
- Some stories include polls, quizzes, and games. Tap the different features in these stories to participate.


Creating a Story
-
1Open Instagram on your phone or tablet. Now that you've seen other peoples' stories, it's time to create your own. If your feed doesn't open by default, tap the house icon at the bottom of the screen to go there now.
-
2Tap the camera icon. It's at the top-left corner of your feed. This opens the story editor to the Normal tab.
- If it's your first time posting a story, you may have to give Instagram permission to access your camera, microphone, and camera roll before you continue.
- You can also get to the story editor by swiping right on your feed.
-
3Check out the story modes. The tabs at the bottom of the camera screen represent different tools you can use to create content. Swipe left or right across the options to see what's available. Here's what each option does:
- Normal: This lets you create a new photo or video, as well as upload exiting photos and videos from your phone or tablet. Videos can be a maximum of 15 seconds in length, but you can always add multiple clips for a longer experience.
- Live: This feature allows you to broadcast video live. The live video will then be saved to your Instagram story so anyone who missed it can watch it for the next 24 hours. For more about live broadcasting, check out How to Broadcast Live on Instagram.
- Create: Create Mode allows you to customize your story from scratch. You can add text, insert GIFs, use fun templates, create polls, and much more. Select this option if you don't want to add a new photo or video to experiment with other types of content.
- Boomerang: This lets you record a burst of still photos that loop back-and-forth. To use Boomerang, tap and hold the Record button at the bottom-center part of the screen for up to 3 seconds.
- Superzoom: This creates a brief video that zooms in on a subject while playing a dramatic sound effect. Point the camera at the subject, tap the subject on the screen to focus, and then hold the Record button.
- Hands-Free: This lets you record video without having to hold your finger down on the record button.
- Music: This lets you choose a song from a large database that plays while you record your video. You can use the Trim tool to choose the part you want to play, as well as the music note at the top of the screen to choose effects that respond to the beat. You can also add music after adding content in Normal or Hands-Free mode.
-
4Tap the gear to set your story preferences. Before you create your first story, tap this icon at the top-left corner so you can control its behavior. Here you can:
- Tap Hide Story From to control who can and cannot view your story. Search for or tap on the names of the followers whom you would like to keep from seeing your story. Tap Done in the top-right corner when you're done.
- Tap Close Friends to manage your Close Friends list, which is a special list you can choose to share your story with. After creating your list, you can upload stories to those users only by selecting Close Friends when uploading.
- Select an option under "Allow Message Replies" to control who can send you messages in response to your stories.
- If you'd like to automatically save your stories to your Archive once they disappear (recommended), enable the "Save to Archive" option (required if you use the Highlights feature).
- To allow people to share your stories as direct messages with other Instagram users, enable "Allow Sharing as Message."
- If you'd like Instagram to automatically syndicate your story posts to your Facebook story, enable "Share Your Story to Facebook."
- Tap Done when you're finished in this section.
-
5Snap or upload a photo. If you just want to add a still photo, you can do so in Normal mode. If the photo is already on your phone or tablet, tap the gallery icon at the bottom-left corner to pull up your photos, then tap the photo you want to add. Otherwise, follow these steps to take a new photo:
- Tap the camera with two curved arrows at the bottom-right corner to toggle between the back and front cameras.
- Tap the lightning icon at the top-center part of the screen to toggle the flash on or off.
- To use a virtual reality filter, swipe through the options at the bottom of the screen, then tap an effect to try it out. These work a little better for video, but they could still be cool for photos.
- Tap the large circle at the bottom-center part of the screen to capture the photo. A preview will appear, which you'll have a chance to edit before posting.
- Skip to Step 7 to start editing your photo.
-
6Record a video. You can record video in Normal or Hands-Free modes. Videos can be up to 15 seconds long—if your video is longer, it'll be broken into 15-second clips that will all upload to your story in order. If you'd rather post a video from your camera roll, tap the gallery icon at the bottom-left corner to select a video. Here's how to record a new video:
- Tap the camera with two curved arrows at the bottom-right corner to toggle between the back and front cameras, and use the lightning icon at the top-center to toggle between flash modes.
- If you want to use a virtual reality filter, swipe through the options at the bottom of the screen, then tap an effect to use it as you record.
- Tap and hold the large circle at the bottom-center of the screen as you record (unless you're using Hands-Free mode, in which case you can tap once to start recording and again when you want to stop). Once you lift your finger from the button, a preview will appear.
- Tap the speaker to toggle the video's sound on or off.
-
7Select a filter. There are a few ways to add filters after uploading or recording:
- Swipe left or right on the preview to select a basic color and lighting filter.
- Tap the round smiley-face icon at the top to bring up the virtual reality filters that can still be applied after recording. Not all filters will be available at this point.
-
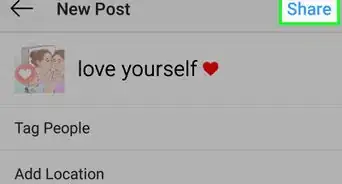
8Tap Aa to add text. This option will spring open the keyboard, allowing you to type what you wish on a photo or video. After typing, tap anywhere to close the keyboard and access the color and font tools.
- Tap through the style options at the top to experiment with fonts and weights.
- Tap and drag your caption to change the text position.
- With two fingers, pinch, pull, or twist your text to change its size and orientation.
- Tap Done when you're finished.
-
9Tap the squiggly line to draw. It's at the top of the screen. You can now draw or paint anywhere on the photo or video by dragging your finger across the screen.
- The icons at the top are different pens to draw with, as well as an eraser you can use to modify your lines.
- Drag the slider on the left to increase or decrease the pen size.
- Choose a color to draw with by tapping the colored circles at the bottom of the screen.
- You can undo your work stroke by stroke by tapping the "Undo" button in the top-left corner.
- Tap "Done" when you're finished.
-
10Tap the sticker icon to add special features. It's the square smiley-face icon with a turned-down corner. This screen contains dozens of extra goodies you can add to your story. Some of the options you'll find:
- Add tags: Tap Location to tag your location, Mention to tag another Instagram user, or Hashtag to add tappable hashtags.
- Stickers and GIFS: Tap GIF to add animated stickers from GIPHY, or scroll down and select one of the basic sticker suggestions at the bottom. You can drag these stickers anywhere you wish and adjust their sizes using pinching gestures.
- Interactive features: Tap Poll to ask your followers to vote on stuff, or Quiz to create a multiple-choice quiz. You can also solicit questions by selecting the Questions feature, which your followers can respond to no matter whether you've allowed or disallowed replies.
- Music: Tap Music to select a song clip (up to 15 seconds) to play in the background.
-
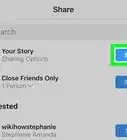
11Tap Your Story to add this post to your story. It's at the bottom-left. Your followers will now see your story in their own story reels at the tops of their feeds.
- If you'd like to save your video or photo to your phone or tablet, tap the downward-pointing arrow at the top-left corner to do so first. You can do this whether you share your story with others or not.
- If you'd rather just share with people on your Close Friends list, tap Close Friends instead.
- To send your post to specific people rather than add it to your ongoing story, tap Send To at the bottom-right corner, then choose people to share with.


Managing Your Story
-
1Open your story. To do this, tap your profile photo (it'll say "Your Story" below it) at the top-left corner of the screen. This plays the first clip of your story.
-
2Swipe up to see who has viewed your story. If anybody has viewed your story, you'll see the icon of an eye with a number next to it at the bottom of your screen. Tap on it to see the list of followers who have viewed your photo.
- If you have posted multiple photos or clips to your story, you can also swipe left and right on their thumbnails at the top of the screen to see who has viewed each individual photo.
- Tap the X in the top-right corner of the screen once you are finished reviewing your story viewers.
-
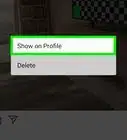
3Tap the More icon for additional options … . It's the three dots at the bottom-right corner of the screen. This opens a menu that allows you to do any of the following:
- Tap Delete to remove this post from your story.
- Tap Send to to share this post with others.
- Tap Tag Business Partner to tag advertisers mentioned in your story.
- Tap Story Settings to modify your privacy preferences.
-
4Add a story post to your Highlights. Although stories disappear after 24 hours, you can select certain content to remain visible on your profile using Highlights. People can view your highlights at any time by tapping them at the top of your profile. Here's how:
- Tap the heart at the bottom of your story to open the Add to Highlights menu.
- Tap an existing Highlights album, or tap + to create a new one.
- If you're creating a new album, you can give it a name and choose a cover image.
- Once you've created Highlights, you can manage them on your profile.


Community Q&A
-
QuestionWhich finger is optimal to use when taking a photo?
 Community AnswerI would say your pointer finger or thumb would be the best option when it comes to that, but you can decide based on what feels most comfortable.


About This Article

1. Tap the plus at the top-left corner.
2. Allow camera and mic access.
3. Adjust the camera direction.
4. Take a photo or snap a video.
5. Draw and write on the image.
6. Add stickers and other media.
7. Swipe through filters.
8. Tap Your Story to post.