This article was co-authored by wikiHow staff writer, Janice Tieperman. Janice is a professional and creative writer who has worked at wikiHow since 2019. With both a B.A. and M.A. in English from East Stroudsburg University, she has a passion for writing a wide variety of content for anyone and everyone. In her free time, you can find her working on a new crochet pattern, listening to true crime podcasts, or tackling a new creative writing project.
There are 16 references cited in this article, which can be found at the bottom of the page.
This article has been viewed 10,620 times.
Learn more...
Originally introduced on TV, Sleep Stylers are an invention that allow you to curl your hair overnight so you don’t have to worry about using a heating iron the next day. The Sleep Styler itself mimics the appearance of a traditional curler, but instead is a memory foam cylinder wrapped in yoga mat fabric.[1] Sleep Stylers come in large and mini sizes and can be used for a variety of hair lengths and thicknesses.[2] Using these rollers will shave time from your morning routine since you'll wake up with beautiful, curly hair!
Steps
Putting in the Rollers
-
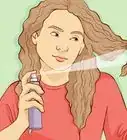
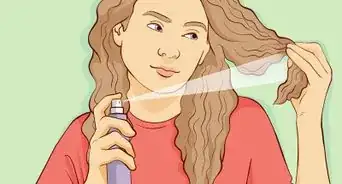
1Take a shower and dry your hair so that it’s damp. Make sure that your hair isn’t dry when you go to put in the Sleep Styler rollers. As with most curling products, wet hair is most effective for achieving noticeable curls, since wet hair is more likely to adhere to the roller and mimic its shape. You don’t want your hair to be soaking wet—blow dry it at a low temperature or towel dry it until it’s no longer dripping.[3]
- Brush your hair so that there are no tangles, and so you don’t have any trouble getting the curlers in.
-
2Choose the large Sleep Stylers if you have long, thick hair. The bigger size of the Sleep Styler is ideal for those with longer hairstyles, as it helps to give your hair gradual waves. If you want more intense curls, then this might not be the product for you.[4]Advertisement
-
3Opt for the mini Sleep Stylers if your hair is shorter and thinner. The mini Sleep Stylers work best on people sporting short haircuts. There are more rollers in a pack of mini Sleep Stylers than there are in a pack of large-sized Sleep Stylers. Having more rollers lets you put a smaller amount of hair in each one, which is perfect for those with thin hair.
-
4Divide your hair into 1 inch (2.5 cm) sections. If you have long, thick hair, put the top half into a bun so you can gradually add in the rollers. Use a rat-tail comb (or your fingers) to separate out each 1 inch (2.5 cm) wide portion. Working in sections helps make the curls look more pronounced later on. Additionally, tying up the top half of your hair makes it easier to start putting your rollers in from the top and work your way down.[5]
- If you have prominent bangs, consider sectioning those off as well.[6]
-
5Roll the Sleep Stylers horizontally if you want more voluminous curls. This type of curl is easiest to achieve with the mini Sleep Stylers, as long as you keep the rollers parallel to your hairline. Make sure that these are secured close to your scalp with a bobby pin so you can get maximum volume in your curls. This method works with all types of hair lengths and thicknesses.[7]
-
6Wrap and secure the rollers vertically if you want more gradual and wavy curls. Larger Sleep Stylers are the best tools to use for this look. Position the rollers so they're angled away from your face—this will make for a looser curl. This style works especially well with longer hair. When you wrap a Sleep Styler vertically, ensure that it rests in a parallel position to your ears.[8]
-
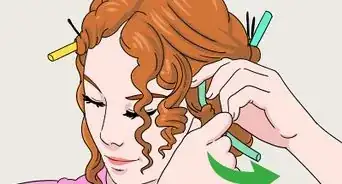
7Wrap a section of hair in the roller. Hold the roller in place while using your opposite hand to grab a piece of hair that’s at least 1 inch (2.5 cm) wide. Use both hands when you put in the Sleep Stylers—one to hold the actual Sleep Styler roller, and one to select a tendril of hair.[9] If your hair is longer and thicker, your piece of hair might be a little wider than 1 inch (2.5 cm).[10]
-
8Secure the roller so the curl stays in place. Take the Velcro strap that’s dangling from the Sleep Styler and loop it lengthwise around the curler. Attach the Velcro to the circular end of each roller. This helps your curls to look smooth and professional.[11]
- Stick a bobby pin into the hair already rolled into a Sleep Styler to connect it with the unrolled hair below. This helps to provide extra security.
-
9Work from the top to the bottom of your head. Continue taking or combing out small portions of your hair and wrapping them around the Sleep Stylers. It doesn’t matter if you go from left to right or vice versa, as long as you are starting near your scalp when you put in the rollers.[12]


Removing the Rollers
-
1Go to sleep with the rollers in. The real power of this product lies in its ability to work overnight, so get in bed and let your Sleep Stylers do the rest of the work. Since the rollers themselves are made out of soft material, they shouldn’t be too difficult to sleep with.[13]
- Be sure to get a full night’s sleep. This product won’t work if you only wear the rollers for a power nap. Make sure that you get a good night’s sleep whenever you wear them—for teens, that means 8.5 to 9.5 hours, while for younger and older adults, it means 7-9 hours.[14]
-
2Unwind 1 Sleep Styler from your hair by undoing the Velcro strap. Use your hand to remove the Velcro strap from the Sleep Styler, ensuring that it doesn’t touch and tangle any of your hair. With one hand, gently twist the Sleep Styler to free it from the curl before setting the empty roller aside. Make sure to twist in the same direction that the curled hair is going so that the curl doesn’t lose its shape in the process.[15]
- Wrap the loose Velcro strap around the body of the roller so you can store it more neatly.
-
3Keep unwinding, going from the front to the back. Keep unstrapping and unwinding the Sleep Stylers from your hair, setting them aside as you do so. Make sure that you unwind the roller from the hair and not vice versa, so you don’t compromise the style or shape of your new curls.[16]
- Depending on how many curlers you used, this shouldn’t take more than 5-10 minutes.
-
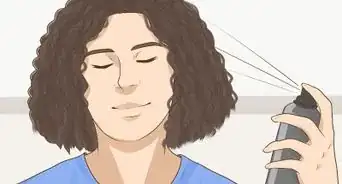
4Adjust your curls and style them as you see fit. Gently run your fingers through your curls to ensure that your hair looks neat and fresh. If you want your curls to hold their shape throughout the day, consider applying some hair spray before you head out.[17]


Warnings
- This product might not work for everyone. Don’t be disappointed if you don’t get the same results as other people who have tried Sleep Stylers.⧼thumbs_response⧽
Things You’ll Need
Putting in the Rollers
- Sleep Stylers (large or mini)
- Brush
- Rat-tail comb (optional)
- Hair dryer (optional)
- Hair tie
- Bobby pins
Removing the Rollers
- Hair spray (optional)
References
- ↑ https://m.youtube.com/watch?v=P6rDE95WKOo&t=2m39s
- ↑ https://www.today.com/series/today-tests/sleep-styler-review-will-you-get-beach-waves-overnight-t118853
- ↑ https://m.youtube.com/watch?v=P6rDE95WKOo&t=1m12s
- ↑ https://www.today.com/series/today-tests/sleep-styler-review-will-you-get-beach-waves-overnight-t118853
- ↑ https://m.youtube.com/watch?v=6d8OIatgOUE&t=9m31s
- ↑ https://m.youtube.com/watch?v=6d8OIatgOUE&t=8m43s
- ↑ https://m.youtube.com/watch?v=6d8OIatgOUE&t=15m46s
- ↑ https://m.youtube.com/watch?v=6d8OIatgOUE&t=23m39s
- ↑ https://m.youtube.com/watch?v=h00nAKqZlCw&t=2m22s
- ↑ https://m.youtube.com/watch?v=6d8OIatgOUE&t=9m45s
- ↑ https://m.youtube.com/watch?v=6d8OIatgOUE&t=15m46s
- ↑ https://m.youtube.com/watch?v=P6rDE95WKOo&t=4m14s
- ↑ https://m.youtube.com/watch?v=P6rDE95WKOo&t=3m45s
- ↑ https://www.sleepfoundation.org/excessive-sleepiness/support/how-much-sleep-do-we-really-need
- ↑ https://m.youtube.com/watch?v=h00nAKqZlCw&t=4m24s
- ↑ https://m.youtube.com/watch?v=P6rDE95WKOo&t=5m4s
- ↑ https://m.youtube.com/watch?v=P6rDE95WKOo&t=5m13s
- ↑ https://www.today.com/series/today-tests/sleep-styler-review-will-you-get-beach-waves-overnight-t118853
- ↑ https://m.youtube.com/watch?v=6d8OIatgOUE&t=3m29s