This article was co-authored by wikiHow Staff. Our trained team of editors and researchers validate articles for accuracy and comprehensiveness. wikiHow's Content Management Team carefully monitors the work from our editorial staff to ensure that each article is backed by trusted research and meets our high quality standards.
This article has been viewed 68,566 times.
Learn more...
Tiki torches are a fun way to add ambiance to your event, but it’s important to use them safely. Whether you’re throwing a one-time party or hoping to add some everyday pizzazz to your garden, tiki torches can help you achieve the yard of your dreams. By setting up, fueling, and storing your tiki torches, you can make your yard a special (and safe) place to enjoy with friends.
Steps
Setting Up Your Tiki Torches
-
1Place torches 6–8 feet (1.8–2.4 m) (1.83-2.44 m) apart. Use a measuring tape to space your torches in your yard. This will help prevent accidents if you accidentally knock a torch over.
-
2Avoid placing tiki torches near overhangs or other flammable materials. Plant tiki torches away from trees, porches, awnings, or hanging party decorations. If you have a propane tank in your yard for a grill or your home, place your tiki torches at least 6 feet (1.8 m) (1.83 m) away.
- The more space you can allow between your torches and any potentially flammable materials, the better.
Advertisement -
3Place tiki torches at least 6 feet (1.8 m) (1.83 m) away from your home and shed. These are often made of flammable materials, such as wood, and may contain combustible cleaning materials.
-
4Use a 1 inch (2.5 cm) drill bit to create a hole for your tiki torch. Hold your drill perpendicular to the ground, and drill directly into the dirt until the hole is at least 6-8 inches (15.3-20.4 cm) deep. If you’re unsure how deep your hole is, withdraw your drill from the ground and check with your finger.[1]
- Avoid using this method to plant tiki torches in extremely hard soil or gravel, as you could damage your drill. To find the best method for your particular soil, follow the manufacturer’s directions.
-
5Plant your tiki torches. Place the bottom of your tiki torch in the hole you’ve created with your drill. If the hole needs to be larger for your tiki torch to fit, use your drill to widen the hole by drilling slightly off center from your original hole. Use a torch stake for extra stability, if needed.
- Repeat this process with the rest of the torches as desired.
- You can purchase torch stakes at your local garden or home improvement store. These secure your tiki torch with a tightening pin and simply need to be pressed into the ground to be installed.
-
6Pat dirt around the opening of your hole to secure your tiki torch. Use your hands to gather dirt that was displaced by drilling the hole. Press it firmly against the base of the tiki torch as it rests in the hole. Do this until the torch feels secure.
- When secured properly, your torch should stand perpendicular to the ground. If you apply gentle pressure to the staff, the torch should not move.


Fueling and Storing Your Torches
-
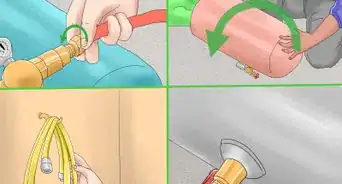
1Use a funnel to pour fuel into the torch. Buy a funnel whose stem fits snugly with the fuel opening of your tiki torches. Pour your fuel into the funnel slowly to avoid spills. Avoid overfilling the fuel reservoir by keeping an eye on the fuel level as you fill.
- If you don’t have a funnel, pour the fuel in a thin stream directly into the torch. Avoid pouring the fuel into another container and then trying to fill the torch, which can cause spills.
- An overfilled fuel reservoir will overflow and leak down the sides of the tiki torch.
-
2Soak up any spilled fuel with kitty litter. Let the kitty litter sit on the spilled fuel until it is clumped and firm to the touch, at least 10 minutes. Throw away the soiled kitty litter in its own garbage bag away from other flammable materials. Use a commercial-grade cleaning solution suited to the spill surface to remove any remaining fuel residue. Keep the area well ventilated after cleaning so it can dry out completely.
- Typically you can apply cleaner to the stain with a damp towel and let it air dry.
-
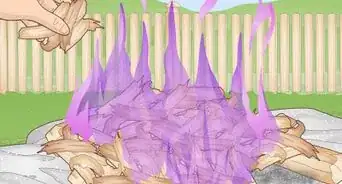
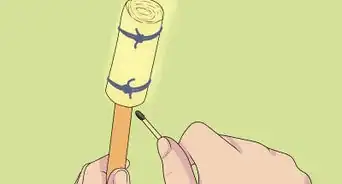
3Light your tiki torches. Use a match or lighter to ignite the wick of your tiki torches when you’re ready to use them. Avoid lighting them long before your event to keep from wasting fuel.
-
4Use a snuffer cap to extinguish your torches. When you want to extinguish your torches, place the snuffer cap completely over the wick and let the torch go out naturally. Remove the snuffer cap when the flame is out, and let the wick cool down completely.
- Once the wick is completely cool, replace the snuffer cap. This will protect your wick from the elements if you store your tiki torches outside.
- How long your torches take to cool down will depend upon how long they were lit. Hold your hand close to the torch to feel if it is still giving off heat, if you’re unsure.
-
5Store torches in an upright position when not in use. Make sure your torches are firmly staked into the ground if you intend to keep them outside. Keep an eye on the weather forecast, as temperatures below 32 ℉ (0 °C) will cause the fuel in your tiki torches to freeze.
- If you store your tiki torches in a garage or shed, use a tether to secure your torches upright.
- It is safe to let any unused oil stay in the torches while they are in storage.
- If the temperature hits freezing, either empty the fuel reservoirs of your outdoor tiki torches or bring them inside to a warmer area.


Decorating with Tiki Torches
-
1Throw a luau. Buy some leis and mix some mai-tais to set the scene for a fun Hawaiian party. Your tiki torches will provide some cool, thematic lighting to your gathering.
-
2Have an outdoor movie night. Set up tiki torches to lend a dim, pleasant atmosphere to a movie outside. Hang a white sheet to project a movie onto. You can serve popcorn and lay down a blanket and some throw pillows for additional comfort.
-
3Host a backyard BBQ. Buy some citronella-scented torch fuel to keep bugs at bay during a mid-summer gathering. You won’t have to worry about getting bitten while you chow down on ribs and pie.
-
4Throw a themed birthday party. Embrace a beach or jungle theme for a birthday party with tiki torches. You can decorate tables with coconuts, fruit or other decor to match. Cocktail umbrellas can also add a festive touch.
- Avoid using tiki torches around young children or rowdy pets. They are a fire hazard.
-
5Buy custom tiki torches. Explore online craft retailers, such as Etsy, to buy custom tiki torches to suit your event. There are wine bottle-torches, mason-jar torches, and more. Use your imagination!


About This Article

To set up tiki torches, position each torch 6 to 8 feet apart and away from any flammable materials to prevent any accidents. Drill a 6 to 8 inch hole in the ground for each tiki torch. Stabilize each tiki torch by patting dirt around the opening to the hole. Check that every tiki torch is secure by applying light pressure to it. If a tiki torch falls over, dig it deeper into the ground. To light a tiki torch, place a funnel into the opening and then use the funnel to pour fuel in. Ignite the wick of each tiki torch only when you’re ready to use them. To extinguish a tiki torch place a snuffer cap directly over the wick until the flame dies down. For more tips on using tiki torches, like how to decorate with them, read on.