This article was co-authored by Yuka Arora. Yuka Arora is a self-taught makeup artist who specializes in abstract eye art. She has been experimenting with makeup art for over 5 years, and has amassed over 5.6K Instagram followers in just 5 months. Her colorful and abstract looks have been noticed by Jeffree Star Cosmetics, Kat Von D Beauty, Sephora Collection, among others.
This article has been viewed 145,421 times.
Applying foundation with a brush or your fingers can result in streaks. The Beauty Blender sponge was invented by makeup artist Rea Ann Silva to ensure even, natural coverage. Use this bright pink sponge to apply foundation, cream blush, tinted moisturizer, and other makeup for a seamless effect. Your sponge can also come in handy for applying skin care products such as moisturizer, sunscreen, and self-tanner -- you just need to learn the right way to prepare the sponge and the proper techniques for the effect that you're going for.
Steps
Readying the Beauty Blender
-
1Moisten the sponge with water. One of the biggest mistakes you can make with a Beauty Blender is using the sponge dry to apply makeup and skincare products. Before using it, make sure to dampen it under the sink so it's thoroughly saturated. That will cause the sponge to expand, so it won't soak up as much of your cosmetic products.[1]
- You can use warm or cool water to dampen the Beauty Blender, but you may find your application more refreshing if you use cool water.
- If you don't have access to a sink when you're using your sponge, you can wet it with bottled water or even spritz it heavily with your favorite setting spray to dampen it.
-
2Squeeze the sponge to remove the excess water. While you want your Beauty Blender to be damp when you use it, it shouldn't be dripping wet. Before applying your makeup or other products, gently squeeze the sponge to remove all of the excess water.[2]
- Beauty Blenders are fairly delicate, so don't wring the sponge to get the water out. You may end up tearing or ripping it.
- When you squeeze the sponge, it helps to wrap it in a clean towel or piece of paper towel. That will help absorb the excess water.
Advertisement -
3Rehydrate the Beauty Blender as necessary. If you're doing a full face of makeup, you may find that your sponge starts to dry while you're applying it. To ensure that you get flawless results from the first step of your makeup routine to the last, keep a spray bottle of water, setting spray or facial mist on hand so you can lightly dampen the sponge when necessary.[3]
- Beauty Blender also makes a reactivation spray to moisten the sponge if it starts to become dry while you're using it.


Applying Makeup with a Beauty Blender
-
1Dab the sponge into the makeup. To use your Beauty Blender to apply foundation, concealer, blush, highlighter, setting powder, or any face makeup, press the damp sponge into the makeup. Don't dab it too hard, though, or you may wind up picking up too much product.[4]
- For makeup products such as foundation, tinted moisturizer, BB cream, or concealer, it helps to put some on the back of your hand and dab the sponge into it there. For the best results, don't apply the makeup directly to the Beauty Blender.
- For makeup products that are in a compact, such as cream blush or highlighter, you can dab the sponge directly into the pan.
- For loose powder products, such as setting powder, shake some into the lid and dab the sponge into it there.
- For makeup items that you'll be applying to large areas of the face, such as a foundation or cream blush, dab the rounded bottom of the sponge into the makeup.
- For makeup that you're concentrating in small areas, such as concealer under the eyes or highlighter along the cheekbones, dab the pointed end of the sponge into the makeup.
-
2Bounce the Beauty Blender over your face. When you've dabbed some of the makeup onto the sponge, tap the round bottom against your skin to apply the makeup. Don't wipe the sponge across your face, but bounce it to gently stipple or press the makeup into the skin for a flawless finish.[5]
- Stipple the sponge over your skin until all of the makeup is evenly blended. It may take a couple of bounces in the same area to fully blend the makeup.
- You don't have to press the sponge very hard against your skin to blend the makeup. Bounce it gently, and the sponge will do the rest of the work.
-
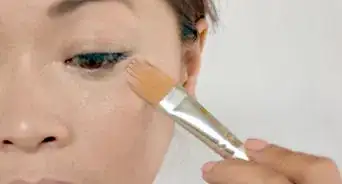
3Use the pointed edge to apply the makeup to smaller areas. To apply concealer or foundation under the eyes, around the nose, along the lips, or in another small areas, press the pointed edge of the Beauty Blender against the skin. You'll want to press a little harder than you would with the rounded edge to ensure that the makeup is completely blended into the skin.[6]
-
4Wash the sponge after you use it. Because the Beauty Blender sponge is so absorbent, it can easily grow bacteria. You want it to be clean the next time you use it, so try to get in the habit of washing it after each use to ensure that it's always ready when you need it.[7]
- Beauty Blender makes a liquid and a solid sponge designed specifically for washing your sponge.
- If you're on a budget, you can also wash your sponge with an antibacterial, fragrance-free dishwashing soap. A bar of antibacterial soap also works well for cleaning a Beauty Blender.
- To wash it, moisten the sponge with warm water and work some of the soap or cleanser into it. Create a lather, and keep washing until the water from the sponge runs clear.
- If there's a stain on your sponge that doesn't come clean from washing, soak it in a mixture of liquid soap and warm water overnight. If the makeup still doesn't come out of the sponge, try treating it with a thin oil, such as baby oil, before washing it. The oil can help break down the makeup that's trapped inside.
- Let your Beauty Blender sit out to air dry after you wash it.


Blending Out Makeup with Beauty Blender
-
1Dot the makeup onto your face. It can be difficult to dab the Beauty Blender into certain products, such as a concealer in a tube with a wand applicator or a cream blush stick. In those cases, dot the makeup directly onto the skin in the area(s) where you want to apply it.[8]
- Start by applying a small amount of the makeup, and only adding more if you need it. The sponge will blend out the product quite a bit, so a little can go a long way.
-
2Stipple the Beauty Blender over the makeup. Once the makeup is dotted onto your skin, bounce the damp sponge over the product to gently blend it into the skin. If you're concerned about the makeup spreading too far as you blend, use the pointed end of the Beauty Blender.[9]
- Because the sponge will pick up some of the product as you blend it out, be careful not to press the Beauty Blender onto other areas of the face or you may transfer the makeup.
-
3Roll the sponge over the area to smooth the makeup. When you stipple makeup that's already on the skin with the Beauty Blender, it can sometimes look a little patchy. To get a flawless, even finish, roll the side of the sponge over the area to smoothe out any streaks or patches.[10]
- Rolling the side of the Beauty Blender all over your face is an ideal finishing step to your look no matter how you apply your makeup. It will ensure that your makeup is fully blended, and there are no harsh edges or streaks.
- Just as when you use your Beauty Blender to apply makeup, make sure to wash your sponge after you've finished blending out your makeup so it's ready for your next use.


Erasing Makeup Mistakes with a Beauty Blender
-
1Start with a clean, dry sponge. While you should always dampen a Beauty Blender to apply makeup or skincare products, that's not the case if you're cleaning up makeup mistakes. Instead, make sure that your sponge is clean but completely dry before you start.[11]
- It helps to have an extra Beauty Blender -- one that you can use wet to apply your makeup and one that you can leave dry in case you need it to clean up mistakes.
-
2Drag the Beauty Blender over areas with too much color cosmetics. If you've applied too much blush or bronzer, wipe the sponge over the areas to help tone down the color. Because the sponge is dry, it will pick up more of the makeup and give you a more natural finish.[12]
-
3Roll the sponge over areas with cakey face makeup. If you've applied too much foundation, concealer, or setting powder, you can use the dry sponge to help pick up some of the makeup. Roll the side of the Beauty Blender over areas that look cakey, and the sponge will remove the excess.[13]
- You can use the same technique to smoothe out streaky foundation or lines around the edge of your face.


Using the Specialty Beauty Blenders
-
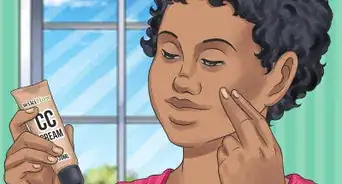
1Apply skin care products with a white Beauty Blender. The sponge is also ideal for pressing skin care products into the skin to ensure that they're fully absorbed. For the best results, though, use the Pure Beauty Blender, which is white so it doesn't contain any dyes that might irritate your clean skin.[14]
- Make sure to wet your Pure Beauty Blender before applying your moisturizer, serum, sunscreen, or other products just as you would when applying makeup. That way, you won't wind up wasting your skin care products because the sponge won't absorb as much.
-
2Use a black Beauty Blender to apply self-tanner. It can be difficult to apply self-tanner with a smooth, streak-free using your hands or even a large mitt. The sponge makes it easy to stipple the tanner into the skin for even color all over. Use the Beauty Blender Body Blender, though, which is black and won't be stained by the self-tanner.[15]
- The black Beauty Blender is also ideal for applying dark bronzers and long-wearing foundation that might be difficult to wash out of the traditional Beauty Blender.
-
3Do detail work with a Micro Mini Beauty Blender. While the pointed end of the sponge is small enough to get into nooks and crannies, it doesn't always offer the precision you might need. The Micro Mini Beauty Blender is a better option because it's ¼ the size of the original. Use it to apply concealer under the eyes, set undereye concealer with powder, or contour and highlight the face.[16]
- You can also use a Micro Mini Beauty Blender to apply cream eyeshadow to your lids.


Expert Q&A
-
QuestionHow do I make my makeup look smooth?
 Yuka AroraYuka Arora is a self-taught makeup artist who specializes in abstract eye art. She has been experimenting with makeup art for over 5 years, and has amassed over 5.6K Instagram followers in just 5 months. Her colorful and abstract looks have been noticed by Jeffree Star Cosmetics, Kat Von D Beauty, Sephora Collection, among others.
Makeup ArtistAfter applying powder, bronzer, and blush, take the sponge and dab it all over your face, especially in areas that tend to be dry or cakey. This makes the powder really smooth on your face, giving you the same effect as setting spray but without looking shiny! -
QuestionMy beauty blender doesn't expand when it's wet. Is this normal? Will it still work?
 Community AnswerIt should still work. It is better to use a wet beauty blender for foundation and cream contour -- just make sure that your beauty blender is not soaking wet, just damp.
 -
QuestionWould I only need one beauty blender if I'm using it for contour and foundation, or would I need two?
 Britney SchmidtCommunity AnswerI say you should use only one, especially if you don't have enough money for two. Just wash them thoroughly after every use so your makeup doesn't mix!
Things You'll Need
- Beauty Blender sponges
- Makeup or skincare products, such as foundation, concealer, cream blush, moisturizer, and serums
- Water
- Mild soap or Beauty Blender cleanser
- A clean towel or piece of paper towel


References
- ↑ http://www.refinery29.com/how-to-use-a-beauty-blender
- ↑ https://www.birchbox.com/magazine/article/how-to-use-a-beautyblender-like-a-pro-makeup-artist
- ↑ http://www.popsugar.com/beauty/Beautyblender-Tips-38789380#photo-38789479
- ↑ http://www.more.com/beauty/makeup/makeup-tools-products/how-use-beautyblender-why-you-need-one
- ↑ https://www.birchbox.com/magazine/article/how-to-use-a-beautyblender-like-a-pro-makeup-artist
- ↑ https://www.birchbox.com/magazine/article/how-to-use-a-beautyblender-like-a-pro-makeup-artist
- ↑ http://www.more.com/beauty/makeup/makeup-tools-products/how-use-beautyblender-why-you-need-one
- ↑ http://www.teenvogue.com/story/common-beauty-blender-mistakes
- ↑ http://www.more.com/beauty/makeup/makeup-tools-products/how-use-beautyblender-why-you-need-one
- ↑ http://www.refinery29.com/how-to-use-a-beauty-blender
- ↑ https://www.birchbox.com/magazine/article/how-to-use-a-beautyblender-like-a-pro-makeup-artist
- ↑ https://www.birchbox.com/magazine/article/how-to-use-a-beautyblender-like-a-pro-makeup-artist
- ↑ https://www.birchbox.com/magazine/article/how-to-use-a-beautyblender-like-a-pro-makeup-artist
- ↑ https://www.birchbox.com/magazine/article/how-to-use-a-beautyblender-like-a-pro-makeup-artist
- ↑ https://www.birchbox.com/magazine/article/how-to-use-a-beautyblender-like-a-pro-makeup-artist
- ↑ http://www.elle.com.au/beauty/beauty-tutorials/2016/7/how-to-use-a-beauty-blender/
About This Article

To use a beauty blender, start by moistening the sponge with water to prevent it from soaking up too much of the product you are blending. Dab the sponge into the makeup, and then tap the round bottom on your skin to apply the makeup. You can also use the pointed edge to apply makeup to smaller areas, like under the eyes and around the nose. After each use, wash the sponge with an antibacterial, fragrance-free dishwashing soap so it won’t grow bacteria. After washing and air drying your beauty blender, it will be ready when you next need it. To learn more from our Makeup Artist co-author, like how to erase mistakes in your makeup with the blender, keep reading the article!