This article was co-authored by wikiHow Staff. Our trained team of editors and researchers validate articles for accuracy and comprehensiveness. wikiHow's Content Management Team carefully monitors the work from our editorial staff to ensure that each article is backed by trusted research and meets our high quality standards.
There are 9 references cited in this article, which can be found at the bottom of the page.
This article has been viewed 30,111 times.
Learn more...
As technology has progressed, digitization has taken over much of the art form of photography. Using negatives represents one of the earliest techniques within the field and there are several different ways to view these negatives. The most common methods are by either using a flat-bed scanner, which many people commonly own, or by using dedicated film scanners, which generally only work with 35mm film strips and are much less common.
Steps
Using a Flat-Bed Scanner
-
1Open the scanning software on your computer. Leave the scanner in "standard" mode if there are no other options available. This means that your scanner is only equipped to handle regular scanning. It's still possible to scan your negatives using this type of scanner, just follow the backlighting step later on.[1]
-
2Select "professional" mode in your scanning software if available. If there is a professional mode, this means that your scanner is equipped to scan negatives directly. There will be several different "modes" when the software opens and it will probably be defaulted on "standard".
- Professional mode allows you to select more detailed options for the scan.
Advertisement -
3Ensure that you have a photo editing software on your computer. These softwares allow you to edit the photo once the image has been scanned into your computer.[2] Examples of editing software include:
- Microsoft Paint
- Adobe Photoshop
- Pixlr
- Photoscape
-
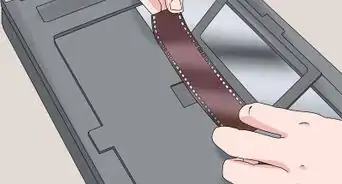
4Clean the negative. It’s really important to make sure that the negative is clean and free from any dust or fingerprints as this will drastically impact the quality of the scan.[3]
- If the film is very dirty, it can sometimes be an idea to get hold of some anti-static emulsion cleaner.
- You can also use non-abrasive pads to clean dust and other particles off of the film.
-
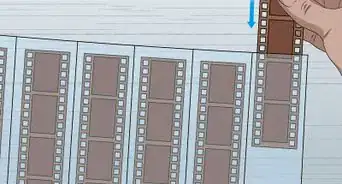
5Place the negative on the scanner with the shiny/reflective side facing down. This can be determined by holding the negative up to the light and gently flicking it side to side. One side will be dull/matte and the other will be shiny/reflective.[4]
-
6Construct your backlight if you have a standard scanner. In order to be scanned properly, the negative needs to be backlit. The easiest way to do this is to cover the negative with a piece of paper and then shine a bright light directly onto the paper.[5] The lid of the scanner should be up. Examples of good light sources might be:
- Desk lamp
- iPhone facing down on the paper with the screen on full brightness
- Propped up torch
-
7Scan your image. In the scanning software, select the highest resolution possible. If it gives you the option, the format you select should be “film".[6]
- If you have professional mode, tick the “dust removal” box as this will assist in getting the highest possible quality image.
-
8Save the image as a JPEG. A JPEG is a standard image format and will allow you to easily edit the photo once you have it open in your editing software.[7] Unless you are operating on a more professional basis, JPEG format will be sufficient.
-
9Convert your scan. Open your editing software and proceed to open the JPEG file you scanned in. The image will be in negatives so select either the “invert image” tool or the “positive exposure” tool in the toolbar.[8] The image will now be colored normally and ready to use.


Using a Film Scanner
-
1Make sure you have 35mm film negatives. Most dedicated film scanners are specially designed to process 35mm negatives. For any other format, you will likely need a flat-bed scanner.
- You can tell if a film negative is in 35mm if the dimensions of the frame are 24mm by 36mm.[9]
- You can use 35mm negatives in flat-bed scanners as well, but they come out much sharper in film scanners.
-
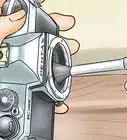
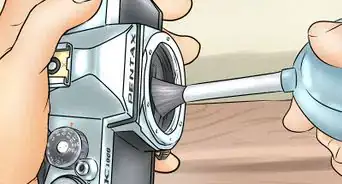
2Clean the negative. It’s really important to make sure the negative is clean in order to ensure that the scanned image doesn’t have any spots or distortions on it. Be very gentle when handling the film and ideally use tweezers to avoid scratching the film or leaving fingerprints on it.[10]
-
3Insert the film into the negative holder. Dedicated film scanners have a specific holder for your negatives to sit in as they have a tendency to curl up which can completely distort the image.[11] This holder will ensure that the film lies flat while it is being scanned.
- The shiny/reflective side should be facing up for this type of scanner.
-
4Scan the image. Once the negatives are inserted, select “preview” in the scanning software on your computer so you can see what a reduced resolution scan will look like. Before you scan the photo, run a checklist to make sure you will get the highest quality image possible.[12] This will include:
- Checking the “dust removal” box.
- Selecting the “film” format.
- Choosing the highest resolution available.
-
5Edit the image in your chosen software. Open your editing software and open the file that you have saved as a JPEG. It will be in negatives so select the “invert image” tool or the “positive exposure” tool to convert it to a regular looking image. You can now edit the photo and add any touch ups where you deem necessary.[13]


References
- ↑ http://howtoscan.ca/negative-scanning/load-negative-scan.php
- ↑ https://www.digitaltrends.com/computing/best-free-photo-editing-software/
- ↑ https://www.familysearch.org/blog/en/scan-film-negatives-pro/
- ↑ http://howtoscan.ca/negative-scanning/load-negative-scan.php
- ↑ https://www.pcworld.com/article/211222/scan_slides.html
- ↑ http://geekbeat.tv/how-to-scan-and-convert-film-negatives-to-digital-for-free/
- ↑ https://kb.iu.edu/d/adqe
- ↑ https://content.photojojo.com/how-to-scan-film/
- ↑ http://www.digitalcopycat.com/slide_negative_identification.html
About This Article