This article was co-authored by wikiHow staff writer, Janice Tieperman. Janice is a professional and creative writer who has worked at wikiHow since 2019. With both a B.A. and M.A. in English from East Stroudsburg University, she has a passion for writing a wide variety of content for anyone and everyone. In her free time, you can find her working on a new crochet pattern, listening to true crime podcasts, or tackling a new creative writing project.
There are 11 references cited in this article, which can be found at the bottom of the page.
This article has been viewed 8,255 times.
Learn more...
After months and years of use, your cupboards might be looking a little worse for wear. Don’t worry! Vinyl door wrapping can make all kinds of cupboards look sleek and beautiful without the need for any expensive repairs or renovations. If you’d like to wrap your own cupboards, you’re in good hands—we’ve answered some of your frequently-asked questions to help you tackle this easy home improvement project.
Steps

What types of vinyl wraps are there?
-
1Adhesive-backed vinyl wraps are the most convenient. Adhesive vinyl wraps are smooth on 1 side and sticky on the other, and are really easy to use. Just remove the backing paper and press the sticky side of the vinyl wraps onto the cupboard.[3]
-
2Heat-activated vinyl wraps are another option. For this method, place the vinyl wrap directly on top of your cupboard. Then, heat the material with a hair dryer so the wrap sticks to the door.[4]


How do you vinyl wrap a cupboard?
-
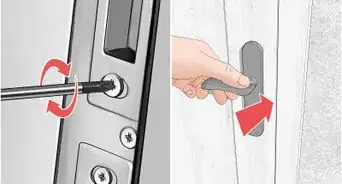
1Remove, disassemble, and clean the cupboard door. Disconnect the door hinges from the cupboard with a screwdriver, and set the door on a flat surface. Then, remove the handle from the front of the cupboard, setting it aside for later. Clean off the front of the door with a de-greasing agent, so the surface is prepped and ready to go.[7]
-
2Apply the vinyl wrap to the front of the cupboard door. Lay a sheet of vinyl wrap on a flat surface. Then, peel back 4 to 6 in (10 to 15 cm) of the backing paper, so part of the sticky side is exposed. Take a moment to center and place your cupboard door front-side-down on the vinyl wrapping. This way, the top of the vinyl wrap will stick to the top 2 in (5.1 cm) of the cupboard door.[8]
- Try to leave around 2 to 3 in (5.1 to 7.6 cm) of vinyl hanging off each side of the cabinet door, so you can wrap it along the inside of the door.
-
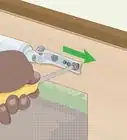
3Remove the rest of the backing paper and squeegee it onto the cupboard door. Flip the cupboard door over, so the backing paper is facing down. Use 1 hand to slowly peel away the backing paper, and your other hand to smooth the sticky vinyl onto the door with a squeegee.[9]


How do you finish setting up the door?
-
1Slice the corners of the vinyl wrap with an X-acto knife. Cut through the wrap at a 45-degree angle, slicing from the outer corner of the wrap to the outer corner of the cupboard door. Repeat this along all 4 corners of the door.[10]
-
2Wrap the extra vinyl along the inner door and cut away any excess. Carefully and tightly fold the excess vinyl over and onto the inner door of the cabinet. Then, slice away any leftover material that’s hanging over the edge of the door with your X-acto knife, so the next vinyl edge is easier to fold and smooth into place. Repeat this process along the other 3 edges of the door.[11]
- You’ll need to trim the vinyl wrap so it fits snugly around the door hinges.
-
3Attach the handle and reinstall the door. Screw the handle back along the front of your newly-wrapped cupboard door. Then, reattach the door hinges into your cupboard. You can now admire all your hard work![12]


Warnings
- You can technically paint over a vinyl wrap, but experts don’t recommend it. Unfortunately, once your vinyl wrap starts peeling, the paint will also peel away.[17]⧼thumbs_response⧽


References
- ↑ https://www.thekitchendoorcompany.com.au/blog/everything-you-need-know-about-vinyl-wrap-kitchen-cabinet-doors
- ↑ https://modernds.co.uk/how-to-wrap-kitchen-doors-with-grooves/
- ↑ https://www.thekitchendoorcompany.com.au/blog/everything-you-need-know-about-vinyl-wrap-kitchen-cabinet-doors
- ↑ https://www.thekitchendoorcompany.com.au/blog/everything-you-need-know-about-vinyl-wrap-kitchen-cabinet-doors
- ↑ https://www.thekitchendoorcompany.com.au/blog/everything-you-need-know-about-vinyl-wrap-kitchen-cabinet-doors
- ↑ https://m.youtube.com/watch?v=G_L3bQyVrZs&t=0m16s
- ↑ https://m.youtube.com/watch?v=G_L3bQyVrZs&t=0m16s
- ↑ https://m.youtube.com/watch?v=G_L3bQyVrZs&t=0m53s
- ↑ https://m.youtube.com/watch?v=G_L3bQyVrZs&t=1m14s
- ↑ https://m.youtube.com/watch?v=G_L3bQyVrZs&t=1m46s
- ↑ https://m.youtube.com/watch?v=G_L3bQyVrZs&t=2m5s
- ↑ https://m.youtube.com/watch?v=G_L3bQyVrZs&t=3m10s
- ↑ https://modernds.co.uk/how-to-wrap-kitchen-doors-with-grooves/
- ↑ https://m.youtube.com/watch?v=G_L3bQyVrZs&t=3m17s
- ↑ https://m.youtube.com/watch?v=hhKJc9hIf2E&t=1m36s
- ↑ https://www.dianellapolishing.com.au/blog/vinyl-wrapped-kitchens-what-you-need-to-know/
- ↑ https://www.dianellapolishing.com.au/blog/vinyl-wrapped-kitchens-what-you-need-to-know/