This article was co-authored by Ryaan Tuttle. Ryaan Tuttle is a Home Improvement Specialist and the CEO of Best Handyman, Inc. in Boston, Massachusetts. With over 17 years of experience, he specializes in building home service businesses, focusing on creating scalable and efficient brands. With the help of his global team, the companies have achieved over 10+ million in sales and received recognition through magazine features, and enjoy partnerships with wikiHow and Jobber field service software. Boston Magazine and LocalBest.com have named Best Handyman Boston the Best Handyman in Boston. Ryaan holds Construction Supervisor and Home Improvement Contractor Licenses.
There are 12 references cited in this article, which can be found at the bottom of the page.
This article has been viewed 337,168 times.
Chain link fences are popular boundary markers, but they leave a lot of space for prying eyes. Fortunately, you have a few ways to block outside views. Bamboo fences serve as inexpensive ways to create tall barriers, or you can build your own wooden slats. If you enjoy gardening, consider planting bushes in front of the fence for a natural barrier that will successfully give your yard the privacy you desire.
Things You Should Know
- Unroll bamboo fencing along the length of your fence. Use wire ties to secure the top and bottom of the bamboo to the chain link.
- Alternatively, plant trees or bushes that thrive in your climate along the length of the fence. Keep in mind that this method requires year-round maintenance.
- For a durable and attractive solution, build a framework of cedar wood planks and secure it to the fence with bolted pipe ties.
Steps
Installing Bamboo Fencing
-
1Purchase a bamboo fence. Bamboo fences can be purchased online or at some home improvement stores. They come in rolls that you spread out across your fence. It’s a much cheaper, more efficient solution than buying lots of slats or replacing your entire fence.
- Bamboo rolls can cost anywhere from $20 to $100 USD.
-
2Put a plank on the ground in front of the fence. Pick up a board from the home improvement store, about 2 in × 8 in (5.1 cm × 20.3 cm) in length. Lay it at 1 end of the chain link fence. Use the board to prop up the bamboo fence as you work.[1]
- The board provides a level surface for the bamboo while also lifting it off of moist soil.
Advertisement -
3Roll the bamboo along the fence. Stand the bamboo roll vertically on the board, up against the fence. Hold the roll steady as you begin rolling it to the side. Roll it as far as you possibly can while holding it upright.[2]
- Work slowly. Tie the fence in place before moving the board so you are able to keep the fence steady.
-
4Place wire ties every 12 in (30 cm) across the top rail. Start at the chain link fence’s end post. Wrap the tie around the bamboo, sliding the ends through it and towards the fence rail. Wrap the ends around the rail to hold the bamboo in place.[3]
- You can purchase packs of chain link wire ties or get 1 ft (0.30 m) galvanized wire from a home improvement center.
- You may also use zip ties. These are made of plastic, so they may be less sturdy but easier to attach than metal wires.
-
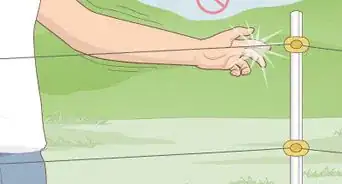
5Twist and clip the wires to secure the bamboo to the fence. On the other side of the fence, twist the ends of the wire together by hand. You will need a wire cutter to trim off the excess. Then, use a pair of pliers to twist the ends as tight as you can make them.[4]
-
6Place a second row of wire ties at the bottom of the fence. Place the second row of wire ties about 1 ft (0.30 m) off the ground. Each tie should be placed directly beneath a tie from the first row. Space the ties 12 in (30 cm) apart once again.[5]
- Tie the ties in place the same way as you did before. This will secure the bottom of the bamboo to your chain link fence.
-
7Repeat unrolling and tying the bamboo to install it. Once you are able, slide the board along the fence. Continue using it as a base to roll out and lift the bamboo. Keep doing this until you are able to tie the bamboo to the other end of your fence.
- If you covering a long fence, you may need multiple bamboo rolls.


Planting Bushes and Trees
-
1Measure the length, width, and height of your growing space. Measuring your space in advance can help you figure out what kind of plant is right for you. Run tape measure along the fence, and also note how much space is between the fence and any nearby structures. Measure the fence’s height to figure out how tall the plants need to be.[6]
- Bushes typically range from $15 to $60 apiece.
- Bushes, trees, and shrubs are a natural “privacy screen” but they require weekly maintenance and can take a few years to grow to full size.
- You can also grow vines similarly to how you grow bushes or trees.
-
2Pick a type of tree suitable to your growing location. The type of plant you pick depends upon your needs as well as where you live. Choose a plant based on the temperature in your region. Also consider if you need a plant that survives well in sunlight, dryer soil, or keeps its color year-round.[7]
- For example, you can choose an Arborvitae. These hedges are evergreens that can grow tall in front of high fences.
- Deciduous bushes like North privet and Rose of Sharon lose their leaves in the winter, so you don’t get year-round coverage.
-
3Space the planting spots evenly along the fence. Mark each planting spot with a wooden stake. The distance between each spot depends on how much space your chosen plant needs to grow. If you leave enough space, your plants will obscure the fence once they reach full size.[8]
- For instance, expect to leave 6 to 8 in (15 to 20 cm) between trees and 3 to 4 in (7.6 to 10.2 cm) between each shrub.
- You can also run a string from stake to stake to ensure you plant in a straight line.
-
4Dig a hole as deep and 3 times as wide as the root ball. If your plant is in a container, dig the hole as deep as the container. You can place the container in the ground to check the hole’s depth. Then, widen the hole appropriately so the plant has plenty of room to spread its roots.[9]
- Avoid planting containers in the ground. Trees and shrubs need to be taken out of the container before planting so the roots can spread.
- If you are placing a bunch of plants with bare roots, you can dig a trench along the fence to make this easier.
-
5Center the plant in the hole and bury the roots. Set a plant at each stake you placed earlier. Position the plants in the center of the hole, then begin refilling the hole until the soil is above the plant’s root crown. The root crown is the spot where the roots connect to the trunk. Then, gently press down on the soil with your foot to eliminate air pockets.[10]
- You do not need to put any compost or other additives into the soil at this time. Compost can be spread over the soil after the first year.
-
6Spread pine mulch around the growing area. Get an organic mulch such as pine bark or pine needles from a home improvement center. Spread the mulch in a layer 2 to 3 in (5.1 to 7.6 cm) thick. The mulch is useful for protecting your plant from harsh weather and keeping the soil moist.
- Spread the mulch along the diameter of the hole you dug earlier. Also, avoid letting the mulch touch the plant’s trunk.
-
7Water the plant immediately and repeat watering once a week. Thoroughly water the ground immediately by spraying it with a hose. The soil should be moist all the way down to the root ball. Spray the ground instead of the plant to avoid root rot.[11]
- To water trees and bushes regularly, place a garden hose nearby and let water drip into the soil for 30 minutes.
- You can check the soil’s moistness by sticking a pole into the ground. It should slide into the soil without resistance.
-
8Trim shrubs and bushes a few times a year. Your plants will need maintenance in spring and fall, at the very least. Get a good pair of gardening clippers. Trim the plant evenly along the top and sides, keeping the top wider than the base so light filters down to the lower branches.[12]
- Trimming shrubs and bushes forces them to grow upwards and keeps them looking neat.
- For trees like juniper and cedar, you are better off letting the branches grow naturally. Prune excessive branches as needed.


Making and Hanging Slats
-
1Cut wood into boards to create the slats. You will need 2 cedar boards that are 6 ft (1.8 m) long and 1 in × 3 in (2.5 cm × 7.6 cm) in size. You also need 12 cedar planks that are 6 ft (1.8 m) long. You can order the wood at a home improvement store and the employees may be able to cut the wood for you.[13]
- Building slats may cost you around $50, although this can be higher depending on the supplies you need.
- Depending on the size of your fence, you may need to adjust the size of the boards.
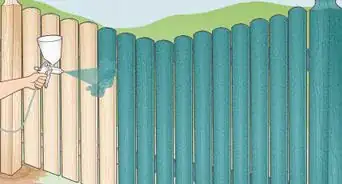
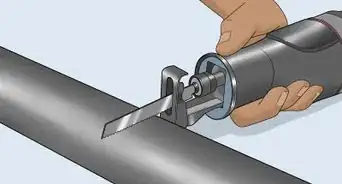
- If you cut the wood yourself, take proper precautions by wearing goggles and a respirator.
- You can also purchase slats from a home improvement store, but they can get expensive.
-
2Connect the smaller boards to 1 plank. Choose 1 of the cedar planks to be the top of your privacy panels and lay it horizontally on the ground. Lay the 2 smaller boards vertically over the plank. Position each board so it is 4 in (10 cm) from the plank’s ends.[14]
- The smaller boards will connect to the fence and hold the slats in place.
-
3Nail the slat to the side boards. Flip the boards carefully so the plank is on top of the side boards. Square up the boards, making sure they are aligned with the top of the slat. Then, hammer a 1.5 in (3.8 cm) steel finish nail through the slat and into each side board.[15]
- Make sure the side boards are level, or else the slats will not hang straight on your fence.
-
4Place the bottom plank on the side boards. Repeat the process by selecting another plank to be the bottom slat. This time, position it so it is 1⁄4 in (0.64 cm) above the free end of the side boards. Use 2 more nails to secure the slat to the boards.[16]
- The bottom slat needs to be higher than the ends of the side boards so it doesn’t hang in wet soil.
-
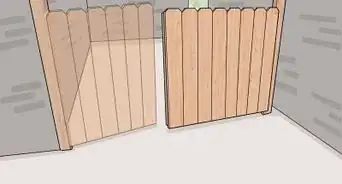
5Space the rest of the boards evenly and nail them in place. The remaining cedar planks form the rest of the panel. Measure the space between the top and bottom slat. Position the other cedar planks between them. When you’re sure they’re square, nail them in place.[17]
- Make sure the edges of the slats are aligned. You don’t want some of the slats to stick out further than the others.
-
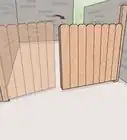
6Tie the panel to your fence with rope. Lift the panel off the ground, placing it where you want it to hang across your fence. Then, use pieces of rope or bungee cords to secure the panel to the top rail of your chain link fence. Use more pieces to secure the panel’s bottom end to the fence as well.[18]
- Adjust the panel so it is as tight against the fence as possible. If it isn’t straight, your next measurements may be inaccurate.
-
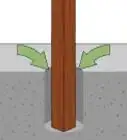
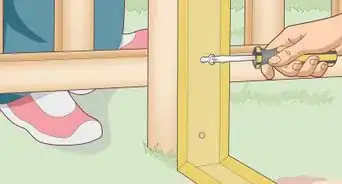
7Mark the spots where the pipe rail tie will fit on the side boards. The pipe rail ties are what you use to secure the panel to the chain link fence. They rest on the side boards and connect to your fence’s top rail. You can hold the pipe ties against the boards to get an idea of how they will line up. Using a pencil, mark the spots where the bolts will pass through the boards and into the ties.[19]
- You can purchase the pipe ties at a home improvement store. You need 2 of them for your panel.
-
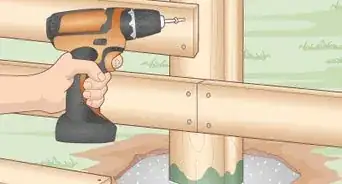
8Drill holes in the spots you marked earlier. Undo the rope or bungee cords holding your panel in place. Lower the panel to the ground. Using an electric drill and a 1⁄4 in (0.64 cm) drill bit, drill all the way through the side boards and panels.[20]
- Each pipe tie connects to the boards in 2 spots, so you will need to drill a total of 4 holes.
- Wear safety gloves, goggles, and other protective clothing while operating a drill.
-
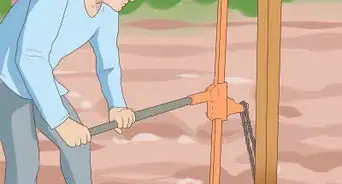
9Bolt the the pipe ties to the panel and fence. Position the pipe ties on the side boards again. Fasten the top ends with 2 in (5.1 cm) bolts. Raise the panel, sliding the ties over the chain link fence’s top rail, then secure the bottom ends with another pair of bolts.[21]
- Twist a washer and nut onto each bolt to ensure the panels stay in place.
- If you have a long fence, repeat the process to create more panels you can hang.


Expert Q&A
Did you know you can get expert answers for this article?
Unlock expert answers by supporting wikiHow
-
QuestionWhat other options do I have?
 Ryaan TuttleRyaan Tuttle is a Home Improvement Specialist and the CEO of Best Handyman, Inc. in Boston, Massachusetts. With over 17 years of experience, he specializes in building home service businesses, focusing on creating scalable and efficient brands. With the help of his global team, the companies have achieved over 10+ million in sales and received recognition through magazine features, and enjoy partnerships with wikiHow and Jobber field service software. Boston Magazine and LocalBest.com have named Best Handyman Boston the Best Handyman in Boston. Ryaan holds Construction Supervisor and Home Improvement Contractor Licenses.
Home Improvement SpecialistYou can call a fence company and have them come put a bunch of slats in the fence for you. You could also do some feature wood on there. Another option is taking some nice lattice work and zip tying it to the fence. Then you could stain or paint it.
Support wikiHow by unlocking this expert answer.
Warnings
- Some areas have government regulations stipulating how you can decorate your fence. Read these to avoid any problems.⧼thumbs_response⧽
- Power tools can be dangerous, so always wear goggles and other safety gear while operating them.⧼thumbs_response⧽
Things You’ll Need
Installing Bamboo Fencing
- Bamboo fence rolls
- Wooden board
- Wire ties
- Wire cutters
- Pliers
Planting Bushes and Trees
- Plants
- Shovel
- Hose
- Organic mulch
- Gardening shears
- Gardening gloves
- Wooden stakes
- String
- Measuring tape
Making and Hanging Slats
- 2 cedar boards 1 in × 3 in (2.5 cm × 7.6 cm) and 6 ft (1.8 m) long.
- 12 cedar planks 6 ft (1.8 m) long
- 2 1 5⁄8 in (4.1 cm) metal pipe ties
- 50 1.5 in (3.8 cm) steel finish nails
- 4 2 in (5.1 cm) bolts
- 4 nuts and flat washers
- Drill
- 1⁄4 in (0.64 cm) drill bit
- Hammer
- Square ruler
- Pencil
- Rope or bungee cord


References
- ↑ https://www.youtube.com/watch?v=j4sdVvIELmg&feature=youtu.be&t=48
- ↑ https://www.youtube.com/watch?v=Lx_gHhgqZZE&feature=youtu.be&t=120
- ↑ https://www.youtube.com/watch?v=j4sdVvIELmg&feature=youtu.be&t=65
- ↑ https://www.youtube.com/watch?v=Lx_gHhgqZZE&feature=youtu.be&t=137
- ↑ https://www.youtube.com/watch?v=j4sdVvIELmg&feature=youtu.be&t=63
- ↑ https://www.rhs.org.uk/advice/profile?PID=636
- ↑ https://www.rhs.org.uk/advice/profile?PID=636
- ↑ http://www.readersdigest.ca/home-garden/gardening/how-space-and-plant-freestanding-shrubs/
- ↑ https://www.todayshomeowner.com/video/how-to-plant-azalea-shrubs-in-your-yard/
- ↑ https://www.bhg.com/gardening/trees-shrubs-vines/care/how-to-plant-container-grown-trees--shrubs/
- ↑ https://www.bobvila.com/articles/how-to-plant-a-bush/
- ↑ https://www.thisoldhouse.com/how-to/how-to-prune-small-trees-and-shrubs
- ↑ https://www.bobvila.com/articles/genius-the-easy-way-to-add-privacy-to-a-chain-link-fence/
- ↑ https://www.bobvila.com/articles/genius-the-easy-way-to-add-privacy-to-a-chain-link-fence/
- ↑ https://www.bobvila.com/articles/genius-the-easy-way-to-add-privacy-to-a-chain-link-fence/
- ↑ https://www.bobvila.com/articles/genius-the-easy-way-to-add-privacy-to-a-chain-link-fence/
- ↑ https://www.bobvila.com/articles/genius-the-easy-way-to-add-privacy-to-a-chain-link-fence/
- ↑ https://www.bobvila.com/articles/genius-the-easy-way-to-add-privacy-to-a-chain-link-fence/
- ↑ https://www.bobvila.com/articles/genius-the-easy-way-to-add-privacy-to-a-chain-link-fence/
- ↑ https://www.bobvila.com/articles/genius-the-easy-way-to-add-privacy-to-a-chain-link-fence/
- ↑ https://www.bobvila.com/articles/genius-the-easy-way-to-add-privacy-to-a-chain-link-fence/
About This Article

Chain-link fences don’t give you much privacy, but there are some simple ways you can prevent prying eyes from peaking into your garden. You could try planting evergreen shrubs or bushes, such as arborvitae, along the fence. These plants won’t lose their leaves in winter, which means you’ll get year round coverage. Alternatively, purchase a bamboo fence from a gardening store or online. You can install the bamboo by attaching it to the top and bottom of your chain-link fence with wire ties. If you’re feeling more ambitious, try making a wooden-slatted privacy panel. You’ll need to cut planks of wood to size and nail them together. Then, attach your panel to the fence with pipe rail ties. For tips on how to cut the wood for your privacy panel, read on!