X
This article was co-authored by Ashley Adams. Ashley Adams is a Licensed Cosmetologist and Hair Stylist in Illinois. She completed her Cosmetology education at John Amico School of Hair Design in 2016.
This article has been viewed 40,704 times.
Angled haircuts are a great way to make blunt cuts look more dynamic. For a face framing cut, you want to have the angle point upwards towards the face. If you want to step up a bob and make it appear longer in the front, you want to have the hair angle downward towards the collarbone. Once you know the basics of angle cutting hair, you can experiment with adding more layers.
Steps
Method 1
Method 1 of 2:
Creating a Face Framing Cut
-
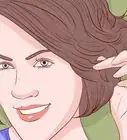
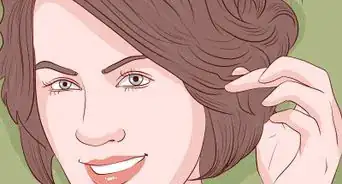
1Start with dry hair that's parted down the center. This method will give you a haircut that is shorter in the front and longer in the back. The around your face will be cut at a steep, downward angle, creating soft, face-framing layers. The rest of your hair should already be cut or trimmed to the length you want it to be.
-
2Gather everything behind your ears into a low ponytail. Secure the ponytail with a clip or a hair tie; you can also pull your hair into a bun instead. Leave the hair in front of your ears (on both sides) loose.Advertisement
-
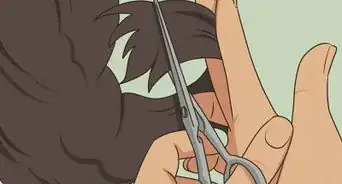
3Cut a point guide in the middle-front of your hair. Gather a 1-inch (2.54-centimeter) wide, ¼-inch (0.64-centimeter) thick section of hair from the center-front of your hairline. Slide your fingers down the section to where you want it to end. Cut your hair below you fingers with a pair of hairdressing shears.[1]
- How much you cut off depends on where you want the layers to start. Decide where you want your shortest layer to be—your nose or chin, for example—and cut there. The higher you cut, the steeper the angle will be.
-
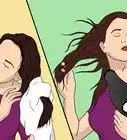
4Begin cutting the left side of your hair at a downward angle. Take a strand of hair to the left of the point guide. Slide a comb down the length of the strand, stopping 1 inch (2.54 centimeters) below the point guide. Cut the strand at a downward angle, towards your left ear.[2]
- This part is known as "rough" cutting and will give you the general length.
- You can also hold the strand between your forefinger and middle finger.
-
5Continue rough cutting down the left side of your hair. Take another small section of hair, to the left of the one you just cut. Slide the comb past the length you cut, then cut the strand at another downward angle. Keep going until you reach the far side of that hair section.[3]
-
6Refine the angle by cutting upwards into it. Take a ½ to 1-inch (1.27 to 2.54-centimeter) section of hair to the left of the point guide. Pinch it between your forefinger and middle finger. Measure the strand against the point guide, then cut into it, angling the shears upwards.[4]
- Refine the rough cut by measuring the next strand against the previous one. Constantly refer back to the previously cut section of hair so your haircut is even.
- Hold the scissors loosely in your palm while doing this.
-
7Repeat the process for the right side of your hair. Begin by rough cutting it into a choppy angle, then refine it by cutting upwards into the strands. Take a moment to ensure that both sides are even. You can do this by pulling matching strands from either side of your face, and making sure that they end at the same level (cheekbone, nose, jaw, etc.).[5]
-
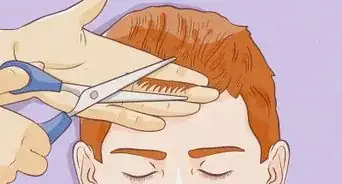
8Straighten your hair and refine the haircut further. Mist your hair with a heat protectant first, then straighten it using a flat iron. Refine both sides of your hair by cutting upwards into it, using the same technique as before. If there are still any pieces sticking out, trim them off.[6]
- Consider trimming the rest of your hair. Even if you already did this, it would be a good idea to give it a quick pass. This will ensure that it blends into the face-framing layers better.
-
9Unclip and style your hair as usual. Once you are happy with your haircut, unclip the hair you sectioned off in the beginning. Style your hair as you usually would.


Advertisement
Method 2
Method 2 of 2:
Cutting an Angled Bob
-
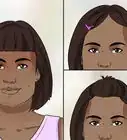
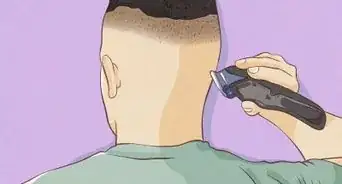
1Start with dry hair that's already cut to the length you want in the back. This style will end up looking like a bob, except that there is a steep angle between the front and the back. The hair should already be cut short at the nape, from corner to corner; everything from the nape-forwards should be left alone. If your hair isn't cut, do so now.[7]
- This method is easier to do on someone else. You can try doing it on yourself, but it will be more difficult.
-
2Part your hair down the center, then measure horizontally across it. Use the handle of a rat-tail comb to create a clean, even part. Pick a side to start from, then place a comb horizontally across the hair. Make sure that the end of the comb is level with the short hair on the back.[8]
-
3Pinch the hair between your fingers, using the comb as a guide. Make a V-shape with your fore and middle fingers. Close those fingers against the front part of the hair, just above the comb. Try to gather the entire hair section between your fingers, from front to where the short lengths start.[9]
-
4Pull the section away from the head and back. The easiest way to do this would be to simply spin the client in the chair until your hand is next to the back of their neck. Your fingers will slide naturally down the hair shaft, and keep them parallel to the floor.[10]
- If you can't spin the chair, pull their hair away at a 90-degree angle, like opening a door.
-
5Cut the hair across using a pair of hairdressing shears. Start from the outside edge of the hair section, and work your way towards the back. Cut just below your fingers.[11]
- If you can find them, a pair of dry cutting shears would be even better for this.
-
6Repeat the process for the other side of the client's head. Use the same process as before: use the comb to measure out a horizontal guide along the client's hair, pinch the entire section between your fingers, angle it back, and cut it.
-
7Fix any unevenness, then style the hair as usual. Take a moment to look at the haircut from the front. Measure the two long lengths in the front against one another, and make any necessary adjustments. Once you are happy with the cut, style the client's hair as usual.


Advertisement
Things You'll Need
- Hair clips
- Hairdressing shears
- Comb
-Step-18-Version-2.webp)

References
- ↑ https://www.youtube.com/watch?v=uiHLsfE2Sus
- ↑ https://www.youtube.com/watch?v=uiHLsfE2Sus
- ↑ https://www.youtube.com/watch?v=uiHLsfE2Sus
- ↑ https://www.youtube.com/watch?v=uiHLsfE2Sus
- ↑ https://www.youtube.com/watch?v=uiHLsfE2Sus
- ↑ https://www.youtube.com/watch?v=uiHLsfE2Sus
- ↑ https://www.youtube.com/watch?v=Ez3S27JKOHE
- ↑ https://www.youtube.com/watch?v=Ez3S27JKOHE
- ↑ https://www.youtube.com/watch?v=Ez3S27JKOHE
About This Article

Ashley Adams
Professional Hair Stylist
This article was co-authored by Ashley Adams. Ashley Adams is a Licensed Cosmetologist and Hair Stylist in Illinois. She completed her Cosmetology education at John Amico School of Hair Design in 2016. This article has been viewed 40,704 times.
Co-authors: 7
Updated: February 17, 2021
Views: 40,704
Categories: Haircuts
Advertisement