This article was co-authored by wikiHow staff writer, Janice Tieperman. Janice is a professional and creative writer who has worked at wikiHow since 2019. With both a B.A. and M.A. in English from East Stroudsburg University, she has a passion for writing a wide variety of content for anyone and everyone. In her free time, you can find her working on a new crochet pattern, listening to true crime podcasts, or tackling a new creative writing project.
There are 15 references cited in this article, which can be found at the bottom of the page.
This article has been viewed 17,489 times.
Learn more...
Plasti Dip is a rubber coating you can use to color and protect cars, work tools, and other metal items. If you’re coating a large item, like an automobile, use a Plasti Dip spray can to make your adjustments. For smaller Plasti Dip applications, like customized car parts or plier handles, try brushing or dipping the rubber coating onto your surface of choice. Before you start, be sure to use gentle soap, water, and a microfiber cloth to clean off the surface of your project. With a little patience and persistence, you’ll be ready to both protect and recolor a variety of different items!
Steps
Spraying Plasti Dip
-
1Put on a safety mask before using Plasti Dip spray. Whenever you work with a sprayable substance, set up your workspace in a clean, well-ventilated area. After slipping on a safety mask or other specialized gas mask, check that your mouth and nose are fully covered and protected. Since you’re working with a sprayable product, you don’t want to accidentally inhale any rubber coating.[1]
- While you don’t have to wear gloves, you can slip some on as a safety precaution.
-
2Mask smaller areas with pieces of painter’s tape. Cut or rip away several sections of painter’s tape, then arrange these pieces in a square or rectangular shape around a surface you’d like to protect and recolor. If you’re painting a larger surface, like the hood of a car, tape drop cloths or plastic sheeting around the designated area.[2]
- For instance, if you’re repainting the silver emblem on the side of your car, place strips of tape a few inches or centimeters away from each side of the emblem. Next, cover the nearby car doors and windows by taping sheeting and/or drop cloths into place.
- If you’re painting over a large surface, don’t worry about masking off specific areas.
Advertisement -
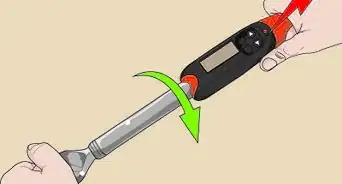
3Shake the Plasti Dip can firmly for 60 seconds. Hold the can in 1 hand and move it in a rapid up and down motion. Once you hear the can rattling, start counting to 60. If you don’t shake the can before spraying the Plasti Dip, you might end up with a lumpy, inconsistent application.[3]
- Ideally, try shaking your can throughout the painting process, like between different coats. This will keep your Plasti Dip smooth.
-
4Keep the can a short distance away from the surface. Hold the Plasti Dip 6 to 10 in (15 to 25 cm) away from the surface, then press along the top of the can to release the rubber coating. Work in slow, overlapping, horizontal strokes that cover the entire surface that you’re trying to cover. Don’t worry if the surface’s original color is still visible, as this first coat helps the Plasti Dip bond to the metal.[4]
- When you hold the can at a distance, you get a more consistent spray along the surface.
-
5Wait 30 minutes after spraying on 1 full coat. Allow the rubber coating to harden and stick to the desired surface. Don’t touch or spray on any more coating until at least a half hour has passed, or the Plasti Dip might not seal correctly.[5]
- Always wait 30 minutes between each layer of Plasti Dip, even if it’s the second or third coat.
-
6Spray on 2-3 more coats of Plasti-Dip onto the surface. Continue spraying the rubber coating in slow, horizontal movements. Try to overlap each stroke of Plasti-Dip, so the color looks vibrant and consistent. After you apply each new layer, wait at least 30 minutes before adding another coat.[6]
- Since Plasti Dip application requires a lot of waiting, consider working on something else in the meantime.
-
7Let the finished product dry for at least 4 hours. Don’t display your new project right away. Instead, set a timer for 4 hours, so the Plasti Dip can seal completely. If you don’t plan on using the item right away, feel free to air-dry it overnight.[7]
- If you don’t like the way your Plasti Dip coating looks, you can always remove it.


Dipping the Item
-
1Set some plastic sheeting or paper beneath your Plasti Dip. Prevent messes ahead of time by preparing a clean and efficient workspace. Before you dip anything, lay a large plastic sheet or old newspaper down on a flat surface, like a table. Once this sheet is in place, arrange the Plasti Dip and other items onto the surface.[8]
-
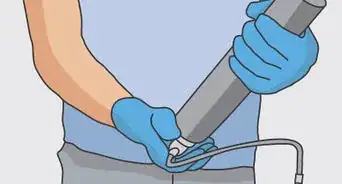
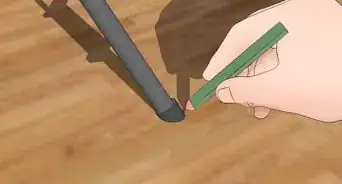
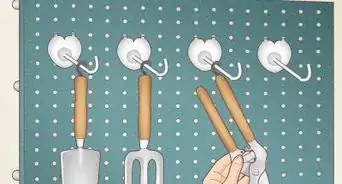
2Remove any existing rubber coating. If you’re resealing a smaller item, like the handles on a set of pliers, first use a utility knife to slice and peel any existing rubber off of the object. Once you’ve completely cleared off the surface, wash and dry the item ahead of time.[9]
- You don’t want dirt and other particles sticking to your new layer of rubber coating.
- If you want to be extra cautious, consider slipping on some work gloves.
-
3Mix the Plasti Dip in the can to make it smooth. Take a long item, like paint stirrer, and place it into the can of Plasti Dip. Swirl the item around slowly so the rubber product has a smooth and consistent texture. Keep mixing the Plasti Dip for at least 30 seconds, or until the substance looks completely smooth.[10]
- Don’t stir too quickly, or the product could slosh out of the can.
-
4Tie a string or wire to the item you’d like to coat. Loop a sturdy strand of wire around the top of the item, or around a place that you don’t plan on coating with Plasti Dip. Try lifting up the object with this wire or string to check that it’s attached securely.[11]
- You’ll also need this wire to dry the item later on.
-
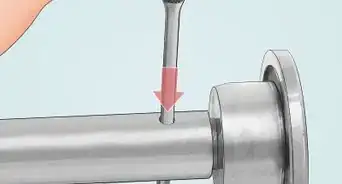
5Lower the item gradually into the can. Hold the loose end of the wire securely in 1 hand, then slowly submerge the item into the can of Plasti Dip. Count to 5 as you lower 1 in (2.5 cm) of the item into the rubber coating. Continue counting to 5 and lowering the item by 1 in (2.5 cm) until you’ve successfully submerged and coated the desired amount of surface.[12]
- This gradual process helps ensure a smooth Plasti Dip application on any item.
- This might not take very long if you’re coating a small object.
-
6Remove the item slowly from the can. Don’t leave the item in the coating for an extended period of time; instead, gradually pull it out of the can. Once again, count to 5 in your head while removing a 1 in (2.5 cm) section from the rubber mixture. Continue pulling on the end of the wire until the object is completely out of the can.[13]
- The dipping and removing processes should take the same amount of time to complete.
-
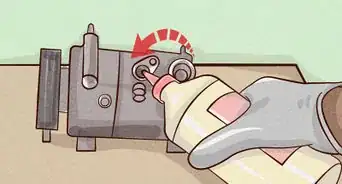
7Wait 30 minutes for the Plasti Dip to dry completely. Twist the loose end of wire along a thin railing or some other space with lots of open air. Leave the newly coated item alone for 30 minutes, so the rubber product can seal and adhere properly. Whenever you add a new coat of Plasti Dip, always let the item dry.[14]
- If you’re working outside, consider tying your item to the handle of a walk-behind lawnmower.
-
8Apply 2-3 coats to finish coating your project. After the initial coat of Plasti Dip dries, submerge your item back into the can of coating. Repeat the same process as you did before, and use gradual motions to lower and raise your object in the rubber coating. After each new coat, use the wire to hang up your item in an open area so it can dry completely.[15]
- Since the dipping method is used for smaller objects, you don’t need to worry as much about the drying time between coats.


Brushing on Plasti Dip
-
1Lay plastic sheeting down to protect your workspace. Arrange a large section of plastic sheeting over a table or other flat area where you plan on working. Once this sheeting is in place, arrange your other supplies, like the Plasti Dip can, plastic tray, paint roller, and the object you’d like to paint over.[16]
- This method is good for painting car accessories, like your splash guards.
- If you want to take extra steps to protect your skin, consider wearing work gloves.
Warning: Whenever you work with paint or a paint-like substance, be sure to work in a well-ventilated area. Keep your windows open, and have a fan blowing air out of the room.[17]
-
2Stir the can of Plasti Dip with a paint stirrer. Open up the can of rubber coating and place a long, thin item inside, like a paint stirrer. Using slow, gradual motions, stir the rubber coating in a slow circle, working to make the substance as smooth as possible. Don’t mix the Plasti Dip too quickly, or the product could spill over the edge and make a mess.[18]
-
3Pour a small amount of Plasti Dip into a plastic container. Fill up your plastic paint tray with less than 1 cm (0.39 in) of Plasti Dip. Don’t pour in too much at first, as you can always refill the tray later on.[19]
- The brushing method works best on smaller objects, so your paint tray and roller don’t need to be very large.
-
4Dip a short-haired roller into the container. Place your paint roller into the tray and push it forward. Roll the tool back and forth, until the roller is completely covered in Plasti Dip. Try to paint with the roller completely coated, or else the paint job won’t look very smooth.[20]
- Whenever you run out of Plasti Dip on your painting tool, dip and roll it in the plastic tray.
- If you don’t have a roller on hand, you can also use a paint brush.
-
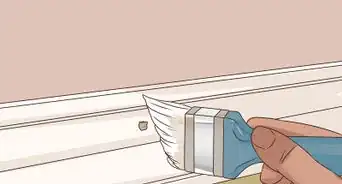
5Paint over your item with long, even strokes. Focus on making your coating look as consistent as possible. As you work, try guiding the paint in smooth, fluid directions, so no roller marks are obvious on the item.[21]
- If you’re using a brush, try painting in 1 direction. This will prevent any obvious brush marks from showing up.[22]
-
6Wait 30 minutes so the first coat can dry. Leave your item on your workspace, then step away for about half an hour. Give the rubber coating time to seal to the object’s surface, so the paint job will last longer. Keep in mind that if you’re coating both sides of an item, you might need to let the 1 side of the item dry before flipping and painting over the opposite edge.[23]
- If you don’t want to lose track of time, try setting a timer.
-
7Add 2-3 extra coats of paint to ensure even coverage. Repeat the brushing process as you apply multiple layers of product to your item of choice. Like you did before, wait 30 minutes before painting on any additional coats.[24]
- If you’re painting both sides of an item, expect the painting, drying, and flipping process to take longer than it would to paint just 1 side.
-
8Don’t use the item for at least 4 hours. Keep the painted item in an area with lots of open air. Next, step away from your workspace for at least 4 hours, so the rubber coating can completely seal and harden. When enough time has passed, feel free to use your newly coated items as you see fit![25]


Things You’ll Need
Spraying Plasti Dip
- Air mask
- Spray can of Plasti Dip
- Gloves (optional)
- Drop cloths (optional)
- Plastic sheeting (optional)
- Painter’s tape (optional)
Dipping the Item
- Utility knife
- Paint stirrer
- Can of Plasti Dip
- Section of wire
- Gloves (optional)
Brushing on Plasti Dip
- Paint stirrer
- Plastic tray
- Short-haired paint roller
- Can of Plasti Dip
- Gloves (optional)
- Brush (optional)

References
- ↑ https://m.youtube.com/watch?v=sKf_JAoUhsE&t=2m40s
- ↑ https://m.youtube.com/watch?v=sIUbG4f2tMw&t=1m4s
- ↑ https://plastidip.com/our-products/plasti-dip/#how-to-spray
- ↑ https://m.youtube.com/watch?v=sIUbG4f2tMw&t=1m31s
- ↑ https://plastidip.com/our-products/plasti-dip/#how-to-spray
- ↑ https://plastidip.com/our-products/plasti-dip/#how-to-spray
- ↑ https://plastidip.com/our-products/plasti-dip/#how-to-spray
- ↑ https://m.youtube.com/watch?v=DwHglysGMDE&t=2m43s
- ↑ https://m.youtube.com/watch?v=DwHglysGMDE&t=0m54s
- ↑ https://m.youtube.com/watch?v=DwHglysGMDE&t=2m19s
- ↑ https://plastidip.com/our-products/plasti-dip/#how-to-dip
- ↑ https://plastidip.com/our-products/plasti-dip/#how-to-dip
- ↑ https://plastidip.com/our-products/plasti-dip/#how-to-dip
- ↑ https://m.youtube.com/watch?v=DwHglysGMDE&t=2m48s
- ↑ https://m.youtube.com/watch?v=DwHglysGMDE&t=2m59s
- ↑ https://m.youtube.com/watch?v=D6ZLK2dQpy8&t=0m57s
- ↑ https://www.cpsc.gov/s3fs-public/painting.pdf
- ↑ https://plastidip.com/our-products/plasti-dip/#how-to-dip
- ↑ https://m.youtube.com/watch?v=D6ZLK2dQpy8&t=5m25s
- ↑ https://m.youtube.com/watch?v=D6ZLK2dQpy8&t=5m31s
- ↑ https://m.youtube.com/watch?v=D6ZLK2dQpy8&t=5m42s
- ↑ https://plastidip.com/our-products/plasti-dip/#how-to-dip
- ↑ https://plastidip.com/our-products/plasti-dip/#how-to-dip
- ↑ https://plastidip.com/our-products/plasti-dip/#how-to-dip
- ↑ https://plastidip.com/our-products/plasti-dip/#how-to-dip