X
This article was co-authored by Marvin Woo. Marvin Woo is a licensed electrician and the Owner of Woo's Electrical & Appliance based in East O’ahu. With over two decades of experience, he specializes in troubleshooting issues and maintaining residential electrical systems. Marvin is both licensed and insured to complete electrical work in the state of Hawaii.
There are 8 references cited in this article, which can be found at the bottom of the page.
This article has been viewed 82,424 times.
This wikiHow will teach you several methods on how to bend wire, all with different goals and outcomes.
Steps
-
1Make sure you have the right tools.
- The simplest method of bending wire is by hand.
- For more precise and comfortable bending, use pliers.
-
2Be sure to mark down the points where to bend your wire with a marker or a pencil. Thicker wire may require larger tools and specialized machinery.[1]


Advertisement
Method 1
Method 1 of 8:
Making 90 degree bends
-
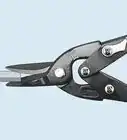
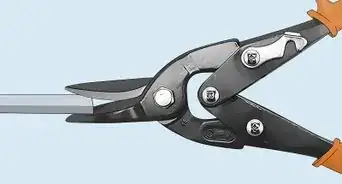
1Making 90 degree bends. The easiest method is to use square pliers with sufficiently wide jaws.
-
2Start by marking down where you want the bend, taking into account a small error as making a corner-like sharp bend into a piece of wire is not easy. Most likely the wire will have a slight curve at the 90 degree angle.
-
3Secure the wire, preferably by the larger part of the wire.
-
4Grip the wire, taking into account a small error. To prevent the wire from developing marks from the pliers, wrap a piece of cloth around the wire or grip the wire with 2 small glimpse of wood on either side of the wire.[2]
- Another option would be to grip the wire with pliers made of a softer material than the wire but finding pliers like that can be difficult as strength and durability are important aspects of pliers.
-
5Make the bend by turning the pliers to the direction needed.
-
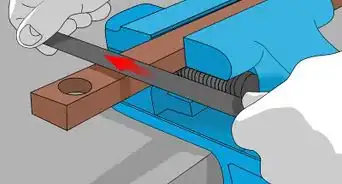
6Using a vice is also an option. Use a block of wood to ensure even bending.
-
7Check the angle of the wire with a square.
-
8Another option would be to make yourself a jig for checking the wire for 90 degree angles.
- The simplest method to make one of these is to drill 2 crossing holes through a piece of wood. By cutting the wood at 90 degrees through the centers of the holes, you will end up with 2 pieces of wood with crossing grooves.
- You could make the grooves by hand if you're confident in your abilities of cutting precise grooves.
- A third option would be to use some sort of saw to make the grooves. For example a bandsaw or table saw.


Advertisement
Method 2
Method 2 of 8:
Bending wire to specific angles


Method 3
Method 3 of 8:
Making regular curves
-
1A regular curve is a line which follows the curvature of one specific circle.
-
2Make a template of the circle or curve. There are several options for making templates.
-
3Consider a french curve. A french curve is a template made out of metal, wood or plastic composed of many different curves. It is used in manual drafting to draw smooth curves of varying radii.[5]
- The shapes are segments of the Euler spiral or clothoid curve.
- There are printable templates of french curves available on the internet if you wish to make one yourself.
-
4Consider making a template with a compass. A compass can easily be used to draw circles and curves.[6]
- Draw the necessary curve or circle onto a piece of paper.
- Cut the paper along the line you drew.
- Now, you could use the paper as a template or make a sturdier version by gluing the paper to a piece of wood or plywood and cutting the wood along the line.
-
5Use specific machinery. There are specialized machines for bending wire and tubing.


Advertisement
Method 4
Method 4 of 8:
Making irregular curves
-
1Follow roughly the same steps as you would for making regular curves or circles. Specific templates will be required as irregular curves follow multiple circles.
-
2Make the template out of paper or wood.
-
3Bend the wire according to the template.
- You could freehand the curve if precision is not required and the wire is malleable by hand.


Advertisement
Method 5
Method 5 of 8:
Straightening wire
-
1Straightening can be done in multiple ways, taking into account the properties of the wire.
-
2Straighten thinner and softer wire by hand.
-
3Straighten short wires with needle nose pliers or lineman pliers. Gently work at the wire in small sections at a time. These handy tools are great if you need to manipulate the shape of wires that are on the thicker side.
-
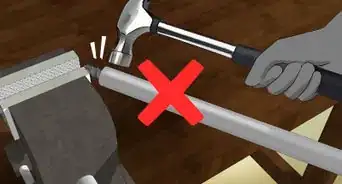
4Straighten thicker and stronger wire on an anvil or similar surface. The hammer needs to be made of a softer material than the wire, otherwise there is a risk of flattening or damaging the wire. Wood or brass is a good choice.
- Start from the end of the wire. The straight starting section will be your baseline for the rest of the wire.
-
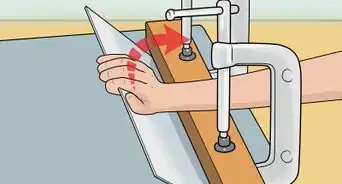
5Straightening thin and soft aluminium or copper wire is easiest with 2 pieces of wood and a vice.
- Sandwich the wire in between the wood and secure it in the vice, don't apply too much pressure. The straightening is done by pulling the wire through the 2 pieces of wood.
- Another option is securing one end of the wire in a vice and then pulling along the wire with 2 pieces of wood.
-
6Straighten thin steel wire by pulling it through a row of nails.
- Start by securing a U shaped arch into a piece of wood. This arch can be made out of a sufficiently strong staple or a nail. The arch should have just enough distance between the wood to allow the wire to pass through underneath it.
- Hammer nails into 2 straight lines with the width of the wire being the distance between the lines.
- Pull the wire through the row of nails.
- Repeat if necessary.
-
7To check the straightness of a shorter piece of wire, use a ruler or roll the wire on a smooth surface.


Advertisement
Method 6
Method 6 of 8:
Making nooses
-
1Use pliers with round jaws. The conical jaws will make it possible to make nooses of varying diameter.
- Square pliers can be used to make square nooses.
-
2Choose the gripping point on the pliers according to the diameter of the noose you wish to make.
-
3Bend the wire in 180 degree increments at the most.
-
4After that, rotate the pliers so that the bent part is not being gripped by the jaws.
-
5Repeat the previous step until the circle is complete.
-
6Bend the noose back.
-
7Cut off the excess with wire cutters, a specialized chisel or a hacksaw.
-
8File the end of the wire smooth. Make necessary adjustments to the noose.
-
9Flatten the noose to finish it.


Advertisement
Method 7
Method 7 of 8:
Making spirals
-
1Use a vice.
- For turning spirals in a vice, a cylindrical metal stick or rod is used. The rod has a slit on one end, matching the thickness of the wire and a lever for turning it on the other end.
- The rod is secured between 2 hardwood blocks with grooves according cut in them according to the grooves.
- The diameter of the rod dictates the diameter of the spiral.
- An alternative method would be to use a threaded rod with a slit and some nuts. The nuts would be turned onto the rod and fastened in the vice. The rod could be turned by turning 2 nuts onto the rod and tightening them against each other, after that the rod could be turned with vice grips, pliers or with a suitable wrench.
- A lathe with a metal or wood cylinder in it could also be used in place of the rod. The wire could be wound onto the cylinder by turning the lathe by hand or at very low RPM. Optionally, the wire could be guided through a stack of 2 pieces of wood to straighten the wire.
-
2Turn the rod and wind the wire onto the rod. Adjust the threading density and spacing according to what kind of wire you need.
- This can be difficult if the wire is thick or strong.


Advertisement
Method 8
Method 8 of 8:
Making rings
-
1Make a spiral of suitable diameter, the same diameter you want the rings to be.
-
2Insert a wooden cylinder into the spiral to make it easier to cut.
-
3Fasten the cylinder and spiral into a vice. Leave enough space over the vice so that you don't cut into it.
-
4Cut the spiral with a hacksaw.
-
5Flatten the rings if necessary.


Advertisement
Warnings
- Be careful while bending the wire by hand as it might hurt your fingers. Make sure to wear proper safety equipment like gloves and protective glasses.⧼thumbs_response⧽
Advertisement
Things You'll Need
- Pliers
- Wire
- Marker or pencil
- A vice
- Wood
- Nails
- Hacksaw


References
- ↑ https://www.youtube.com/watch?v=ocb55UQX-0E
- ↑ https://www.youtube.com/watch?v=KtiUmu86y9s
- ↑ https://sciencing.com/protractor-12928.html
- ↑ https://www.ece.k-state.edu/hkn/files/protractor.pdf
- ↑ https://www.youtube.com/watch?v=wgATTmC0JSQ
- ↑ https://www.youtube.com/watch?v=Q5dl1esizM8
- Straighten a Wire using a Drill
- Make a Simple Wire Ring
About This Article

Marvin Woo
Licensed Electrician
This article was co-authored by Marvin Woo. Marvin Woo is a licensed electrician and the Owner of Woo's Electrical & Appliance based in East O’ahu. With over two decades of experience, he specializes in troubleshooting issues and maintaining residential electrical systems. Marvin is both licensed and insured to complete electrical work in the state of Hawaii. This article has been viewed 82,424 times.
Co-authors: 16
Updated: December 16, 2022
Views: 82,424
Categories: Metalworking
Advertisement