This article was co-authored by wikiHow Staff. Our trained team of editors and researchers validate articles for accuracy and comprehensiveness. wikiHow's Content Management Team carefully monitors the work from our editorial staff to ensure that each article is backed by trusted research and meets our high quality standards.
There are 8 references cited in this article, which can be found at the bottom of the page.
This article has been viewed 604,562 times.
Learn more...
Glassblowing is the art of creating glass sculptures by manipulating molten glass in a very hot furnace. It is a fun way to express your creativity and try working with a new material. The most common and accessible type of glassblowing is called offhand, where you heat and shape the glass on the end of a hollow pipe. Blowing glass requires working closely with heat and glass, so make sure you take all the necessary precautions before you roll, blow, and shape the glass.
Steps
Gathering the Glass on the Pipe
-
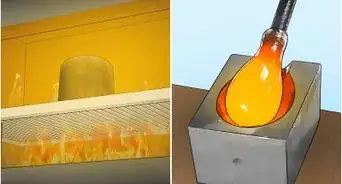
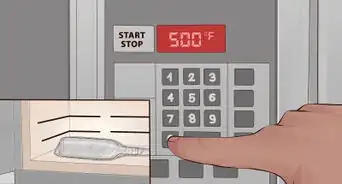
1Place the molten glass in the furnace. Use heat resistant gloves to place the molten glass in the furnace. The furnace should be heated to 2,000 °F (1,090 °C) to melt the glass.[1]
- Heating and melting the glass will make it more malleable and easier to gather on the blowpipe.
-
2Put the pipe in the furnace and gather the glass. Put one end of the pipe in the furnace, holding the pipe straight. You may need an assistant to open the door of the furnace for you so you can put it in the pipe. Then, roll the pipe around in the furnace to gather the glass. You want to get as much of the glass on the pipe as you can so you have a lot to work with.[2]
- You can try to open the furnace door yourself if you do not have someone to assist you, but it may be tricky to do if you are a beginner glassblower.
Advertisement -
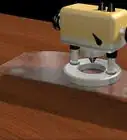
3Roll the glass on the marver to form a cylinder shape. Carry the glass on the pipe to the marver. Roll it on the marver in a continuous, round motion. The marver will help to distribute the heat on the glass evenly and allow you to shape the glass into a symmetrical cylinder.[3]
-
4Put the glass in the crucible, or glory hole, and turn it several times. Roll the glass in the heat of the glory hole so it stays hot. This will ensure it does not become too hard or tough for blowing.[4]
-
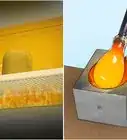
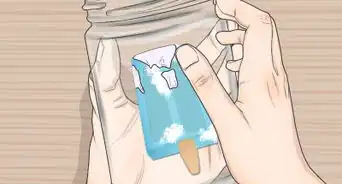
5Dip the glass into a crushed colored glass to add color. If you want your blown glass piece to have flecks of color in it, carefully dip it in a steel bowl of crushed glass. Add one layer of crushed glass to each side of the rounded glass by dipping it once in each color.[5]
- Once you’ve dipped the glass put it back in the crucible and turn it several times so the crushed glass melts.
-
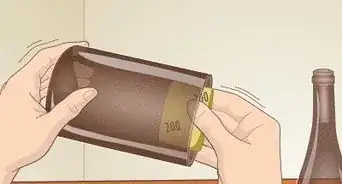
6Roll it on the marver again. Try to get it to form the shape of a bullet. Keep the sides even and rounded so the glass is easier to blow.[6]


Blowing the Glass
-
1Place the pipe on a stand. Use a steel stand that can hold the pipe securely. This will make blowing into the pipe easier.[7]
- If you do not have access to a stand, you can blow the pipe by holding it just above the marver. However, it may be tricky for you to hold the pipe and blow into it at the same time, especially if you are a beginner.
-
2Blow into the pipe and roll it at the same time. Let out deep breaths into the pipe to blow air into the glass. Turn the pipe as you blow into it so the air is evenly dispersed. Blow into the glass continuously with even breathes for 10-15 seconds.[8]
- Do not blow into the glass for too long, as you do not want it to become too cool or lose too much heat. Blow into it for 10-15 second intervals so it stays hot.
-
3Return the glass to the crucible to keep it hot. Turn pipe several times as the glass heats up in the crucible.[9]
-
4Repeat the process until the glass is the size you want. Continue blowing into the end of the pipe to expand the glass. Always turn it as you blow. Then, return it to the crucible and turn it several times. Blow and heat the glass until you have blown the glass to the size and shape you want.[10]


Cooling the Glass
-
1Have an assistant cut the bottom of the blown glass with steel tweezers. The assistant will run the tweezers, called jacks, around the bottom of the blown glass as you turn the pipe. This will help to cut the bottom and loosen the glass so it can come off.[11]
-
2Tap the pipe to remove the blown glass. Use a wooden block to hit the pipe once so the blown glass comes off the pipe where the glass has been cut. Make sure your assistant is ready, wearing heat resistant gloves, to catch the blown glass when it comes off the pipe.[12]
- Try to hit the pipe only once with a hard and firm whack. Doing it more than once can cause the blown glass to crack or break.
-
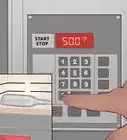
3Transfer the blown glass to an annealing oven. The annealing oven should be kept at 960 °F (516 °C). Wearing heat resistant gloves, put the blown glass in the oven. The oven should then be cooled down over 14 hours to room temperature. The slow cool-down period will prevent the blown glass from cracking or breaking.[13]
-
4Remove any sharp edges on the finished piece. Take the blown glass out of the annealing oven after 14 hours. Inspect it for any sharp edges, especially on the bottom. Use a grinding block to carefully smooth them out.[14]


Staying Safe When Glassblowing
-
1Wear close-toed shoes. Protect your feet by wearing sneakers with socks or shoes that cover your feet. Do not wear shoes made of plastic or other flammable materials.
-
2Put on long pants and long sleeves made of cotton or denim. These materials are breathable and will help to protect your arms and legs from the heat. Avoid wearing clothing that contains plastic, nylon, or other potentially flammable material.
-
3Wear heat-resistant gloves when needed. You can buy heat-resistant gloves at your local hardware store or online. Make sure the gloves are heat-resistant up to at least 2,000 °F (1,090 °C). Always wear heat-resistant gloves when you are touching the hot glass or hot metal while glassblowing.
-
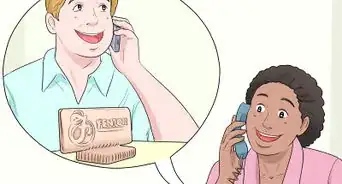
4Take a glassblowing class. Look for a glassblowing class at your local art center or glass studio to perfect your skills and ensure you are blowing glass safely. Take a class with a seasoned glassblower.
- Taking a glassblowing class will give you access to all the tools and materials you need to practice this art. You will also be able to watch your instructor demonstrate how to blow glass successfully.


Community Q&A
-
QuestionWhat is a glass blower called?
 Community AnswerSomeone who blows glass is called a glassblower, glassmith, or a gaffer.
 -
QuestionWhere did glass blowing begin in Germany?
 Community AnswerIn Cologne on the river Rhine in Germany by the late 1st century BC. I took a tour recently and a guide pointed out the spot.
 -
QuestionWhat kind of glass do I need?Community AnswerIt depends on what you are making. For example, glass and crystal are made with basic ingredients, but the formulas may change depending on what properties you want the item to have.
Warnings
- Do additional research before attempting to blow glass.⧼thumbs_response⧽
- Always wear proper equipment.⧼thumbs_response⧽
- Do not attempt to blow glass at home.⧼thumbs_response⧽
- If it is your first time blowing glass, attend a workshop at the glass studio or take a glass blowing class.⧼thumbs_response⧽
Things You'll Need
- Batch or Cullet glass
- Crushed colored glass
- A furnace
- A crucible, or Glory Hole
- A blowpipe
- A marver
- An annealer oven
- Steel tweezers
- Heat resistant gloves
- A grinding block
- A partner to assist you


References
- ↑ http://www.sacramentoartglass.com/the-process-of-blowing-glass.html
- ↑ https://www.youtube.com/watch?v=XxgIEeIBCFo&feature=youtu.be&t=32
- ↑ http://www.sacramentoartglass.com/the-process-of-blowing-glass.html
- ↑ http://www.sacramentoartglass.com/the-process-of-blowing-glass.html
- ↑ https://www.youtube.com/watch?v=XxgIEeIBCFo&feature=youtu.be&t=42
- ↑ https://www.youtube.com/watch?v=XxgIEeIBCFo&feature=youtu.be&t=59
- ↑ https://www.youtube.com/watch?v=XxgIEeIBCFo&feature=youtu.be&t=66
- ↑ https://www.youtube.com/watch?v=XxgIEeIBCFo&feature=youtu.be&t=66
- ↑ https://www.youtube.com/watch?v=XxgIEeIBCFo&feature=youtu.be&t=76
- ↑ http://www.sacramentoartglass.com/the-process-of-blowing-glass.html
- ↑ https://www.youtube.com/watch?v=XxgIEeIBCFo&feature=youtu.be&t=119
- ↑ https://www.youtube.com/watch?v=XxgIEeIBCFo&feature=youtu.be&t=119
- ↑ https://www.youtube.com/watch?v=XxgIEeIBCFo&feature=youtu.be&t=145
- ↑ http://www.sacramentoartglass.com/the-process-of-blowing-glass.html
About This Article

The most common and accessible type of glassblowing is called offhand, which is where you heat and shaped the glass on the end of a hollow pipe. You’ll need access to a furnace that can be heated to 2 thousand degrees Fahrenheit to melt the glass. After you put your pipe in the furnace, you’ll roll it around to gather the glass. Once you gather enough glass from the furnace, you’ll want to roll it on a marver, which is a special surface that helps distribute heat, to form a cylinder shape. You can then put the pipe on a stand and blow into it as you roll it. If the glass starts to cool, you’ll have to put it in a crucible, which is a small oven, to keep it hot and malleable until you get it the size you want. To learn how to cool your glass, keep reading!