This article was co-authored by Ollie George Cigliano. Ollie George Cigliano is a Private Chef, Food Educator, and Owner of Ollie George Cooks, based in Long Beach, California. With over 20 years of experience, she specializes in utilizing fresh, fun ingredients and mixing traditional and innovative cooking techniques. Ollie George holds a BA in Comparative Literature from The University of California, Berkeley, and a Nutrition and Healthy Living Certificate from eCornell University.
This article has been viewed 63,581 times.
Mushrooms are an incredibly versatile food that can be added to lots of different recipes or eaten on their own! Boiling mushrooms is a great way to prepare them if you also have other cooking tasks you need to complete, as they won’t need as much attention. Prepare your mushrooms by cleaning and cutting them, and then boil them to have a tasty addition to many dishes.
Ingredients
Simple Boiled Mushrooms
- 8 to 12 ounces (230 to 340 g) of mushrooms
- 1 tablespoon (15 mL) of butter
- 1 teaspoon (4.9 mL) of salt
- Herbs, seasonings, or sauces to taste
Makes 2-4 servings
Steps
Cleaning and Chopping the Mushrooms
-
1Rinse the mushrooms and pat them dry with a paper towel. You can rinse the mushrooms by hand or put them all into a colander and rinse them with the kitchen sprayer. If there are large chunks of dirt, use your fingers to lightly rub the mushrooms clean.[1]
- Alternately, you could wipe the mushrooms down with a damp paper towel, though if they are caked in dirt, you should fully rinse them.
-
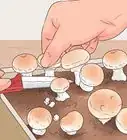
2Remove the gills or stems from the mushrooms. The gills on portobello mushrooms are edible, but they excrete a dark liquid when they cook. Use a spoon to gently scrape and remove the gills. For mushrooms that have stumps, use a knife to slice off the hard ends.[2]
- You can discard the sliced off mushroom stumps, or set them aside to add to your compost pile later.
Advertisement -
3Cut the mushrooms into quarters or slices, depending on your recipe. Use a clean cutting board and a kitchen knife, and gently cut your mushrooms. If you’re in a pinch and don’t have a clean knife, you can also rip the mushrooms using your hands.[3]
- Whole mushrooms will boil just the same as sliced mushrooms, so if you prefer larger bites, don’t worry about chopping them up.
-
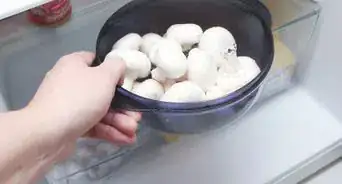
4Store excess mushrooms in an airtight container in the fridge. Uncooked, sliced mushrooms can last for 7 days, while whole mushrooms can last for 10 days when stored in the fridge. Make sure the mushrooms are fully dry before you put them into the fridge to prevent them from getting slimy.[4]
- Put a piece of masking tape with the “use by” date on the container so you don’t forget how long they’ll be good for.

Bringing the Mushrooms to a Boil
-
1Put your prepared mushrooms in a medium or large sauté pan. Use 8 to 12 ounces (230 to 340 g) of mushrooms. Make sure the pan is clean before you use it and that it will be large enough to hold all of your mushrooms and the liquid it takes to cover them.[5]
- One of the benefits of boiling mushrooms is that you can batch-cook as many as will fit into the pan at one time.
-
2Add enough water to the pan to just cover the mushrooms. It’s okay if the mushrooms are poking through the top of the water a little bit. You can either bring the pan directly to the sink to fill it up, or if the pan is really heavy, use a large cup to bring water to the pan directly.[6]
- You can always add more water or scoop some away if you find that the cooking time is too short or long, depending on your other cooking tasks.
-
3Put 1 US tbsp (15 mL) of butter and 1 tsp (4.9 mL) of salt into the pan. Most sticks of butter have measurements on the wrapper to show you where to cut, but if yours doesn’t, use a measuring spoon. Always measure out the salt to avoid over- or under-salting the dish.[7]
- If you don’t have butter, you can substitute 1 tablespoon (15 mL) of a cooking oil, like olive oil, avocado oil, or even coconut oil.
-
4Turn the burner to high and let the water come to a boil. If you want the water to come to heat up faster, you can put a lid on the pan. Just keep an eye on it so you notice when it starts to boil.
Simmering and Browning the Mushrooms
-
1Reduce the heat to medium-low once the mushrooms are boiling. You want to keep the heat high enough so that the water is simmering but not so high that it is at a roiling boil. You may need to adjust the burner to get a simmer depending on your stovetop.[8]
- You may notice that there seems to be more water in the pan now than when you first started, and that is because mushrooms lose water as they cook. But don’t worry! The boiling and simmering process will evaporate away all that excess water.
-
2Simmer the mushrooms for 5-7 minutes, or until the water evaporates. You’ll hear a sizzle once the water is gone and the mushrooms are touching the bottom of the pan. If you won’t be in the kitchen while your mushrooms are boiling, set a timer for 5 minutes so you can check them.
- Don’t use a lid on the pan, as that will hinder the steam from escaping and will make the evaporation process take longer.
-
3Brown the mushrooms in the remaining butter for 1-2 minutes. Once the water evaporates away, the butter or oil that you added into the pan with the mushrooms will be left on the bottom. Use a spatula to stir the mushrooms occasionally during the 1-2 minutes.[9]
- Because the mushrooms are already cooked, this last step simply serves to finish them off with a light searing.
-
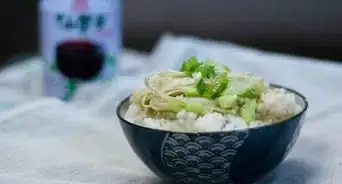
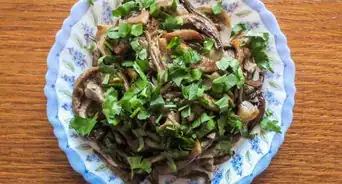
4Add your seasonings to the mushrooms and serve. You could add a little more salt and a dash of pepper, or you could stir in some soy sauce, toss in some minced garlic or fresh herbs, or any other combination of seasonings you prefer. You could also serve the mushrooms along with another dish, like scrambled eggs, or simply eat them on their own.[10]
- If you are only going to eat half of the mushrooms that you prepared right away, remove and store the other half before adding your seasonings. That way you can season that second half differently if you so desire.
-
5Store leftover mushrooms in an airtight container in the fridge. Let them cool completely before putting them into the container, and then keep them in the fridge for 7 to 10 days. To reheat, you could put them into the microwave for 30 to 45 seconds, or toss them in a heated skillet for 2 to 3 minutes.[11]
- After 7 to 10 days, discard any unused, prepared mushrooms. Use a piece of masking tape to label their container with the use-by date.
Expert Q&A
-
QuestionWhat does a bad mushroom look like?
 Ollie George CiglianoOllie George Cigliano is a Private Chef, Food Educator, and Owner of Ollie George Cooks, based in Long Beach, California. With over 20 years of experience, she specializes in utilizing fresh, fun ingredients and mixing traditional and innovative cooking techniques. Ollie George holds a BA in Comparative Literature from The University of California, Berkeley, and a Nutrition and Healthy Living Certificate from eCornell University.
Private Chef & Food EducatorFresh mushrooms are dry, light, and smell earthy (like mushrooms). If they smell at all bad, then they are.
Things You’ll Need
Cleaning and Chopping the Mushrooms
- Paper towels
- Sharp kitchen knife
- Cutting board
- Air tight container (for storage)
Bringing the Mushrooms to a Boil
- Medium to large sauté pan
- Water
Simmering and Browning the Mushrooms
- Spatula or spoon
- Serving dish or plates
- Air tight container (for storage)


References
- ↑ http://www.organicauthority.com/how-to-cook-mushrooms-perfectly
- ↑ http://www.organicauthority.com/how-to-cook-mushrooms-perfectly
- ↑ https://www.bonappetit.com/test-kitchen/common-mistakes/article/mushroom-common-mistakes
- ↑ https://www.eatbydate.com/vegetables/fresh-vegetables/mushrooms/
- ↑ http://www.organicauthority.com/how-to-cook-mushrooms-perfectly
- ↑ http://www.organicauthority.com/how-to-cook-mushrooms-perfectly
- ↑ https://www.thespruceeats.com/a-new-way-to-cook-mushrooms-913400
- ↑ https://www.thespruceeats.com/a-new-way-to-cook-mushrooms-913400
- ↑ https://www.thespruceeats.com/a-new-way-to-cook-mushrooms-913400
About This Article