This article was co-authored by Hannah Young. Hannah Young is an Outdoor Education Expert with more than three years of experience. She specializes in educating others on backpacking and hiking, land ethics and best practices, and wilderness Restoration. Hannah earned a BS in Earth Systems from Stanford University.
This article has been viewed 130,096 times.
If you ever find yourself lost or stranded in the wilderness, one of the essentials for safety and survival, even for a short amount of time, is a makeshift shelter. A shelter protects you from the elements: it keeps you warm in cold and snowy areas to prevent hypothermia; it shades you from extreme sun and heat to prevent dehydration and heat stroke; and it shields against wind, rain, or snow in a storm. Learn how to quickly put together a basic shelter that will protect you in the wilderness.
Steps
Building a Shelter in a Wooded Area
-
1Look for natural shelter features. Search in your immediate wilderness area for land features that could act as shelter. These will be the fastest forms of shelter you can make.
- Look for is a durable surface to place your tent that is not going to have a lasting impact on the area that you're camping in such as tough rocks, or dirt with no vegetation.
- You want to choose a spot at least 200 feet away from the nearest water source so that all of your cooking and bathroom habits don't contaminate that water.
- Caves or rock outcroppings that hang over your head are simple natural shelters.
- Build a fire in the entrance to a rock dwelling, to smoke out any critters living inside.
- A fire can also warm rocks you can then put around your body for warmth while sleeping.[1]
- Look for large fallen trees, which can offer shelter if there is space between the trunk and the ground.
- Prop branches against either side of the trunk like a tent for more protection.
- Cover the branches with leaves and brush for more warmth.
-
2Look for two close trees for a lean-to. Build a classic lean-to shelter by first finding two trees that are growing close together, about the height of your own body or slightly longer. Then put a long branch between the trees, or a rope if you have one.
- Look for a tree with low “forks” where the trunk or larger boughs branch off from one another.
- The ideal situation is a tree that forms a “Y” shape with its trunk and branches, where you can simply rest your branch, called a “ridgepole,” into them.
- If you cannot find two close trees, rest one end of the ridgepole on the ground and the other in or against a tree.
- Lay branches at a 45° angle onto the ridgepole on one side.
- Then cover crosswise with more branches, brush, leaves, snow, etc. until the wall is several inches or even feet thick.[2]
Advertisement -
3Build a small a-frame or debris hut. Find a tree with a low crook, a sturdy boulder, or a stump to create a small shelter just large enough for your body. Rest one end of a large branch onto the tree, rock, or stump, with the other end on the ground.
- Choose a main branch (ridgepole) long enough to create a space large enough for you to lay down once you lean the branch against a tree or rock.
- Lay branches at an angle against the ridgepole on both sides.
- Then, cover the structure with smaller branches, leaves, and other brush, laid crosswise on the first branches so they don’t fall through.
- The thicker the walls the better!
- Keep a pile of brush outside the entrance that you can use to partially cover the opening once you’re inside.[3]
- As a fast last-resort shelter, create a debris hut by simply piling debris from the forest floor, then creating a hole in the pile that's large enough for your body.
- Partially cover the entrance once you’re inside to create warmth.[4]


Building a Plastic Sheeting Shelter
-
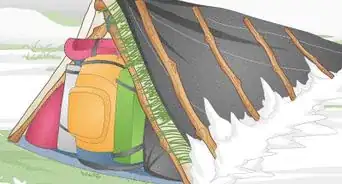
1Build a tarp tent or lean-to. Construct the base of a regular lean-to by finding two close trees and resting a long branch in between them, or tying a rope across if you have one. Then drape a tarp over the branch on one or both sides and weight it down on the ground with rocks, logs, dirt, or snow.[5]
- If you don’t have a standard tarp, construct a shelter with a poncho, garbage bags, a space/emergency blanket, or other plastic sheeting available.
- If you have enough tarp material, lay the tarp over the ground inside the shelter for better protection.
- For an a-frame tent, form a full triangle with the tarp, making the ridgepole the top point of the frame.
-
2Make a small a-frame with a tarp or blanket. Construct a typical a-frame by propping one end of a large branch against a low crook of a tree, rock, or stump to make a shelter just large enough for your body. Then drape plastic sheeting of any kind you have over the ridgepole with equal lengths on either side, and secure to the ground with heavy objects.[6]
- Small a-frames are suited to one person for maximum warmth, so they also work well if you have a smaller poncho, garbage bags, or space blanket rather than a large tarp.
- You can also construct an a-frame with branches and brush for the walls as you would if you didn’t have any other materials.
- Then, use a tarp or other plastic sheeting to cover walls for extra warmth and protection.
-
3Make a tube tent out of trash bags. Build a simple tube tent if you have at least two large trash bags. Split the bottom of one bag, and slide it partly over the open end of the other bag to make one longer tube.
- String up the tube between two trees, rocks, or other structures with a long branch or a rope if you have one.
- You can also prop the tube open with branches and brush, or simply crawl into it for sufficient protection.[7]


Building a Snow or Sand Shelter
-
1Dig a shelter into the snow around a tree. Build a tree-pit snow shelter if you are in a wilderness area with deep snow and evergreen trees, and you have a tool to dig with. Dig around the tree to the ground level to create a shelter where the branches act as a roof.
- Look for an evergreen tree that has thick, bushy branches that extend wide from the tree for the best overhead coverage.
- Dig down in a circle around the trunk, no wider than the tree’s branches.
- Dig to a level you can comfortably sit or lay down into, or until you reach the ground.
- Pack down the snow at the top and sides of your hole to prevent any caving in.
- Cut or break off evergreen branches to line the bottom of the hole and provide thicker overhead coverage if needed.[8]
-
2Build a snow cave. Mound up snow and carve out a space big enough for your body to create a small cave that will insulate you from wind and snowstorms. Make a snow pile a few feet longer than your body height and tall enough that you can dig into it without the top collapsing.
- After building a mound of snow, let it sit for several hours or pack it down.
- Packing it down and letting it solidify will make it easier to dig a cave without the snow collapsing.
- Dig down and into the snow until you have a corridor long and wide enough to fit your whole body inside.
- Make sure all walls of the cave remain about a foot thick to prevent them from collapsing.
- Line the inside with evergreen branches for insulation and comfort. You can also close the entrance with more branches.
- Use a shovel for the most efficient digging tool.
- If you don't have a shovel, use a cup or bowl, ski or snowshoe, or other sturdy item.[9]
-
3Dig a pit in a desert or beach. Access cooler temperatures in the sand and protect yourself from the sun and wind by digging a trench into the sand. Cover the pit with any plastic sheeting you may have, or sand supported by driftwood or branches.
- Dig out a trench long enough for your body and as low as possible, running north to south so it gets as little sun as possible throughout the day.
- Mound up sand on three sides of the trench to make a deeper pit.
- Then, lay a tarp or other plastic sheeting over the mounds and weigh it down with sand.
- Alternatively, put down driftwood, branches, or another flat material to support sand for a roof.
- Make sure you build your sand pit well above the water line or high tide mark if you’re on a beach.[10]


Expert Q&A
-
QuestionWhat is the easiest shelter to build?
 Hannah YoungHannah Young is an Outdoor Education Expert with more than three years of experience. She specializes in educating others on backpacking and hiking, land ethics and best practices, and wilderness Restoration. Hannah earned a BS in Earth Systems from Stanford University.
Outdoor Education ExpertTarps can be really helpful wilderness shelters, and all you'll need is some rope and fasteners. Obviously, please make sure that you're not creating any lasting damage to the tree that you're tying the tarp to. Also, it's important that you're in a site that has some drainage capacity so that, if it does start raining on you, the water won't pool in your site. -
QuestionWhere is the safest place to build a sleeping den, the woods or on the beach?
 Community AnswerThe safest place to build a sleeping den is high up on the beach, which will put you out of reach of the the tide. You can make an elevated bed out of trunks and branches. You can make cover out of anything soft, like leaves, long grass or sand.
 -
QuestionCan you use a cave as a den if you're living in the woods?
 Community AnswerYou can, but you have to be careful. Wild animals, such as bears or wolves, tend to make caves their homes. If you can see inside, look for bones, excrement, fur, and (of course) the animal. If you cannot see inside the cave, it is not recommended you go in to find out whether or not there is an animal, as this is clearly dangerous. If you can survive without a shelter for a while longer, find a hiding spot and keep watch over the cave to see if any animals enter/exit. If it's clear, then immediately use foliage such as sticks and branches to cover the entrance, while still giving yourself a way out. This will help ensure that no animals come into the cave looking for shelter.
Warnings
- Use sturdy branches that are not wet or rotting when constructing wooded shelters.⧼thumbs_response⧽
- Survival shelters are used for dangerous emergency situations in the wilderness. While you may choose to build a rough shelter recreationally, you should never plan to rely on one. Always bring maps, adequate clothing and water, and all other materials necessary to navigate wilderness in any weather, and prevent a situation for which you’d need to build a shelter quickly for survival.⧼thumbs_response⧽
- Be aware of potential dangers in the area you plan to build a shelter. Don’t build in an area prone to a rockslide or avalanche, or under trees with dead or loose branches.⧼thumbs_response⧽


References
- ↑ http://www.practicalsurvivor.com/shelter
- ↑ http://www.fieldandstream.com/photos/gallery/survival/shelter/2006/10/seven-primitive-survival-shelters-could-save-your-life/?image=2
- ↑ http://www.wilderness-survival.net/shelters-2.php
- ↑ http://www.fieldandstream.com/photos/gallery/survival/shelter/2006/10/seven-primitive-survival-shelters-could-save-your-life/?image=0
- ↑ http://www.motherearthnews.com/diy/winter-shelter-ze0z1301zsau.aspx
- ↑ http://www.wilderness-survival.net/shelters-2.php
- ↑ http://www.motherearthnews.com/diy/winter-shelter-ze0z1301zsau.aspx
- ↑ http://www.motherearthnews.com/diy/winter-shelter-ze0z1301zsau.aspx
- ↑ http://www.practicalsurvivor.com/snowcaves
About This Article