wikiHow is a “wiki,” similar to Wikipedia, which means that many of our articles are co-written by multiple authors. To create this article, 13 people, some anonymous, worked to edit and improve it over time.
This article has been viewed 50,522 times.
Learn more...
If you ever find yourself injured or lost in a winter wilderness area, you may need to craft an effective emergency winter shelter. This design can be used by you and others in your party, requires few or no tools, and takes only a short time to build. The shelter can be expanded for a second occupant and repeated for additional people needing shelter.
Steps
Preparing to Build
-
1Assess available building resources-- materials, supplies of any kind, manpower, and daylight. This seemingly short and less important step will actually be the factor that decides between success (survival) and failure (dirt nap). Knowing what you have to work with and how much time to build shelter is the key to surviving cold and snowy weather in the short run. Make use of anything you have and plan to work with whatever is provided by nature.
- The amount of manpower you have is limited by injuries, strength, and the general health of you and all other survivors. Even injured persons who can not walk can use their hands to fabricate materials for the shelters so plan to include everyone in the effort.
-
2Try to work during daylight. The ability to see is vital. Working in the dark is dangerous and it slows progress greatly, so recognize how much time you have until sundown.Advertisement
-
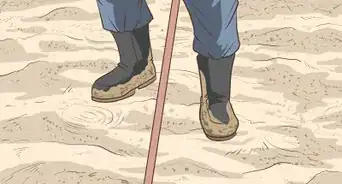
3Prepare the ground of the shelter. For a single person shelter you must clear any snow, ice, and debris away to form an area large enough for the survivor to lay down with no more than six inches of space on either side of their body. The space should run so that the short ends line up with the wind direction or to the north and south.
-
4Pad the ground. After clearing this spot of any wet debris it must be padded with materials that are as dry as possible. Pine boughs can be 'slapped' against a tree trunk to knock water, ice, and snow off to dry the materials.
- Any man made materials you have access to can be used as well: Floor mats from a car, seat cushions, plastic grocery sacks filled with leaves... Anything that will distance you from the ground and keep you dry. The ground steals heat rapidly and water pools in low spots so this step is critical.
-
5Gather materials to construct a frame to cover the prepared ground space. If possible, locate a long branch or pole that is ideally about a foot taller than the person to be sheltered. This 'spine' will be what sits above the body of the survivor and to which the sidewalls of the shelter will be laid. If you have access to fallen trees that are still attached to their stump you can use the space beneath the fallen trunk as a great start to your shelter.


Building the Shelter
-
1Raise the spine on one end of the shelter to form the opening by which you enter and exit the shelter. Looking at the arrangement from the side will make it appear to be a 30-60-90 degree triangle with the opening at the 60-90 degree angle side. The 90 degree angle is on the ground and it stretches all the way to the the other end of the shelter where the 30 degree angle forms at the closed back end of the shelter. The survivors feet will be down in the space where the spine pole touches the ground and forms that 30 degree angle.
-
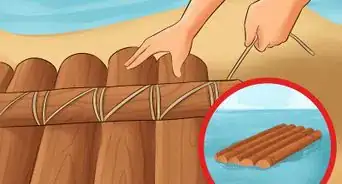
2Take two branches of about three to five feet in length and lay them side by side. Lash them together with any cord, rope, wire, tape, or vines you can find. When you grasp the untied ends and pull them away from each other the lashing will tighten and provide a sturdy prop to lay the spine pole on.
- These two branches will form a 45 degree triangle to hold the spine up off of the ground. The mouth of the shelter will form a 45 degree triangle with the longest side being the ground the two poles are set on and the point of the triangle above it. The point of the triangle is where the spine branch will rest because the two branches cross and form a small "X" to set the spine on.
-
3Build your shelter's "skeleton." Stab smaller branches into the ground and lean them against the spine pole from the front of the shelter down its length towards the 30 degree end of the shelter. They should look like skeletal 'ribs'.
-
4Find materials to cover the frame. Any water proofing materials you have will be put to good use in this step but you can still do it without any man made materials.
-
5Break off small leaf covered or pine needle branches. Lay them against the 'ribs' with the broken end of the branch pointing up at the spine pole.
-
6Repeat with a second row of these branches. Lay them above the first just like the shingles on the roof of a home. This deflects rain and snow and layers insulation over the frame.
-
7Add more cover. Crush flat standing weeds and lay them over the branches as well. The goal is to evenly heap water proofing natural materials over the frame not only to keep you dry but to insulate you as well. A plastic tarp, split open plastic trash bags, or rubber floor mats could be draped over the frame and if done properly would keep you dry but would provide little to no insulation.
- The idea is to block all light from being seen while in the shelter. Pinpoints of light mean air (and heat) can easily escape from the inside. Covering the shelter with as much insulating material as possible is limited by the strength of your spine pole and of course the amount of available materials.
- Even in an open field you can gather bunches of field grasses and make a 'pile' shelter, so covering your 'A' frame should not prove too difficult. Weigh down any materials you cover the frame with to keep them from blowing away in the wind. Mud, branches, and even snow will hold the materials down. Also, snow is a natural insulator.


Finishing the Shelter
-
1Weigh down any materials you cover the frame with. This will keep them from blowing away in the wind. Mud, branches, and even snow will hold the materials down. Also, snow is a natural insulator.
-
2Add final touches. Any materials you have can be stored inside the shelter with you including your drinking water to prevent it from freezing. If built properly this type of shelter can be slept in without heavy clothing and still be adequate enough for survival if not comfortable as well.
-
3Close off the shelter. Once the survivor and up to one other guest back into the shelter through the triangle opening at its mouth, they will need to close off the opening. Backpacks, a trash bag full of leaves, or a small frame of sticks tied together and strung with as much materials as possible can be used.
- Feel free to 'stuff' the interior of the shelter with dry grasses, leaves, or other materials (rugs, blankets, pillows). The extra padding will help keep you warm as well.
-
4Finished.


Community Q&A
-
QuestionHow would I get the rocks to stick to the plants on the branches?
 Community AnswerYou could use mud found at the bottom of lakes as an adhesive, or you could weave the branches, sticks, and plants together to make a frame and bury the frame in the snow.
 -
QuestionHow do I get the ground dry in an area with a tarp shelter when it's already built?
 HelpfullscoutCommunity AnswerStuff a trash bag full of leaves and sleep on it, it will give you insulation and keep you off the ground.
 -
QuestionWhat if I don't have any materials to build a frame?Community AnswerFind some trees and cover the wood with leaves, then do a second layer. You can also put rocks and mud on the top to make sure the rain doesn't come in.
Warnings
- Keep any bottled water near your body as it takes a long time (and a lot of heat) to melt a frozen container of water back to liquid again.⧼thumbs_response⧽
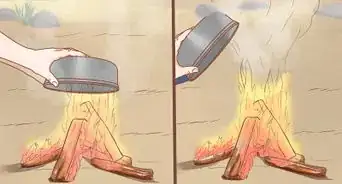
- A candle could be used for light and warmth within the shelter but care must be given to avoid burning up all of your hard work and possibly killing you.⧼thumbs_response⧽
- Inside the shelter, especially if covered in a blanket of snow, you will not be able to hear much of the outside world. The calls of rescuers may not be noticed by you.⧼thumbs_response⧽
- Be careful not to let snow or ice encase your door. Having a stick or tool inside the shelter with you to break through any snow or ice will work wonders.⧼thumbs_response⧽


About This Article
To build an emergency winter shelter, start by clearing a patch of ground and padding it as dry as possible. Next, find a long branch to use as a “spine” and 4 branches that are 3-5 feet in length. Use the shorter branches to make 2 sturdy triangles for each end of, then lay down the “spine” on top. Once your frame is in place, lean additional branches against the spine for support. For added insulation, find materials to cover the frame, and weigh them down with rocks, mud, and snow. For some examples of manmade and natural materials to keep an eye out for, keep scrolling!