This article was co-authored by Ryan Glynn, CPA and by wikiHow staff writer, Hunter Rising. Ryan Glynn is a Plant Specialist, Interiorscaper, and the Founder of Chicago Plants, LLC. He specializes in houseplant care, interior plant-scaping, and gardening. Ryan and Chicago Plants have been featured in several media outlets such as TimeOut Magazine and the Chicago Tribune. Ryan holds a BBA and Master’s degree in Accounting from The University of Wisconsin-Madison.
There are 17 references cited in this article, which can be found at the bottom of the page.
This article has been viewed 211,659 times.
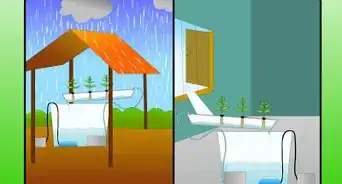
Hydroponic gardening involves growing plants in a water and nutrient solution without using any soil. Hydroponic gardens are easy to start in your own home so you can grow throughout the year. There are many different styles of gardens you can build, the most common being wick systems, deep water cultures, and nutrient film techniques. With a simple build, you can easily have a garden in your home!
Steps
Making a Simple Wick System
-
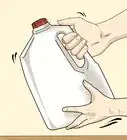
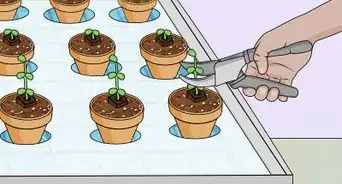
1Cut the top 4 in (10 cm) off of a plastic bottle. Recycle an empty 1⁄2 US gal (1.9 L) soda bottle. Start your cut with a pair of scissors or utility knife just above the bottle’s label, or about 4 inches (10 cm) down from the top. Cut around the entire bottle until the top is completely removed.[1]
- Using a soda bottle will hold 1 plant. If you want to house 10 or fewer plants in a hydroponic garden, consider using a 20 US gal (76 L) plastic tote instead.
-
2Poke a hole through the bottle cap using a screwdriver. Set the bottle cap on a hard surface such as a cutting board. Hold the cap by its sides with your non-dominant hand while you punch a hole in the center with a screwdriver. Make the hole about 1⁄4 in (0.64 cm) wide.[2]
- Heat the end of the screwdriver over a candle flame to melt the plastic cap if you have trouble punching through it.
- If you’re using a plastic tote, use a hole saw attachment for a drill to make 3-4 holes along the middle of the lid.
Advertisement -
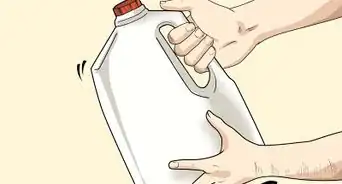
3Feed a piece of twine through the hole in the cap. Cut a piece of twine with a pair of scissors so it’s about 12 in (30 cm) long. Feed the end of the twine through the top of the bottle cap until you have about 6 in (15 cm) on each side. Once the twine is through the cap, screw it back onto the bottle.[3]
- If you’re using a larger reservoir, you may use a thicker piece of rope as the wick to transport more water.
-
4Fill the bottom of the bottle with a nutrient solution. Visit your local gardening store to find a nutrient mix meant for hydroponic gardening. You can use the same solution regardless of what you plant in your system. Fill the bottom of your bottle with about 4 c (950 ml) of tap water. Follow the directions on your nutrient solution to find the amount you need to stir into your water. Once you add the right amount, mix the water with a stir stick.[4]
- Use store-bought purified water in your container if you have hard tap water.
- If you can’t find any nutrient mixes in store, order a bottle online.
-
5Place the top of the bottle upside-down so the twine is mostly submerged. Once you have the nutrient solution mixed together, set the top of the bottle upside-down so the cap faces down. Make sure there’s about 1 inch (2.5 cm) of twine between the bottle cap and the top of the solution.[5]
- If you’re using a plastic tote, use a plastic container that’s 3–4 in (7.6–10.2 cm) deep on top of the tote lid. Make sure to drill holes in the new plastic container so they line up with the holes in your tote.
-
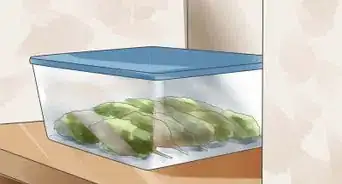
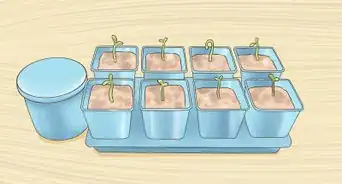
6Put growing medium and your seeds into the top of the bottle. Look for a medium that allows water and nutrients to easily travel through it, such as perlite, coconut coir, or vermiculite. Spread 2 handfuls of the medium in the top portion of the bottle and tamp it lightly with your fingers. After the growing medium is added, you can plant your seeds at the depth specified on their packaging.[6]
- Each growing medium can be purchased from your local gardening or yardcare store. Any of these growing mediums will work no matter which plants you’re using.
- The nutrient solution travels up the wick into the growing medium to provide food and water to your plants.
- Wick systems work great for new hydroponic gardeners and are hands-off, but they cannot support larger plants. Wick systems work best for herbs or lettuce.
Tip: Plant at least 3 seeds to increase your chances of successful germination. Once 1 of the plants grows in more than the others, thin out the weaker growths.


Building a Deep Water Culture System
-
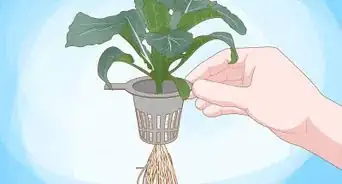
1Cut a hole in the lid of a plastic coffee container the same size as a net pot. Net pots have slots so water can easily flow through them. Trace the bottom of your net pot onto the coffee container lid with a pencil or marker. Use a craft knife or a utility knife to cut the hole to size so the pot fits tightly inside the cutout section. Continue to shave the sides away until the rim of the net pot is level with the top of the lid.[7]
- A coffee container can hold 1 plant. If you want to make a larger hydroponic garden, use a large plastic tote instead with multiple net pots.
-
2Cut a small X near the edge of the lid for an air tube. Measure in about 1⁄2 in (1.3 cm) from the edge of the lid and mark the spot with a pen or marker. Push your craft knife through the lid to make a slit. Rotate the lid by 90 degrees and make another slit going through the first one.[8]
- Make your cut like the hole where you put a straw in on a fast food drink lid.
-
3Feed 6 in (15 cm) of air tubing through the X. Use 1⁄4–1⁄2 in (0.64–1.27 cm) tubing in your deep water culture system. Stick the end of the tube through the X-shape you cut until you’ve fed in 6 in (15 cm) or until the tube reaches the bottom of the container. Leave enough tubing on top to reach a bubbler machine, or about 1 1⁄2 feet (46 cm).[9]
-
4Fill the coffee container three-quarters full with a nutrient solution. Nutrient mixes are sold at gardening stores or online, and any mix will work regardless of what you’re planting. Fill the coffee container three-quarters full with tap water. Follow the directions on the label carefully to mix the right amount of the nutrient liquid for the amount of water you use. Use a stirring stick to combine the nutrients with the water. Put the lid back on your coffee container.[10]
- If you have hard tap water, use store-bought purified water in your container instead.
-
5Put growing medium and seeds into the net pot. Fill the pot to the top with either coconut coir, perlite, or vermiculite. Sow the seeds of your plant about 1⁄2 in (1.3 cm) deep in your growing medium.[11]
- Opt for leafy greens or herbs when planting seeds instead of larger plants.
- Any of the growing mediums will work regardless of the type of plant you’re growing.
- Seed depth while planting may change depending on the type of plant. Consult with the seed package to see if they need to be planted shallower or deeper.
-
6Attach the other end of the air tube to a bubbler and turn it on. Bubblers help add oxygen to the solution so your roots don’t drown. Secure the end of your tubing sticking out from the top of the container to the port on the bubbler, and turn it on. Leave the bubbler on the entire time while your plants are growing.[12]
- The nutrient solution soaks into the growing medium in your pot, providing your plants with constant water and food so they can grow.
- Deep water nutrient systems are low-maintenance and easy to make at home, but they don’t work well for plants that have a long growing period.
- Bubblers can be purchased from your local pet or aquarium store.
- Bubblers need to run continuously or else your plants could die.


Using the Nutrient Film Technique
-
1Connect a pump to an air stone on the bottom of the water reservoir. Make a hole 2 in (5.1 cm) down from the top of a 20 US gal (76 L) plastic tote with a utility knife. Set an air stone in your tote on the same side with the hole and feed the air tube through it. Attach the tubing to an air pump.[13]
- Air pumps and air stones can be purchased from your local pet or aquarium store.
-
2Set a submersible water pump on the other side of the reservoir. Set the water pump on the opposite side of the tote as the air stone. Cut a hole on the side of the tote that’s 2–3 in (5.1–7.6 cm) down from the top and large enough for the power cable and 1⁄2 in (1.3 cm) tubing. Feed the tube and the power cord through the hole.[14]
- Water pumps can be purchased from your local pet store.
-
3Fill half the reservoir with a nutrient solution. Use about 10 gallons (38 L) of tap or purified water in your tote so your pump and air stone are completely submerged. Any nutrient mix can be used regardless of the plants you’re growing. Add the amount of nutrient liquid listed on the label for the water in your tote. Mix the solution together with a stir stick.[15]
- Nutrient liquids can be bought from your local garden store or online.
-
4Slope a rain gutter or PVC pipe between 2 sawhorses to make a channel. Use a 4–6 ft (1.2–1.8 m) piece of rain gutter or PVC piping. Attach a 2 in × 4 in (5.1 cm × 10.2 cm) board on top of one of the sawhorses with 2 screws or nails. Space your sawhorses 3 ft (0.91 m) apart so your tote fits between them, and set the piping or rain gutter on top.[16]
- Make sure the ends of your channel are closed so water doesn’t spill out.
-
5Cut holes in the top of your channel to fit your pots. Use a 2–3 in (5.1–7.6 cm) hole saw attachment for your drill to make holes on the top of your channel. Space each of your plants about 1 ft (30 cm) apart so they have room for the roots to grow. Place 1 net pot in each hole once they’re cut.[17]
- Your channel should fit about 4-6 plants depending on how long it is.
- Hole saw attachments can be purchased at your local hardware store. Make sure to choose a hole saw made for the material you’re cutting through.
- The size of your hole depends on the size of the net pots you plan on using.
-
6Make a drain hole in the lower end of your channel and the lid of your reservoir. Drill a 1 in (2.5 cm) hole in the bottom of the channel about 1–1 1⁄2 in (2.5–3.8 cm) from the edge. Make another 1–2 in (2.5–5.1 cm) hole in the lid of the tote directly underneath the channel drain so the water keeps recycling.[18]
- You can run a tube between the drain and the lid if you want, but it’s not required.
-
7Feed the water pump tube into the higher end of your channel. Use a drill or a hole saw to make a 1⁄2 in (1.3 cm) hole in the center of the raised end of your channel. Feed the end of the tube 2–3 in (5.1–7.6 cm) into the channel so it stays in securely.[19]
- You may also make a hole in the top of your channel if you don’t want to feed in from the side.
- The size of the hole may depend on how thick your tubing is.
-
8Fill your pots with growing medium and seeds. Use a hydroponics-friendly growing medium, such as perlite, coconut coir, or vermiculite. Fill each pot so they’re three-quarters full before planting the seeds. Put each seed about 1⁄4–1⁄2 in (0.64–1.27 cm) deep into the pot.[20]
- Hydroponic gardening works best for leafy greens or for fresh herbs.
-
9Plug in the water pump so it constantly runs. Make sure the water pump transfers the nutrient solution through the bottom of the channel without leaking. The solution will flow through the channel and the roots of your plants to provide them with constant nutrients before falling back into your reservoir.[21]
- The nutrient film technique constantly pumps a thin layer of water through the channel so your plants grow without drowning the roots.
- Nutrient film systems allow for multiple plants to grow and recirculate water to reduce waste, but the pumps need to constantly run or else your plants may die.
- Plug the pump into an automatic timer that runs every 2-3 hours if you don’t want the pump constantly running.
Tip: Plant roots can grow long enough to clog the channel or drains. Check your channel at least once a week to make sure everything is still flowing properly.


Things You’ll Need
Making a Simple Wick System
- Large plastic soda bottle
- Scissors
- Screwdriver
- Twine
- Water
- Nutrient mix for hydroponics
- Growing media
Building a Deep Water Culture System
- Plastic coffee container
- Net pot
- Craft knife
- Air tube
- Nutrient mix for hydroponics
- Growing media
- Bubbler
Using the Nutrient Film Technique
- 20 US gal (76 L) with a lid
- Utility knife
- Air pump
- Air tubing
- Air stone
- Water pump
- Nutrient mix for hydroponics
- Water
- Sawhorses
- 2 in × 4 in (5.1 cm × 10.2 cm) board
- Hammer
- Nails
- PVC pipe or rain gutter
- Net pots
- Growing media

References
- ↑ https://youtu.be/OJJvghf1E7A?t=5
- ↑ https://youtu.be/OJJvghf1E7A?t=24
- ↑ https://youtu.be/OJJvghf1E7A?t=39
- ↑ https://youtu.be/43zTp9A7Td0?t=113
- ↑ https://youtu.be/OJJvghf1E7A?t=96
- ↑ https://www.epicgardening.com/hydroponic-systems/
- ↑ https://youtu.be/-s5RD8zkomo?t=286
- ↑ https://youtu.be/-s5RD8zkomo?t=416
- ↑ https://youtu.be/-s5RD8zkomo?t=442
- ↑ https://youtu.be/43zTp9A7Td0?t=113
- ↑ https://youtu.be/-s5RD8zkomo?t=574
- ↑ https://youtu.be/-s5RD8zkomo?t=571
- ↑ https://youtu.be/8sbwypDFVgM?t=102
- ↑ https://youtu.be/8sbwypDFVgM?t=143
- ↑ https://youtu.be/43zTp9A7Td0?t=122
- ↑ https://www.epicgardening.com/hydroponic-systems/
- ↑ https://youtu.be/DBME3l29G6Q?t=75
- ↑ https://www.epicgardening.com/hydroponic-systems/
- ↑ https://youtu.be/8sbwypDFVgM?t=208
- ↑ https://www.epicgardening.com/hydroponic-systems/
- ↑ https://youtu.be/8sbwypDFVgM?t=272
About This Article

To build a simple wick hydroponic system, you'll need a soda bottle, twine, and a growing medium for your chosen plants. To get started, cut off the top of a soda bottle about 4 inches from the top and punch a hole in the cap with a screwdriver. Then, thread a 12-inch piece of twine halfway through the cap before putting the cap back on the bottle. Next, fill the bottom of your bottle with 4 cups of water and a hydroponic nutrient mix, which you can buy from your local gardening store. After you’ve mixed the water and nutrients, place the top of the bottle upside down so the cap points down towards the water. Add 2 handfuls of a growing medium, like perlite or coconut coir, to the top of the bottle. Finally, put your chosen plant’s seeds in the medium and leave them to grow. For tips on how to build a deep water culture system, keep reading!