This article was co-authored by Oz Tzalalihin. Oz Tzalalihin is a Project Manager for Vitoli Builders, based in Calabasas, California. He has a passion for working with sloped terrains and has shared his expertise through contributions to local publications. Oz holds a PMP (Project Management Professional) degree from Cornell University and specializes in building pools and structures on hillside properties. With his education and experience, he is a valuable asset to Vitoli Builders and is dedicated to delivering quality results and smooth construction.
wikiHow marks an article as reader-approved once it receives enough positive feedback. In this case, several readers have written to tell us that this article was helpful to them, earning it our reader-approved status.
This article has been viewed 194,964 times.
Building a solid retaining wall using 4x4 treated posts is a straightforward project you can complete yourself with just some basic tools and supplies. In this article, we'll walk you through the best way to build the retaining wall step-by-step, from digging a trench to cutting and laying the posts. Follow the steps below, and before you know it, you'll have a beautiful, sturdy retaining wall made of treated posts.
Steps
Laying the Foundation
-
1Dig a level trench a foot deep into stable soil. Make the trench straight by staking out the location exactly and using a tight string to make a line between the stakes.[1]
-
2Add 6” of sand or crushed limestone as a base leveling material. Compact the base material.
- Check base material with a level or measure down from a leveled string line.
- Add base material to low spots.
- Repeat compacting.
Advertisement -
3Level the trench from one end to the other.


Building the First Course
-
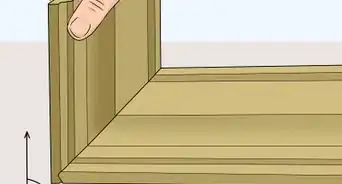
1Begin 1st course with a full length 4x4 post. The word “course” means one row or one layer of the materials of which the wall is made.
-
2Drill two half inch holes through post centered 4 feet (1.2 m) apart.
-
3Hammer the post in place with rebar through the holes. Hammer rebar until flush with top of 4x4 post.
-
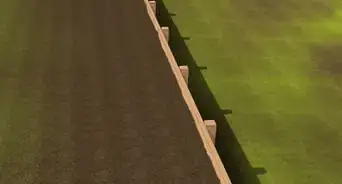
4Repeat for the entire length of the wall.
-
5Measure the last post needed. Transcribe measurement onto a post. Mark line around the post with speed square and pencil, and cut the lines with circular saw.
-
6Check each post level horizontally and plumb vertically as subsequent courses will be affected.[2]
- Add wooden shims if necessary.


Constructing the Wall
-
1Begin the second course with a post cut to half-length to stagger the joints.
- Check posts for level and plumb before nailing.
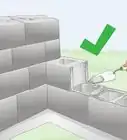
- Use the 4 pound sledge to hammer 60d wall tie nails through the top of the post into the course below.
- Install the wall tie nails every 16 inches.
- Install full length posts to complete the course cutting only the end post.
-
2Begin third course/layer with ¼ length post to stagger seams. Keep going until the layer is complete.
-
3Begin fourth course with ¾ length post to stagger seams. Keep going until the layer is complete.
-
4Begin fifth course with full post again.
-
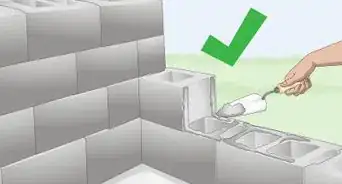
5Add T-braces to the wall while being constructed for support.
- Dig a T shaped trench behind the wall.
- Build the T-brace horizontally behind the wall with 4x4 posts.
- Incorporate the base of the T-brace by nailing it flush in between two posts in a course of the wall.
- Hammer rebar down through the T-brace into the ground.
- Bury the T-braces.
- Locate all T-braces below the top of the finished wall so as to not become disturbed or visible.
-
6Use the straightest and most visibly appealing 4x4 posts for the final top course the wall.
-
7Backfill the wall.[3]


Community Q&A
-
QuestionIf I am building a wall in sand, do I need the rock base?
 Community AnswerYes. Rock or concrete will make the wall much more stable and less likely to topple. The width and thickness of the base is dependent upon the height of the wall and how loose the sand at the base is.
 -
QuestionWhat distance between posts for a 20" wooden retaining wall?
 Community AnswerYou wouldn't want to span the posts any farther than 8 feet. Any farther apart and you run the risk of the retained material bowing out the wall. This is all dependent on several factors, such as hydraulic pressures behind wall, type of backfill material, thickness of retaining wall material, etc.
 -
QuestionHow high can I make this wall, and how do I know where to place the T-braces?Community AnswerI wouldn't go any higher than 8 feet. Depending on the shifting soil or sands, I wouldn't span any farther than 8 feet with the braces.
Warnings
- Wear ear and eye protection always when using a circular saw.⧼thumbs_response⧽
- Wear safety glasses always when working with tools.⧼thumbs_response⧽
- Wear personal protective equipment such as leather gloves, safety-toe work boots with good traction, and a protective hard hat.⧼thumbs_response⧽
- Work with an assistant as the materials and tools are large and heavy.⧼thumbs_response⧽
Things You'll Need
Materials
- 4”x4”x8' (or 12' length) treated post
- ½” x 24” rebar
- 6” 60d galvanized timber ties (nails)
- wooden shims
Tools
- Spade shovel
- metal rake
- 4ft level
- measuring tape
- pencil
- 2 wooden stakes
- roll of string
- string level
- 4 pound sledgehammer
- circular saw
- speed square
- cordless drill
- ½” auger bit
- large pry bar
- tamper


Expert Interview
Thanks for reading our article! If you'd like to learn more about building walls and ceilings, check out our in-depth interview with Oz Tzalalihin.
References
- ↑ https://www.bigrentz.com/how-to-guides/dig-trench-really-fast
- ↑ https://www.sikana.tv/en/diy/masonry/how-to-use-a-spirit-level
- ↑ https://www.bobvila.com/articles/building-retaining-walls/
- https://www.lowes.com/n/how-to/build-a-block-retaining-wall
- https://extremehowto.com/strong-sturdy-retaining-walls/
- https://www.todayshomeowner.com/how-to-build-a-stackable-block-retaining-wall/
About This Article

If you like do-it-yourself projects and want to make your property look more visually appealing, then build a strong retaining wall with 4 by 4 treated posts. To get started, you’ll need to dig a level trench and add sand or crushed limestone to it as a base leveling material. Once your trench is ready, you can prepare your posts by drilling holes through them so you can hammer rebar in to hold them in place. Do this every 4 feet for the entire length of your wall. Once your first layer is set, begin the second course by cutting the posts to half-length to stagger the joints. Then, begin the 3rd layer with ¼ length posts and the fourth layer with ¾ length posts to stagger seams. You can begin the fifth layer with full posts again. To add extra support, add a T-brace to the wall before the final layer. To learn how to lay the final course on the wall, keep reading!