This article was co-authored by Alberto DeJesus. Alberto DeJesus is a Construction Specialist and the CEO of DeJesus Industries. With more than four years of experience, he specializes in high-end real estate development and construction. Alberto and DeJesus Industries have been featured on NBC News and have worked with numerous well-known companies, including Mazda, Amazon, and CVS. Alberto holds a Bachelor’s degree from Boston University.
There are 11 references cited in this article, which can be found at the bottom of the page.
This article has been viewed 167,789 times.
Cutting a proper corner trim requires a moderate amount of mechanical knowledge and preparation. You will need to use a miter saw to connect 2 pieces of trim at an angle. The way you cut depends on whether you need to cover an inside corner, which is concave and between connecting walls, or an outside corner, which is convex and juts out from the walls. Any gaps in the trim can be filled in with caulk, but you may not even need to do this if you measure and cut carefully.
Steps
Setting up for Success
-
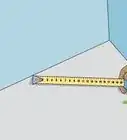
1Measure out your wall space to determine how long the trim needs to be. Before you cut the trim, figure out where you plan on placing it. Use a tape measure on the wall, but also hold the piece of trim to the wall to get an idea of how it will fit. Although each piece of trim needs to be cut to a specific length, overestimate the length of trim you need to ensure you have enough to cover the corner.
- Getting enough trim for short corners is important. You can use short pieces of trim to form the corners as needed, then connect them to longer pieces of trim.
-
2Determine the angle of your wall with an online calculator. The best way to determine the angle is with a bevel protractor. To use the bevel, place the base end firmly against 1 wall, open up the tool, and place the blade end against the other wall. Find the 0 degree mark and read the number above it to figure out the angle measurement. Then, type this into an angle calculator to determine how to adjust a miter saw to cut the trim perfectly.[1]
- You can find a calculator at http://www.installcrown.com/Crown_angle_generator.html.
Advertisement -
3Protect your eyes, ears, and airways before cutting trim. Take some standard safety precautions before operating a saw. Always wear safety glasses, a dust mask, and earmuffs. For more protection, cut the trim in a ventilated area such as outside of your home. If you can't get outside, open nearby doors and windows.[2]
- Avoid wearing gloves, long clothing, or jewelry that can get caught under the saw's blade.


Sawing Outside Corner Trim with a Miter Saw
-
1Slice a trim board at a 45-degree angle. You will need a miter saw to cut the trim at an angle and form a corner. Miter saws have adjustable bases you set to the angle you wish to cut. For the initial angle, turn the base clockwise until the saw points to the 45-degree angle mark, which you can see on the angle gauge beneath the base. Then, position the edge of the trim to the left of the saw blade, holding it firmly against the built-in metal fence for stability as you cut.[3]
- This piece will typically fit on the left-hand side.
- All of the trim around windows and doors forms outside corners. Think of a picture frame. Some baseboard and crown molding installation involves outside corners as well.
- Outside corners generally consist of single pieces of trim connected together. For long walls, you can glue or nail longer pieces of trim to the corner pieces you cut.
-
2Rotate the saw to slice the second piece of trim. To create the mating piece of trim, the angle gauge needs to point to the exact opposite angle from what you used earlier. If you look on the gauge, you should see a second “45” to the right. Turn the saw to point to it, hold the trim to the right of the blade, then cut through it.[4]
- This piece will typically fit on the right-hand side.
- For trim with multiple corners, such as the top and bottom pieces framing a window, cut the opposite end of the original trim.
-
3Test the mitered pieces by connecting them. When you push the mitered edges together, they will connect seamlessly. To get a better sense of this, hold the trim up against the wall corner where you plan on installing them. Then, redo the miter cuts as needed to create the perfect corner angle.[5]
- The cut edges should fall exactly on the corner of your wall, door, or window.
-
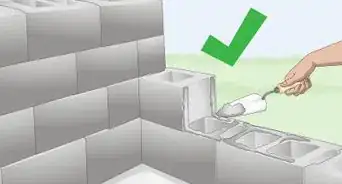
4Trim the pieces to length and fill in gaps with paintable silicone caulk. You can quickly cut the trim down to size by making a square cut with a miter saw. Use the 0-degree setting on the miter to slice through the ends of the trim opposite of the miter cuts. Then, install the trim and fill the gaps with caulk. You can apply caulk with a caulk gun. Place the nozzle near the gap you need to fill, then gradually move the it along the gap while holding down the gun's trigger.[6]
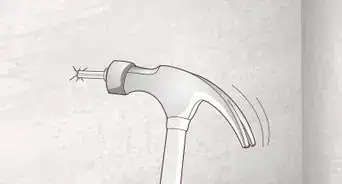
- You can also nail the boards in place for additional stability. Position 2.5 in (6.4 cm) finish nails about every 16 in (41 cm) along the trim.
- If the boards don't connect cleanly or rest flat against the wall, caulk can cover up the imperfections. You can paint caulk the same color as the trim so anyone who comes into your home is hard-pressed to spot the flaws in the miter cut.
- You can also prime and paint the boards afterwards.


Making Inside Corner Trim with a Coping Saw
-
1Cut a 45-degree angle in a piece of trim with a miter saw. Turn the angle gauge clockwise until it is oriented to the left hand 45-degree angle setting. Then, position the trim to the right of the saw. Cut all the way through the trim to create the corner angle.[7]
- Doing this is similar to cutting an outside corner. You can cut another piece of trim at a 45-degree angle and install them on the wall right away. However, most walls do not form a perfect 90-degree angle, so you will notice gaps in the connection.
- Inside corners are where 2 walls meet to form a concave angle. It is common in baseboards and crown molding.
-
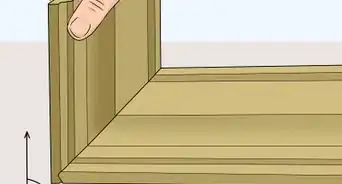
2Connect cut trim together to identify gaps between them. To perfect the inside corner, you need to trim 1 of the boards with a coping saw. Lay the cut piece of trim down on a flat surface, then connect the mating piece to it. Hold the second board straight up, holding it over the miter cut on the first board. Use a pencil to mark the angle of the first board onto the second board as a guideline for the next cut.[8]
- Make sure the boards are set up exactly as they will be when you put them on the wall, or else you won't get an accurate cut.
-
3Use a coping saw to cut the second trim board. Coping saws are very thin hand saws, so they are good for smoothing out small, uneven surfaces. To use the saw, first clamp the piece of trim to a flat surface as needed to hold it steady. Move the saw back and forth to gradually slice through the trim. Follow the contours of the trim to ensure the pieces fit smoothly together on the wall.[9]
- If you are good with a miter saw, you can use it instead of a coping saw. Set it at 0 degrees to make a square cut, then carefully slice off the edges you marked.
-
4Smooth out the trim's edges with a wood file. The coping saw cut doesn't have to be perfect and it may, in fact, look a little rough at first. That isn't a problem since you can shave down the trim's edge to improve it. Rub away any rough spots until the trim is the size you need it to be. This is the only way to perfect tight curves in fancier pieces of trim.[10]
- You can also use a utility knife or 180-grit sandpaper to gradually smooth out the rough edges.
-
5Test and install the trim on the wall. Connect the pieces of trim together again. The trim with the coping cut will be flush with the face of the mitered board. When placed on the wall, the mitered board's edge will rest flat against the wall.[11]
- Caulk is often used for inside corners. If you can't get the angle right, fill in the gaps with paintable silicone caulk, then paint over it to hide it.


Warnings
- Operating a saw is dangerous. Take proper safety precautions such as eye protection and a dust mask. Keep loose hair, clothing, and jewelry out of the way.⧼thumbs_response⧽
Things You'll Need
Making an Outside Corner
- Tape measure
- Pencil
- Miter saw
- Safety glasses
- Dust mask
- Earmuffs
- Caulk
- Nails
- Wood glue
Forming an Inside Corner
- Tape measure
- Pencil
- Miter saw
- Safety glasses
- Dust mask
- Earmuffs
- Caulk
- Nails
- Wood glue


References
- ↑ https://www.woodmagazine.com/woodworking-tips/techniques/skills/bevel-basics-and-beyond
- ↑ https://www.finewoodworking.com/2009/04/01/safety-manual-miter-saw
- ↑ https://www.youtube.com/watch?v=g-M-LeBqx_w&feature=youtu.be&t=60
- ↑ https://www.youtube.com/watch?v=Te_PVrtJkC0&feature=youtu.be&t=76
- ↑ https://www.youtube.com/watch?v=Te_PVrtJkC0&feature=youtu.be&t=123
- ↑ https://www.youtube.com/watch?v=g-M-LeBqx_w&feature=youtu.be&t=115
- ↑ https://www.youtube.com/watch?v=iGfW7zi4yUA&feature=youtu.be&t=64
- ↑ https://www.youtube.com/watch?v=PQsPwY-eoFI&feature=youtu.be&t=162
- ↑ https://www.youtube.com/watch?v=17UNVNFeMfI&feature=youtu.be&t=75
About This Article

To cut a corner trim, you’ll need to use a miter saw to cut both pieces to the right angle. If you have a bevel protractor, use it to determine the specific angle of your corner. However, if you don’t, stick with 45 degree angles. To cut an outsider corner trim, turn your miter saw clockwise to 45 degrees and cut your first trim piece to the left of the saw blade. For the other side, rotate the saw to the other 45 degree angle on the right, and cut the trim to the right of the blade. To cut an inside corner trim, you’ll use the same process, then make another cut with a coping saw to make a more precise angle. Fit the cut pieces together on a flat surface and hold the second piece straight up. Use a pencil to mark the angle of the first piece onto the second one as a guideline for the next cut. Clamp the second piece still and cut along the line with a coping saw. For more tips, including how to fill in a small gap in your corner trim, read on!