This article was co-authored by wikiHow Staff. Our trained team of editors and researchers validate articles for accuracy and comprehensiveness. wikiHow's Content Management Team carefully monitors the work from our editorial staff to ensure that each article is backed by trusted research and meets our high quality standards.
There are 18 references cited in this article, which can be found at the bottom of the page.
This article has been viewed 15,207 times.
Learn more...
Learning how to work with wood is an important skill for both art and survival. Hot pens are an effective way to turn an unassuming piece of wood into a stunning piece of art. If you need to heat, burn the wood in a stove, fireplace, or fire pit with tinder or kindling instead. You can also create a burn barrel to safely burn off scrap wood.
Steps
Using Wood Burning Pens
-
1Purchase a wood burning pen, pen tips, and other tools. Basic wood burning pens are like soldering irons. Most pens have removable tips you change out to burn different lines into the wood. If you’re just starting out, get a quality pen and practice with a single tip. Purchase additional tips as needed to customize your designs.[1]
- Some craft supply shops sell wood burning kits that include a pen and an assortment of tips. These are great for both beginners and anyone looking to take their art to the next level.
- Pliers are very helpful for changing out the small pen tips. Also, consider getting a heatproof glass or metal dish to hold the tips when they’re not in use.
- Some pyrographers choose to wear gloves to protect themselves against burns. If you wish to use gloves, get a heat-resistant material such as leather.
-
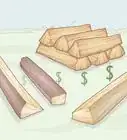
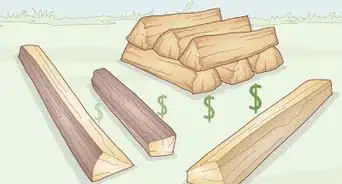
2Select a softwood board with minimal grain that is easy to burn. Woods like pine, aspen, basswood, and birch are the best choices for beginning pyrographers. The more evenly-colored the wood looks, the more your design will show up on them. Get a small square of wood that suits the size of the design you wish to burn.[2]
- Craft stores and hardware stores often have a selection of wood available for burning.
- Hardwoods can be burned, but they’re more difficult to work with. Hardwoods like oak and maple are darker and don’t burn as easily as softwoods. They’re also typically more expensive than softwoods.
- Painted and chemically-treated wood release toxic smoke when they’re burned. Avoid using them in your project.
Advertisement -
3Sand the wood flat with 320-grit sandpaper. Put light pressure on the wood as you sand it. When you’re done, wipe up the debris with a damp cloth. Make sure the wood feels smooth to the touch before you try burning it. Doing this ensures the wood burns much more consistently.[3]
- You can use regular sandpaper or get a solid sanding block. Most hardware stores and general stores carry them.
- Sand the wood along the grain to avoid scratching it. The grain is the direction of the fibers within the piece of wood.
- The sandpaper is also useful for scrubbing debris off of pen tips. Be careful if you try this when the pen is hot. Don’t touch the tip for more than 1 second, or else it will burn the sandpaper.
-
4Choose a design if you don’t wish to burn wood freehand. Begin sketching design ideas on a piece of paper. You can also create it in a computer program like Photoshop and print it out. Think of the design as a template that will help prevent stray burns or other errors in your project.[4]
- If you wish to draw freehand, you can. Skip the template and burn the wood directly.
- For example, you may wish to use a template to draw neat block letters. Perhaps you’re a Game of Thrones fan drawing a map of Westeros, which is a complex project filled with intricate details.
-
5Transfer the design onto the wood using carbon paper. Place the carbon or graphite paper facedown on the wood. Secure it in place with some masking tape. Next, place the template on top of it. Using a basic 2B pencil, sketch the outline of your design. Remove the paper and draw over the lines again to deepen them.[5]
- You can also purchase a transfer tip for your burner pen. The tip is flat and once it heats up, all you have to do is rub it over the paper.
- Another way to do this is to sketch freehand on the carbon paper. That way, you don’t need to draw the design twice.
-
6Press the hot pen lightly against the wood to burn it. Pressing down hard leads to mistakes and broken pen tips. Apply light pressure and let the pen do the work. Move the pen tip in short strokes along your outline. That way, your burn lines will have a more uniform appearance. When you’re done, you will have a wood board with a unique image burned into it.[6]
- Keep the pen moving if you wish to make lighter lines. Holding the pen in place longer burns more of the wood, creating deeper, darker lines.
- If you’re unsure about how a line will turn out, try your pen on a piece of scrap wood. Practice often to get a sense of what different pen tips do and refine your technique.


Operating a Stove or Fireplace
-
1Open the flue before using a home stove or fireplace. The flue is the component that opens to the outside world. If you’re using a fireplace, look for a small ring above the fireplace’s opening. For stoves, the ring will be on the pipe heading towards the ceiling. Pull the ring to open a flue.
- When the flue is open, you will feel cold air coming into your home. If you look inside of the chimney, you will be able to see up the flue pipe leading outside. When the flue is closed, a grate cover the opening.
- Make sure the flue is open or else smoke will accumulate in your home. The flue needs to be completely open.
- Wood-burning camping stoves do not have flues. Otherwise, they operate like ordinary stoves and fireplaces.
-
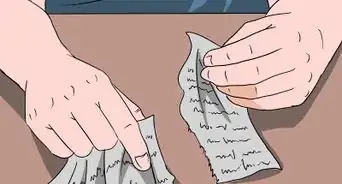
2Throw newspaper or other tinder into the back of the chamber. Even indoors, tinder is important for starting a fire. Shred up some newspaper, or use an alternative like pine needles, wood shavings, dried plants, and even dryer lint. Pile them inside your device’s wood-burning chamber.
- The tinder needs to be small and dry or else it won’t catch fire properly. If the tinder doesn’t light up, any wood you add won’t burn either.
-
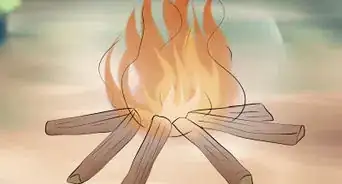
3Stack small branches for kindling around the tinder. Kindling needs to be small in order to grow the fire, so avoid large logs. Instead, get some sticks, pine cones, or other dry pieces of wood. Pile them up loosely over the tinder, leaving plenty of gaps for oxygen pass through.
- If you don’t have anything to use as kindling, try splitting a wood log into smaller sections. Keep the pieces no wider than your finger so they catch fire easily.
-
4Light the tinder with a match to start the fire. Strike the match, then throw it onto the newspaper and other tinder. Make sure it reaches the tinder. If the tinder doesn’t burn first, the fire may not get big enough to consume the kindling. Wait for the fire to grow before adding logs.
- If you don’t have a match, a long lighter works too. Avoid using a regular lighter, since you will need to get too close to the tinder to light it.
- Let the fire burn naturally. Adding an accelerant like coal lighting fluid is dangerous and can lead to fires or even explosions in your home.
-
5Add dry logs lengthwise to keep the fire going. Once the kindling catches fire, put your firewood into the stove or fireplace. Make sure the logs are dry. Lean them over the kindling so the logs meet in the middle, forming a “teepee” shape. Add a few at first, then put in more as needed to grow the fire.
- Another way to arrange firewood is in a crisscross pattern. Lay 2 logs horizontally across the kindling. Then, lay the next 2 logs perpendicular to the first 2.
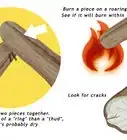
- For a good fire, use hardwood cut and left to age for at least 6 months. Types of hardwood include oak, birch, ash, and ceder
-
6Smother the embers with ash when you’re done using the fire. If you let the wood continue to burn, the fire will eventually run out of fuel. To speed this up, use a poker to spread out the wood and embers. Then, shovel ash onto the flames to extinguish them. Poke through the ash to ensure you didn’t miss any hidden flames.
- Arrange the logs and embers in a flattened mound to get the flames to fade more quickly.
- Wait for the fireplace or stove to feel cool to the touch. Then, gather the ashes in a metal ash container and place it outside, away from fire hazards, for safety.


Using a Fire Pit
-
1Dig a hole away from combustible objects to make a fire pit. Widen the hole into a circle big enough to hold the wood you need to burn. Make the hole at least 1 ft (0.30 m) deep. Place rocks around the pit’s rim to prevent sparks from escaping.[7]
- For safety, always dig fire pits on level ground away from overhanging branches, plants, and buildings. Stay at least 8 ft (2.4 m) away from dead grass and other plants.
- Take advantage of campfires, fire rings, and commercial fire pits. Use them to start fires the same way you would with a fresh fire pit.
-
2Put newspaper or another source of tinder in the pit. Choose a small, dry material that catches fire easily. If you have newspaper available, tear it up and scatter it in the center of the pit. If you’re outdoors, look for dried plants and branches. Use a knife to scrape some dried bark off a tree, for instance.[8]
- Look for dried-out brush plants out in the wild. Use them as tinder or stack them on top of a smaller layer of tinder to help start the fire.
- Wood shavings, cardboard, wax, and even dryer lint serve as good tinder. You can also buy commercial fire sticks and fire starters to create fires easily.
-
3Stack smaller branches on top of the tinder for kindling. Choose a few small pieces of wood from 1⁄8 to 1⁄2 in (0.32 to 1.27 cm) in diameter. Stick to pieces about as wide as your finger or smaller. Collect some dry twigs if you don’t have any wood this size. Then, arrange them in a “teepee” shape, leaning them towards the pit’s center.[9]
- Arrange the kindling loosely. Stacking the wood too close together means oxygen can’t reach the tinder, so the fire will have a hard time spreading.
- If you can’t find any kindling, add extra tinder. You will need to wait a little longer for it to burn before you begin burning wood.
- Another way to stack the kindling is “log cabin” style. Stack the kindling in a square. Add a “teepee”-style roof to start the fire faster.
-
4Start the fire by lighting the tinder with a match. Matches and lighters are the most common ways to start a fire. If you’re outdoors, use a working lighter or a dry box of matches for an easy starter. Otherwise, you will need to start a fire the old-fashioned way, such as by creating a spark.[10]
- To make a spark, strike steel against a piece of flint. Alternatively, rub wood sticks together until they begin to smoke.
- Light the tinder in a few different spots to get the fire going faster.
-
5Blow gently on the flame to help it spread. Once the tinder catches fire, lean down near the edge of the fire pit. Give the flames some extra oxygen by blowing lightly. If the fire shrinks and smolders, wait for the flames to come back again, then blow lightly again.[11]
- Be careful when getting too close to a fire. Keep your head away from the center of the pit and any lit flames.
- If the fire goes out, chances are you blew too hard. Blow more softly to avoid cooling the tinder.
- Never use gasoline or other fuels. These additives are a sure way to make your fire go crazy. Using them is dangerous, so wait patiently for the fire to grow on its own.
-
6Add more kindling and logs to keep the fire going. Now that you have a fire, you can burn whatever wood you need to get rid of. Keep the fire under control. Feed it a log or some smaller branches, wait for the wood to burn, then feed the fire another batch. Continue on until you no longer need the fire.[12]
- Wood is fuel, so adding too much of it often leads to tall, dangerous flames. When this happens, wait for the excess wood to burn or put out the flame immediately.
- Adding a lot of wood at the same time is a sure way to put out the fire. Every piece you add cools the fire pit, so the fire may go out. You will need to light the tinder again.
-
7Smother the fire with water and dirt when you’re done with it. Wait for the flames to die down, then pour a bucket of water on the embers. Use a stick or shovel to mix the tinder and kindling into the dirt. Keep mixing and adding water as needed until you’re sure the fire is out. Feel around the pit for any signs of warmth indicating that the fire is still a hazard, including the rocks outside the pit.[13]
- If adding water or dirt isn’t an option, let the fire continue to burn. Eventually, it will burn itself out. Watch it as it smolders down to nothing to ensure it stays under control.


Making a Burn Barrel
-
1Select a safe site away from plants and other flammable material. Find a level patch of dirt to set up your incinerator. If you need to, dig to help level the ground and remove dried plants. Make sure it’s 10 ft (3.0 m) or more from grass, plants, buildings, and other fire hazards.[14]
- The best spots for burning wood are near fireproof boundaries like roads, wet ditches, and ploughed ground.
-
2Set up a metal barrel with a heavy mesh cover. You will need a metal barrel like the kind used to store oil. Clean it out with soap and water first to reduce the amount of smoke it gives off when you burn the wood later. Then, cover the barrel with a piece of mesh or metal grate. Use a brick or another fireproof object to hold the mesh in place.[15]
- To make a good incinerator, get a 55 US gal (210 L) oil drum. A lot of hardware stores have them. They are also available online and at industrial supply shops.
- Mesh sheets are also at hardware stores or online. A good mesh sheet has holes to let oxygen into the barrel while preventing sparks from escaping.
- Also, consider putting the barrel on some cinder blocks to lift it off of any grass or plants underneath it.
-
3Punch oxygen holes in the barrel with a hammer and metal punch. Measure about 3 in (7.6 cm) up from the bottom of the barrel. Hold the punch against the barrel, then tap it with a hammer to create a hole all the way through the metal. Make 10 to 15 holes all the way around the barrel. These holes don’t have to be placed in a straight line around the metal, so place some of the holes slightly higher than the others.[16]
- For another way to make the holes, use a drill. Choose a strong drill bit, such as a high-speed titanium one.
- Drilling a few holes in the bottom of the barrel will help drain water you use to put out fires. Making these holes is option but useful.
- Customize your barrel further to make it easier to use. For instance, try cutting a rectangular door in the barrel so you have an easier way to add wood to the fire.
-
4Wait for a calm, damp day before burning any wood. The safest time to burn wood is at at the end of the day, no earlier than 2 hours before sunset. Check the weather first to make sure you aren’t working in dry or windy conditions. Bad weather makes starting a fire harder and increases the chances of accidents.[17]
- Be wary of heat waves in your area. Grass and other plants that have dried out are more liable to catch fire from sparks escaping your barrel.
- For safety, put out any fire about 2 hours after sunrise. That way, the next day’s heat and wind have no chance of affecting your incinerator.
-
5Put the wood over tinder in the center of the barrel. Setting wood in the barrel is similar to arranging a campfire. Sprinkle shredded newspaper, dried bark, or another source of tinder in the center of the barrel. Place smaller pieces of wood next, followed by larger logs. Stack them loosely so the tinder has plenty of room to burn.[18]
- Lay the kindling around the tinder. If you have room, stack them in a rectangular or “teepee” shape.
- If you have a lot of wood to burn, stick to smaller branches at first. Add only a couple bigger logs. Putting all the wood in at once will either smother the tinder or lead to big fire.
-
6Light the tinder with a match or a long lighter. Use a match to easily light the barrel. Simply strike the match and drop it onto the tinder. Replace the mesh cover when you’re done. If you’re using a long lighter, lower the lighter down towards the tinder. Once the tinder begins smoking, pull the lighter out and replace the mesh cover.
- Keep your face and hands clear of the barrel while it is on fire. Wait for it to cool and stop smoking before you try lighting it again.
-
7Drown the embers in water when you’re done burning wood. Have a bucket of water on hand to put out the fire right away. After you have taken care of all the wood you need to get rid of, pour the water directly onto the tinder. Stir the tinder around with a stick or a shovel and add more water as needed to finish putting out the fire.[19]
- Test the barrel with your hand. If part of the barrel feels hot or you feel heat coming out of the top, do not leave it unattended. Keep pouring water in while stirring the embers until the barrel feels completely cool to the touch.


Warnings
- Fires are dangerous, so make sure you’re well prepared before starting one. Be careful on windy or dry days and always have ways to put out the fire.⧼thumbs_response⧽
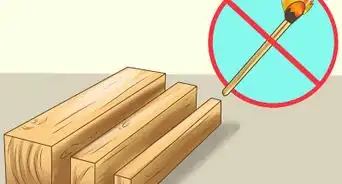
- Never burn anything other than wood in your fire. Trash and even manufactured wood releases pollution or toxic chemicals that are dangerous to breathe in.⧼thumbs_response⧽
Things You'll Need
Using Wood Burning Pens
- Wood burning pen
- Pen tips
- Piece of wood
- 320-grit sandpaper
- Glass or metal dish
- Heat-resistant gloves
- Pencil
- Carbon paper
Operating a Stove or Fireplace
- Newspaper or other tinder
- Smaller branches for kindling
- Wood logs
- Lighter or matches
- Fireplace poker
- Fireplace shovel
- Metal ash container
Using a Fire Pit
- Newspaper or other tinder
- Smaller branches for kindling
- Wood
- Lighter, matches, or an alternative fire starter
- Water
- Stick
- Stones
Making a Burn Barrel
- Metal barrel
- Wire mesh
- Hammer
- Metal punch
- Newspaper or other tinder
- Smaller branches for kindling
- Wood
- Lighter or matches
- Water
- Shovel


References
- ↑ https://www.youtube.com/watch?v=5rodSgfnM38&feature=youtu.be&t=16
- ↑ https://www.youtube.com/watch?v=LZXdpZvN988&feature=youtu.be&t=18
- ↑ https://www.youtube.com/watch?v=bHVBYZmdIAQ&feature=youtu.be&t=114
- ↑ https://www.youtube.com/watch?v=8GClaRYJi5w&feature=youtu.be&t=11
- ↑ https://www.youtube.com/watch?v=kTT8WEMOOoE&feature=youtu.be&t=75
- ↑ https://www.youtube.com/watch?v=CrXvvgHEGTw&feature=youtu.be&t=484
- ↑ https://www.youtube.com/watch?v=d4NNgbCJGWQ&feature=youtu.be&t=19
- ↑ https://woodheat.org/build-maintain-fire.html
- ↑ https://www.gardensillustrated.com/garden-equipment/how-to-chop-kindling-and-the-best-tools-for-the-job/
- ↑ https://www.youtube.com/watch?v=wXverGSYw64&feature=youtu.be&t=158
- ↑ https://www.youtube.com/watch?v=19nNeL0C5ec&feature=youtu.be&t=354
- ↑ https://woodheat.org/build-maintain-fire.html
- ↑ https://www.mass.gov/service-details/open-burning-safety
- ↑ https://smokeybear.com/en/prevention-how-tos/backyard-debris-burning
- ↑ https://www.youtube.com/watch?v=DTECVHq4GVo&feature=youtu.be&t=269
- ↑ https://www.youtube.com/watch?v=KkQ0UofjAIo&feature=youtu.be&t=35
- ↑ https://www.ontario.ca/page/how-burn-grass-and-woody-debris-safely
- ↑ https://www.youtube.com/watch?v=f0EyRJw1Dos&feature=youtu.be&t=114
- ↑ https://www.ontario.ca/page/how-burn-grass-and-woody-debris-safely
- ↑ https://www.epa.gov/sites/production/files/documents/burnwisetips.pdf
- ↑ https://www.epa.gov/sites/production/files/documents/burnwisetips.pdf
About This Article

To burn wood for your stove or fireplace, first open the flue, which is the small ring above the fireplace’s opening, so smoke doesn’t gather in your house. Once the flue is completely open, pile small pieces of dry tinder like newspaper, pine needles, and wood shavings into the wood-burning chamber. On top of the tinder, loosely stack kindling like small branches and pinecones to help the fire grow. After your pile is ready, use a match or long lighter to light the fire. If you want to burn wood in a fire pit, follow the same idea by first putting tinder and then kindling into the hole. When you’re ready to start a fire, use a match or lighter to light the pile and gently blow on the flame to help it spread. For more help, including how to use a wood burning pen to burn designs into wood, read on!