This article was co-authored by wikiHow staff writer, Cory Stillman. Cory Stillman is a Technology Writer for wikiHow. Cory has experience writing about Film and TV for several online publications, including Screen Rant and Film Cred. He earned a degree in Film and Media Studies with a minor in Creative Writing and certificates in Global Studies and Children’s Literature from the University of Pittsburgh.
This article has been viewed 5,795 times.
Learn more...
If you are experiencing resistance issues with your Peloton Bike, or if your metrics seem to be registering incorrectly, you likely need to calibrate it. Peloton Bikes used to come with a calibration kit, but now you will need to request a calibration kit from Peloton's support team. Once you have your kit, however, calibrating your bike is quite easy! This wikiHow article will tell you everything you need to know about calibrating your Peloton Bike. Note: If you own a Peloton Bike+, it automatically calibrates upon first use and adjusts to you again after each power cycle, so Peloton does not recommend performing a manual calibration.
Things You Should Know
- Contact Peloton customer support for a calibration kit before calibrating the Bike on your own.
- Remove your Bike's water bottle holder/sweat guard to properly calibrate it.
- The full calibration requires 31 steps, in which you must turn the resistance knob 1/4 to the right each time.
Steps
-
1Contact Peloton customer support. In order to calibrate your Peloton Bike, you first need a calibration kit. These kits can be requested via a live chat with a Peloton customer service agent.
- Peloton previously provided a calibration kit with their Bikes, but no longer do so. This also means the company's online instructional video is no longer available.
-
2Gather your supplies. Once you have received your calibration kit in the mail, you can start calibrating your Peloton Bike. However, you will need a few other tools as well:
- Phillips head screwdriver
- 3mm Allen wrench - Included with initial purchase of the Bike.
- 4mm Allen wrench - Included with initial purchase of the Bike.
Advertisement -
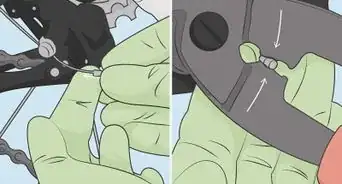
3Remove the water bottle holder/sweat guard. Using the screwdriver and both Allen wrenches, remove the water bottle/holder/sweat guard from the front of your Bike. It is a translucent piece of plastic.
- Simply place the equipment to the side until you are ready to reattach it after calibration.
-
4Power on your Peloton Bike. We will need to access the Bike's touchscreen, so power it on first.
-
5Tap ... in the bottom-right corner. Find the ... icon in the bottom-right corner of your screen. Tap it to pull up a variety of options and settings.
-
6Tap "About". It is represented by an encircled "i". This will open a pop-up containing basic info on your machine.
-
7Repeatedly tap the right-hand corner of the pop-up. Peloton suggests tapping the pop-up 10-20 times in order to trigger the Sensor Calibration menu.[1] Keep tapping until you see it.
-
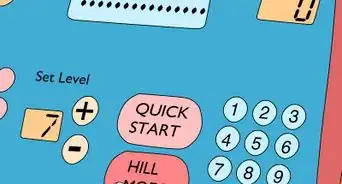
8Tap Get Started. It's the big red button in the middle of the screen.
-
9Turn the Bike's resistance knob all the way to the left and start the calibration.[2] The resistance knob is the large orange knob towards the front of your Bike. Once you have turned the know completely to the left, tap Calibrate on your touchscreen.
- The Bike should automatically calibrate the minimum resistance.
-
10Turn the resistance knob all the way to the right and start the calibration. Once you have turned the knob all the way to the right, tap Calibrate to calibrate the maximum resistance.
-
11Tap Done and turn the knob all the way to the left again. Have the calibration tool located within your calibration kit handy.
- The tool is a small white plastic wedge.
-
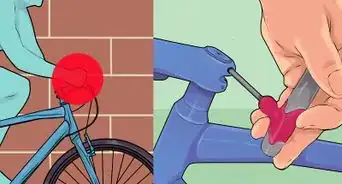
12Place the wedge between the 2nd and 3rd magnets on the flywheel. It should slide in naturally, so long as you have lowered the resistance enough for it to fit.
-
13Turn the resistance knob to the right until the wedge is secure. Slowly rotate the knob until the wedge is tightly located between the two magnets.
- Do not turn the knob too far to the right, as the wedge should still be removable at this stage.
-
14Remove the calibration tool and place the two small white disks beneath the resistance knob. Your calibration kit includes two small white disks, which are to be secured around the metal pole beneath the resistance knob.
- Make sure the lines on both pieces are aligned, and that both are facing forward.
-
15Tap Next to begin calibration.
-
16Tap Set and perform the 31-step calibration. Each time you tap the button, rotate the resistance knob roughly 1/4 to the right. Repeat this for all 31 steps until the calibration is complete.
-
17Tap the Peloton icon at the bottom and power off your Bike. Tap the icon to return to the home screen, then turn the Bike off. Unplug the Bike from its power source as well to perform a full power cycle.
- This power cycle will trigger a full calibration cycle as well.
- While waiting for the Bike to power cycle, take this time to reattach the water bottle holder/sweat guard to the Bike.
-
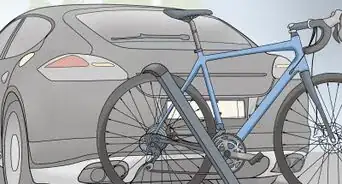
18Try out your newly calibrated Bike! Power the Bike back on and join a Peloton class to ensure the new calibration is to your liking.


References
About This Article