This article was co-authored by Michelle Driscoll, MPH. Michelle Driscoll is the Owner of Mulberry Maids, which is based in Fort Collins, Colorado. With five years of experience, her business specializes in cleaning homes and small offices. She holds a Masters in Public Health from the Colorado School of Public Health. Additionally, Mulberry Maids has an A+ rating from the Better Business Bureau.
This article has been viewed 17,585 times.
Knotty pine cabinets lend your home a rustic and retro feel, but the wood is soft and liable to wear and tear. Fortunately, it can be restored by cleaning it like you would most other pieces of wood. Scrub away grime with a mild soap and warm water. For stubborn spots on unpainted cabinets, try a little paint thinner. Keep your cabinets clean and finished to extend their lifespan.
Steps
Cleaning the Cabinets with Soap and Water
-
1Mix soap and water in a bucket. Fill a bucket of water with about 1 US gal (3.8 L) of warm water. Add in any mild or all-purpose soap you have, checking the label to make sure it is safe for wood. You usually need about ¼ cup (60mL) of soap per 1 US gal (3.8 L) of water.[1]
- Read the manufacturer’s instructions to find out the exact ratio of soap and water to use.
- Specialty wood or cabinet cleaners are also very effective. They tend to be a little more expensive, so you may want to try mild soap first. Find any of these options at a general store.
- Some soaps come in spray bottles. For these, spray the soap directly onto the wood instead of diluting it in water.
-
2Wash and dry 1 cabinet at a time. Go slowly to avoid any water damage to your cabinets. Focus on 1 side at a time, washing and scrubbing it before tackling the rest of the cabinet. Rinse and dry it completely before moving on to another cabinet.Advertisement
-
3Dampen a microfiber cloth in the soapy water. Dip the cloth in the water to dampen it rather than soak it. Limit the amount of moisture on your cabinets to protect them. Before using the cloth, squeeze it to remove excess water.
-
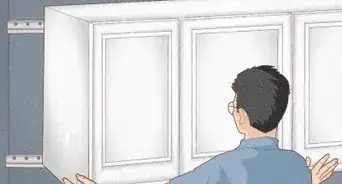
4Scrub the outside surfaces from top to bottom. Wipe down the cabinet to clean it with the soapy water. Spend a little extra time on the corners to lift the more unnoticeable dirt from tough areas.[2]
-
5Scrub tough spots with a toothbrush. Dip an old toothbrush into the soapy water, then use it on places you couldn’t reach with the cloth. This is perfect for treating areas such as carvings or beadwork.[3]
-
6Repeat cleaning as needed for the inside parts of the cabinets. Protect items inside the cabinets by moving them out of the way first. Then, scrub out the insides with soapy water. Make sure the cloth is damp, not dripping.[4]
- Avoid letting water sit inside the cabinets. Leave the doors open until you are sure they are dry.


Rinsing and Drying the Cabinets
-
1Dampen another microfiber cloth in clean water. Use your sink or fill another bucket with clean water. Keep the water warm, about room temperature. Dip a clean cloth into the water and squeeze out the excess moisture before using it.[5]
-
2Rinse off the soap with the cloth. Go back over the cabinet from top to bottom again. This time, use the clean water cloth. It should pick up leftover soap and eliminate most of the remaining grime.[6]
-
3Dry the cabinets with a clean microfiber cloth. To protect the cabinets, dry them off right after washing them.. Water, especially if your cabinets are unpainted, can soak in and damage the finish.[7]
-
4Apply wood polish to a microfiber cloth. Spread a drop of polish onto a dried cloth. You can find commercial polishes at any general store. Both wax and oil polishes work, so use either type to revitalize your cabinets.[8]
- You can also make your own polish. Try mixing 1 cup of olive oil with ½ cup of lemon juice.[9]
-
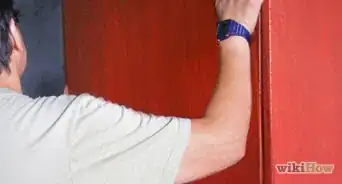
5Polish the wood with the grain. Look closely at the wood to identify the direction of the dark marks running from one end to the other. This is the grain. Rub the cloth back and forth along the grain to work the polish into the wood.[10]


Removing Tough Stains with Paint Thinner
-
1Work in a well-ventilated area. To avoid breathing in paint thinner fumes, work outside at first. Mix the paint thinner out there. When you go back inside to clean the cabinets, get some air flowing into your environment. Open any nearby doors and windows.
-
2Mix paint thinner and a mild soap in equal parts. Get a bucket or a small container to mix the ingredients. First, pour in a small amount of paint thinner purchased from a home improvement store. Then add an equal amount of a gentle, all-purpose soap and stir the ingredients together.[11]
- Avoid using paint thinner on painted cabinets. Repeatedly scrub the cabinet with soapy water instead.
- Be careful when choosing soaps. Pick a gentle soap without bleach to avoid any noxious fumes and damage to your cabinets.
-
3Wear gloves and a respirator before using the mixture. To stay safe, cover up your skin. Wear long sleeves and put on a pair of disposable gloves. Wear a respirator to avoid breathing in any fumes. Also consider using goggles to cover your eyes.
- All of these safety products can be found at general stores and home improvement stores.
-
4Brush the mixture over the stained areas. Dip a paint brush or sponge into the mixture. Once the tool is lightly coated, apply the mixture directly to the stained areas.[12]
-
5Wipe off the paint thinner immediately using an old rag. Use a rag you are not attached to since you have to dispose of it later. Go over all the areas on the cabinet you treated. Make sure all of the paint thinner comes off.[13]
- Usually a layer of varnish or shellac comes off with the dirt. Consider refinishing your cabinets when you get the chance.
-
6Dispose of used rags in a metal container. Paint thinner is flammable, so immediately put used rags in a sealable metal container. Fill the container with cool water before sealing the container. Then, take the container to a hazardous waste disposal center. Search online to find places near you that accept this kind of material.[14]
- If you do not have a metal container, move the rags outdoors. Place them on a safe surface such as dirt or concrete out of direct sunlight. Once the rags dry fully, which happens after at least 2 days, you can safely throw them into the trash.


Warnings
- Be careful when working with paint thinner. Work in a well-ventilated area and dispose of rags safely.⧼thumbs_response⧽
Things You’ll Need
- Buckets
- Warm water
- All-purpose soap
- Microfiber cloths
- Toothbrush
- Wood polish
Treating Tough Stains with Paint Thinner
- Mixing container
- Paint thinner
- All-purpose soap
- Brush or sponge
- Rag
- Metal disposal container


References
- ↑ https://www.thekitchn.com/how-to-clean-wood-kitchen-cabinets-cooking-lessons-from-the-kitchn-218365
- ↑ https://www.thisoldhouse.com/ideas/clean-grime-woodwork
- ↑ https://www.thisoldhouse.com/ideas/clean-grime-woodwork
- ↑ https://www.thekitchn.com/how-to-clean-wood-kitchen-cabinets-cooking-lessons-from-the-kitchn-218365
- ↑ https://retrorenovation.com/2010/02/23/a-1956-knotty-pine-kitchen-respectfully-retained-and-revived/
- ↑ https://www.thisoldhouse.com/ideas/clean-grime-woodwork
- ↑ https://retrorenovation.com/2010/02/23/a-1956-knotty-pine-kitchen-respectfully-retained-and-revived/
- ↑ https://www.bhg.com/homekeeping/house-cleaning/tips/how-to-clean-cabinets/
- ↑ https://healthyblenderrecipes.com/recipes/homemade_natural_eco_green_wood_furniture_polish
- ↑ https://www.bhg.com/homekeeping/house-cleaning/tips/how-to-clean-cabinets/
- ↑ https://www.thisoldhouse.com/ideas/clean-grime-woodwork
- ↑ https://www.thisoldhouse.com/ideas/clean-grime-woodwork
- ↑ https://www.thisoldhouse.com/ideas/clean-grime-woodwork
- ↑ https://www.consumerreports.org/wood-stains/oily-paint-rags-can-spontaneously-combust/
About This Article