This article was co-authored by Jamie Corroon, ND, MPH. Dr. Jamie Corroon, ND, MPH is the founder and Medical Director of the Center for Medical Cannabis Education. Dr. Corroon is a licensed Naturopathic Doctor and clinical researcher. In addition to clinical practice, Dr. Corroon advises dietary supplement and cannabis companies regarding science, regulation, and product development. He is well published in the peer-review literature, with recent publications that investigate the clinical and public health implications of the broadening acceptance of cannabis in society. He earned a Masters in Public Health (MPH) in Epidemiology from San Diego State University. He also earned a Doctor of Naturopathic Medicine degree from Bastyr University, subsequently completed two years of residency at the Bastyr Center for Natural Health, and is a former adjunct professor at Bastyr University California.
There are 14 references cited in this article, which can be found at the bottom of the page.
This article has been viewed 88,735 times.
What are cannabis clones? Clones are just cuttings from established cannabis plants, which are called “mother plants." For beginners and experienced growers alike, growing from clones offers a variety of benefits. You have total control over the plant genetics you pick, and you don’t have to deal with the delicate seedling stage. In other words, it’s easier, faster, and more precise. Roll up your sleeves and let’s get started by taking your cuttings, rooting them, and finally transplanting your cannabis clones.
Steps
Taking Cuttings
-
1Pick a plant with a high yield. Since your clones will have the same genetics as the mother plant, you want your initial cuttings to come from hardy stock. Try to choose plants that you know produce a lot of buds and grow to your desired size and height.[1]
- If your mother plant hasn’t flowered before, pick a plant with lots of branching.
- You can also consider the desired THC or CBD content in your clones and the aroma/flavor of the mother plant.[2]
- Choose indica strains for cannabis with a calming, relaxing effect and sativa strains for an uplifting, energetic effect.[3]
-
2Take your cuttings from a plant in the vegetative stage. The vegetative stage begins when the plant is 3-4 weeks old, and the stage lasts for up to 16 weeks before the plant starts blooming.[4] While you can technically take a cutting from any plant, plants in the flowering stage take weeks or even months longer to clone![5]
- Ideally, pick a mother plant that’s at least 5 weeks old from seedling and has multiple side shoots.[6]
- If you pick a plant that’s too young, the cutting will have hollow inner walls, and it’ll quickly wilt.
Advertisement -
3
-
4Use a knife to cut each branch at a 45° angle.[11] Make your cut just below the 3rd node of the branch you want to take. Remove any leaves growing near the node closest to the bottom of your cutting. Getting rid of these leaves lets your plant retain more water.[12]
- Knives or razors create a cleaner cut that does less damage to the stem than scissors.[13]
-
5Put your cuttings in water immediately. Place your cuttings into a jar of clean water to keep them hydrated. Water also prevents air bubbles from forming inside the stem.[14] You can keep them in the jar for several hours if you need to harvest other cuttings.[15]
- If you don’t immediately have water available, you can set the cuttings down on a clean glass or ceramic plate. It’s important to use clean materials to prevent fungus from attacking your delicate cuttings.[16]


Rooting Your Plants
-
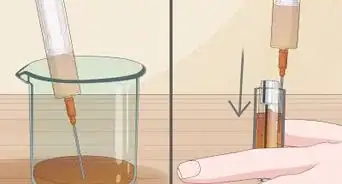
1Dip the cut ends in rooting hormone as soon as possible. Apply rooting hormone to the open ends of the plant just before you set them into their rooting medium. Rooting hormone encourages the plant to start producing root cells instead of regular green plant cells.[17] You can use either a gel or powder rooting hormone.[18]
- Don’t get the rooting hormone on the foliage or it can damage the leaves.[19]
-
2Mist your rooting medium and push your cuttings in.[20] Use a rockwool rooting cube for a popular medium that locks in moisture.[21] Lightly spray the rockwool with water so it’s moist all the way through. Dig a small hole into the rooting medium just deep enough so the branch will stand up straight and just wide enough for the plant stem’s thickness. Place your cutting into the hole, and lightly push the soil around the plant stem to hold it in place.[22]
- If you don’t have rockwool, use potting soil or even water (for a hydroponic growth process).[23]
- To keep your plants easy to transport and care for simultaneously, root them in growing trays rather than individual small pots.
-
3Close your plants in a plastic humidity dome for the first 48 hours. Lightly mist the plants with a spray bottle once they’re in their rooting medium. Then, put the plants under a plastic humidity dome to reduce the risk of your plants drying out.[24]
-
4Keep your plants under low-intensity fluorescent lighting for 18 hours a day. Use T8 or T12 bulbs, since excessive light can cause your plants to “stretch” or (grow way too quickly between nodes).[25] To keep your cuttings happy, put the lights about 30 inches (76 cm) away from the plants.[26]
- Leave the cuttings in their rooting cubes until white hairs start to sprout up from the cubes. Then, it’ll be time to transplant.[27]


Transplanting
-
1Fill 1 gallon (3.8 L) pots with potting medium.[28] Choose a soilless peat- or sphagnum-based mixture, because soil is rarely sold sterilized and can contain pests and fungus.[29] Break apart the chunks of your potting medium. Water the medium so that it’s moist all the way through.
- Fill the pots up to 1 inch (2.5 cm) from the lip.[30]
- Then, gently press the soil down so it’s 1.5–2 inches (3.8–5.1 cm) from the lip. The space prevents you from overflowing the pot.
-
2Dig a hole in each pot the size of the clone’s current rockwool rooting cube. Ideally, the soil level in your pot will sit flush with the top of your rooting cube. This prevents the cutting’s roots from drying out, while preventing excess moisture from getting to the cutting's stem.[31]
- If the rooting cube becomes totally exposed when you water the plant, just add a little more soil.
-
3Plant 1 clone in each pot. Squeeze the rockwool rooting cube out of your tray. Place the cube into the hole you dug. Backfill any empty space or gaps with soil. Make sure the entire bottom of the cube is in contact with the soil medium around it.[32]
- Thoroughly water the plant to get rid of air bubbles.
- Your clones are now ready to keep growing and thriving!
-
4Water intensely for the first week after transplanting. Make sure the original rockwool cube is moist all the way through. Every time you water, you should see 20% of the water coming out as runoff.[33]
- Keep your water under 70 °F (21 °C).
- For more tips on caring for your plants as they grow, check out this article.


References
- ↑ https://thehighestcrop.com/how-to-clone-cannabis/
- ↑ Jamie Corroon, ND, MPH. Medical Director of the Center for Medical Cannabis Education. Expert Interview. 10 March 2020.
- ↑ https://www.ncbi.nlm.nih.gov/pmc/articles/PMC5576603/
- ↑ https://www.maximumyield.com/definition/2190/vegetative-stage
- ↑ https://www.perfectgrower.com/knowledge/knowledge-base/how-do-i-clone-a-cannabis-plant/
- ↑ https://hightimes.com/grow/frequently-asked-questions-about-cloning-cannabis/
- ↑ https://thehighestcrop.com/how-to-clone-cannabis/
- ↑ https://www.maximumyield.com/how-to-clone-your-cannabis-plants-the-right-way/2/4602
- ↑ https://extension.oregonstate.edu/node/115961/
- ↑ https://farmtheworld.org/2019/07/22/growing-cannabis-plants-from-cuttings/
- ↑ https://www.maximumyield.com/how-to-clone-your-cannabis-plants-the-right-way/2/4602
- ↑ https://thehighestcrop.com/how-to-clone-cannabis/
- ↑ https://www.maximumyield.com/how-to-clone-your-cannabis-plants-the-right-way/2/4602
- ↑ https://farmtheworld.org/2019/07/22/growing-cannabis-plants-from-cuttings/
- ↑ https://www.perfectgrower.com/knowledge/knowledge-base/how-do-i-clone-a-cannabis-plant/
- ↑ https://thehighestcrop.com/how-to-clone-cannabis/
- ↑ https://www.maximumyield.com/definition/106/rooting-hormone
- ↑ https://thehighestcrop.com/how-to-clone-cannabis/
- ↑ https://www.maximumyield.com/definition/106/rooting-hormone
- ↑ https://thehighestcrop.com/how-to-clone-cannabis/
- ↑ https://www.maximumyield.com/how-to-clone-your-cannabis-plants-the-right-way/2/4602
- ↑ https://farmtheworld.org/2019/07/22/growing-cannabis-plants-from-cuttings/
- ↑ https://www.maximumyield.com/how-to-clone-your-cannabis-plants-the-right-way/2/4602
- ↑ https://www.perfectgrower.com/knowledge/knowledge-base/how-do-i-clone-a-cannabis-plant/
- ↑ https://darkheartnursery.com/news/cannabis-clone-care/
- ↑ https://www.maximumyield.com/how-to-clone-your-cannabis-plants-the-right-way/2/4602
- ↑ https://thehighestcrop.com/how-to-clone-cannabis/
- ↑ https://darkheartnursery.com/news/cannabis-clone-care/
- ↑ https://hightimes.com/grow/grow-medium-guide-indoor-growers/
- ↑ https://darkheartnursery.com/news/cannabis-clone-care/
- ↑ https://darkheartnursery.com/news/cannabis-clone-care/
- ↑ https://darkheartnursery.com/news/cannabis-clone-care/
- ↑ https://test-dark-heart-nursery.pantheonsite.io/cultivation-resources/watering/
About This Article