This article was co-authored by Sina Kamran. Sina Kamran is a Hardscaping Specialist and the Owner of Design Scapes, Inc. in Santa Monica, California. With over 15 years of experience, he specializes in customized, site-specific hardscaping and landscaping design/build projects. He's a certified National Concrete Masonry Association (NCMA) designer, a certified installer with the Interlocking Concrete Pavement Institute (ICPI), and a Rain Bird Certified Irrigation Professional. Additionally, Design Scapes, Inc. has many 5-star rated reviews.
There are 7 references cited in this article, which can be found at the bottom of the page.
This article has been viewed 99,369 times.
Looking to upgrade your landscaping around the house and a retaining wall would fit perfect around the garage or in the back yard. Here is a set of simple instructions to get you on the right track and will save you money in the long run. A block retaining wall is durable, long-lasting and can be constructed in any form to fit your landscaping needs. Building one of these walls can be fairly simple, depending on the design and size of the wall. This may take you some time and a little physical work, but in the end you will have save money and have a sense of doing your own work.
Steps
-
1Make a plan or two. A well designed plan will be essential in the building process. Plan out the area where you want to build your wall and make sure it is detailed and to scale, so when in the constructing process you won’t have to go off the top of your head and possibly make a mistake.
-
2Order the materials. You will have a lot of materials to choose from, so take your time and make sure that the color and design will match your home and its surroundings. From your plans estimate how much you will need, with around 10% extra to ensure that you are covered for a possible mistake.Advertisement
-
3Outline your project area. Using spray paint to draw out the area that you are going to excavate is a good idea or staking it out will work as well.
-
4Excavate your area. When digging out the area or trench for your wall, you are going to want to dig around 6 to 7 inches (15.2 to 17.8 cm) below the surface to allow enough depth for the gravel base for the wall. Also the trench should be roughly 14 to 16 inches (35.6 to 40.6 cm) wide.[1]
-
5Tip: When digging the trench try to keep it as flat and level as possible, so when building the base it will be easier to keep that level and flat as well.[2]
-
6Make the base. Using gravel to fill the trench slowly and packing it in stages to build up the base. You are going to want to make the base around 4–6 inches (10.2–15.2 cm), depending the height of your wall. Also you want to make sure that your base is wide enough so that your block will sit completely on the base. Also make sure the base block is at least one inch below the surface to ensure the gravel base won't wash out underneath.[3]
-
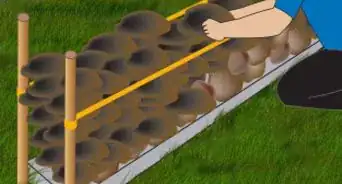
7Tip: Using a motorized plate packer will ensure a solid base. You can also use a hand packer, which would be cheaper, but not as efficient. Using a string line can help ensure a straight wall when laying the base block.[4]
-
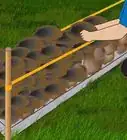
8Set the base block. Now that you have the base set and level as close as possible, you can now set your base row of the wall. This is going to be the most time consuming and important step of the building process. The tools needed to do this task would be a rubber mallet and 12 inch (30.5 cm) level. When setting the base block you want to make sure that it is level from front and back and side to side. Also when joining the blocks, you want to make sure they line up and are flush with each other.[5]
-
9Tip: If the base row is not level and flush with each other, it will throw off the entire wall and you will notice that after a couple additional rows.
-
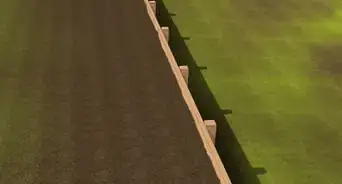
10Build up the wall. Now is the simple task of adding the rows and the only thing to keep a close eye on is making sure the blocks line up or make a smooth bend. You can do this by looking down the wall to see if they all line up.[6]
-
11Tip: If making a bend in the wall you may have to chip off some of the knob on the bottom in order to make the bend. This is a judgment part and a little trial and error.
-
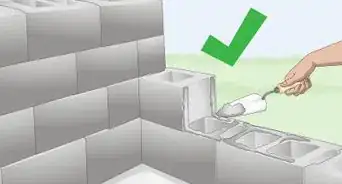
12Fill the cavity of the wall with rock. As you slowly build the wall up, you will want to fill the cavity with river rock or other medium sized rock to help will filtering the water and mud when it rains. This will also help with the back fill behind the wall instead of hauling lots of dirt in.[7]
-
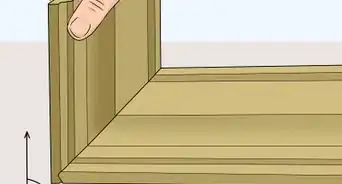
13Cap off the wall. Now take the wall caps and glue them to finish off the wall. You will want the cap to overhang about an inch over the final row or about the length from the tip of your index finger to that first line or bend of the finger. You may need to cut the cap with a cement saw to make the bend.[8]
-
14Back fill and clean the area. Back fill behind the wall up to the top of the cap or just below it. Clean up the area in front of the wall to make it look good and prevent the base from washing out.[9]


Expert Q&A
-
QuestionHow do you build a firepit with retaining wall blocks?
 Sina KamranSina Kamran is a Hardscaping Specialist and the Owner of Design Scapes, Inc. in Santa Monica, California. With over 15 years of experience, he specializes in customized, site-specific hardscaping and landscaping design/build projects. He's a certified National Concrete Masonry Association (NCMA) designer, a certified installer with the Interlocking Concrete Pavement Institute (ICPI), and a Rain Bird Certified Irrigation Professional. Additionally, Design Scapes, Inc. has many 5-star rated reviews.
Hardscape SpecialistUse either concrete block or a material that's fire-rated for the inside of it. That way, you won't damage the retaining wall blocks that you use for the face of it. -
QuestionWhat is the process of building a retaining wall with concrete along a road?
 Community AnswerWith a building permit, inspector assistance, multiple Inspections and many YouTube videos from professionals showing you every step. Sure, a 2-foot tall wall can be just 4x4s nailed into the ground with rebar, but anything more may actually kick you, legally, into a fully engineered and approved design. Retaining walls must be built very specifically, or they will majorly detract from a property's value or threaten lives and others' property. Water's weight, dirt's weight and any kind of freeze and thaw is not a terribly easy set of problems to handle. Overall, water must be able to pass through and so as to never collect behind the wall.
Things You'll Need
- Shovel
- Wheelbarrow
- Laser Level
- 12" Hand Level
- Motorized Plate Packer or Hand Tamper
- Rubber Mallet
- Construction Glue
- Cement Saw
- String
- Hammer
- Chisel
- Garden Rake


Expert Interview
Thanks for reading our article! If you'd like to learn more about landscaping, check out our in-depth interview with Sina Kamran.
References
- ↑ https://theconstructor.org/structures/concrete-block-retaining-wall-construction/18885/
- ↑ https://www.youtube.com/watch?v=jT3PgIOpMjM
- ↑ https://www.youtube.com/watch?v=hTyj4K5DvmU
- ↑ https://www.youtube.com/watch?v=xRzqHscmHJY
- ↑ https://images.homedepot-static.com/catalog/pdfImages/99/995a24b2-0f8e-4245-ac88-3ab659740ee3.pdf
- ↑ https://www.youtube.com/watch?v=mp5OLKynS3k
- ↑ https://www.youtube.com/watch?v=xRzqHscmHJY
- ↑ https://images.homedepot-static.com/catalog/pdfImages/99/995a24b2-0f8e-4245-ac88-3ab659740ee3.pdf
- ↑ https://www.youtube.com/watch?v=LcCEbUT0Rbo
About This Article